Making Your Own Cybersecurity Website
Why You Should Make a Website
 Honestly, I think everyone should think about making a website, even if you’re not really into cyber or IT in general. It’s a fun little project, a great creative outlet and honestly, I think it’s good to decentralize the internet a little bit. Enough about that, why should you as a (presumably) security enthusiast go through the trouble of setting up your own web server instead of using Google Sites or some website builder.
Well, for starters, deploying and maintaining your own web server is in it of itself a great portfolio project. I also like to think it shows potential employers a little bit of your technical skills and that you’re passionate about what you’re learning. Yeah, you could accomplish a similar thing by using a platform like Medium or some third party blogging service, but there’s something special about having your own. So, if that convinced you to join me on our quest to host our own blogging platform let’s get after it.
The Fun Begins: Picking a VPS Provider
Alrighty, let’s get down to the nitty gritty of it. So, in order for us to host our own website, we’re gonna need a web server. Luckily, that is not too hard now a days to accomplish as the cloud exists. You can use any cloud provider you want, just keep in mind you are renting computing power and it does cost money. For our little web server though we don’t need much, mine’s only packing 1 CPU and 1 GB of RAM and costs me about $5 a month. Also, a lot of cloud providers provide some free credit when you make an account. If you don’t know which provider you want to use, you could go with Linode/Akami Cloud or Vultr. I actually will in fact be drinking the big cloud cool aid with this one and be setting up my Virtual Private Server (VPS) in Microsoft’s cloud platform, Azure. I have some more student credit to use up so if you want to follow me along there that’s a okay, but VPS deployments are fairly similar across providers so following along on a different platform shouldn’t be terrible. So, go ahead, pick your provider, make an account and we’ll get going.
Deploying our Server
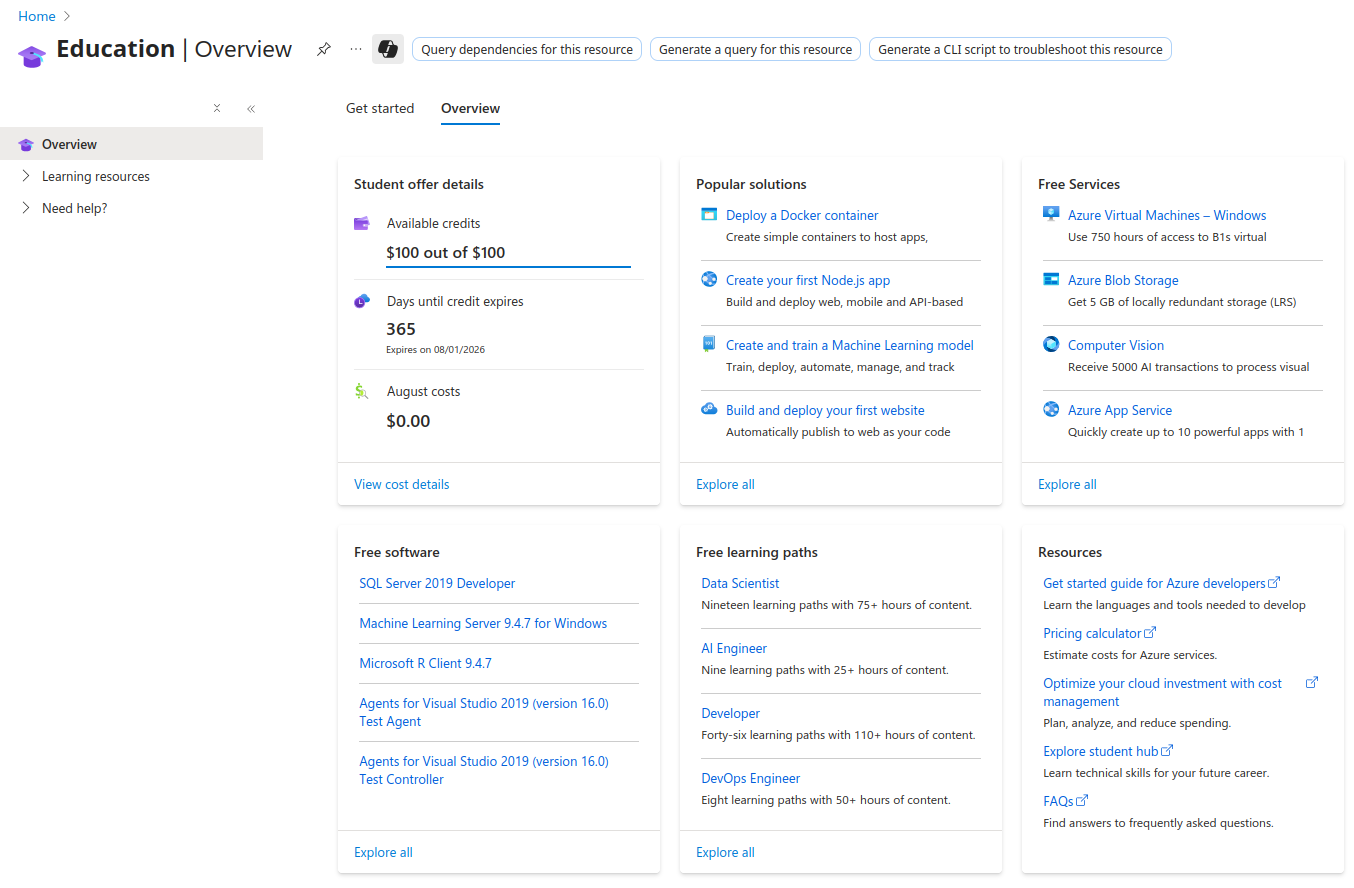 So this is the Azure Education portal and this is where I am going to start the process of deploying my VPS. Signing up with a student email not only gives you $100 of credit, but also access to some free resources. Under Free Services on the top right there, I’m gonna click on Explore all.
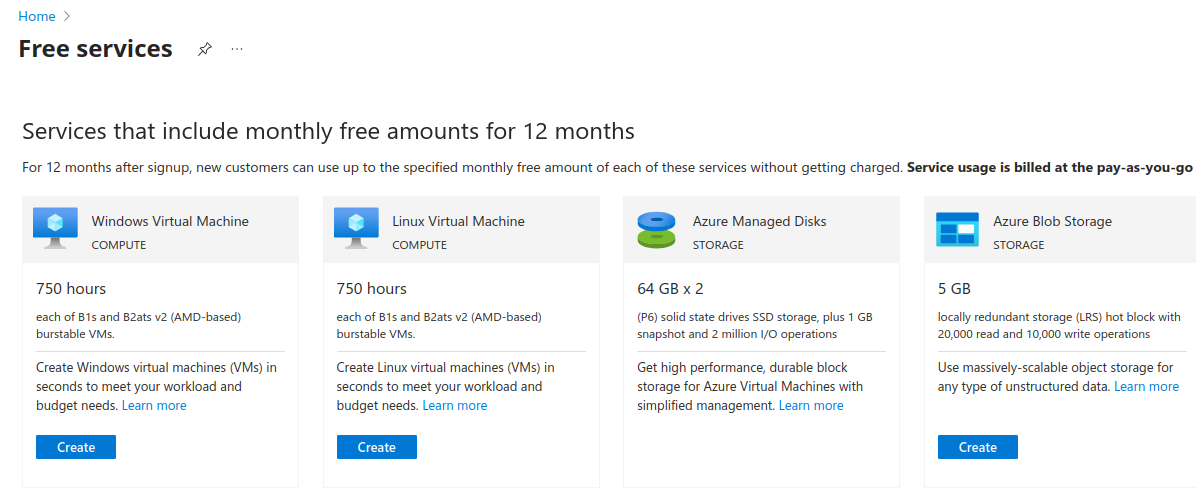 This page shows all of the different free services available to an education account. Wee see Linux VM here and that’s exactly what we want, so we’re gonna click Create on that.
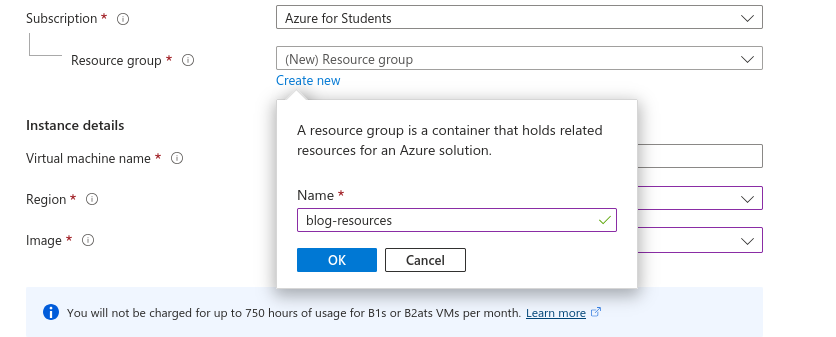
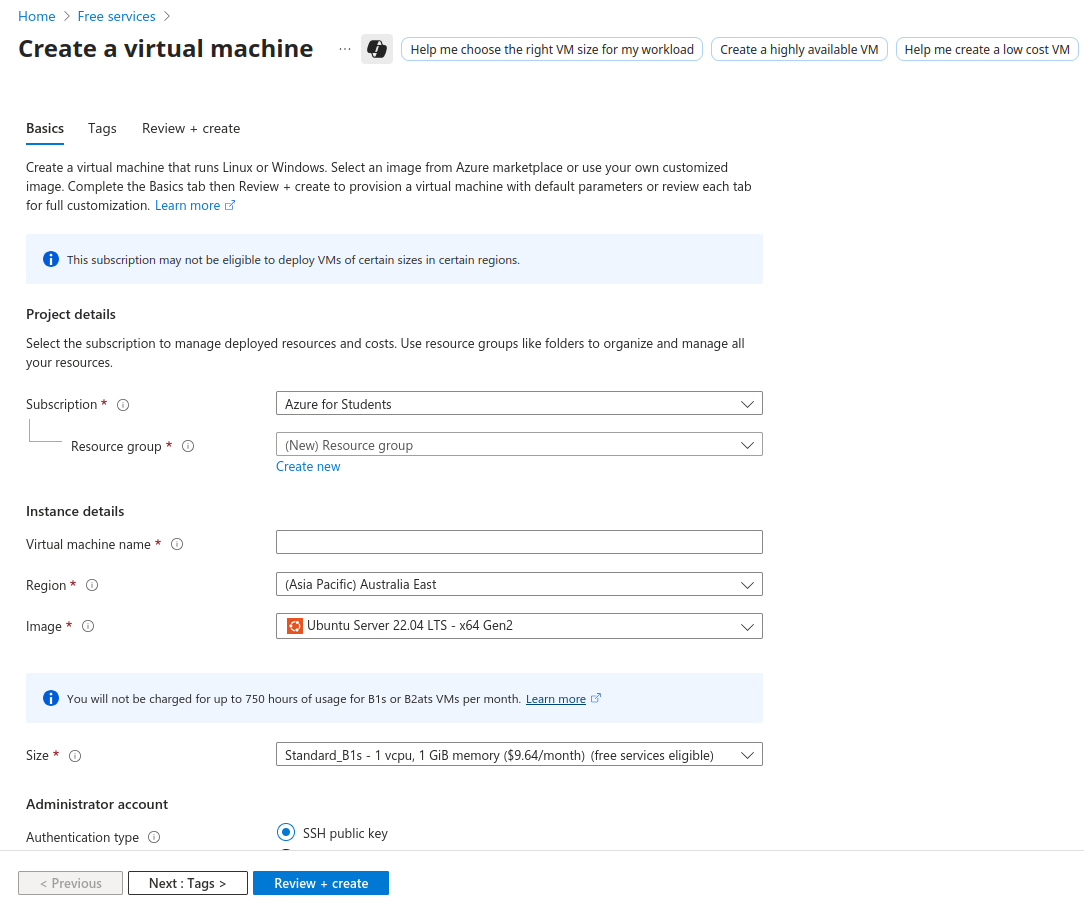 Here we are on the Create Resource page where we can configure lots of different options. In Azure all these different services are referred to as Resources can be be grouped together in Resource Groups. I’m not going to get into all the Azure specific stuff as that’s a little outside of the scope of this project. We are going to need to create a Resource Group though, so I’m going to click on Create new under the Resource group section.
 Click OK.
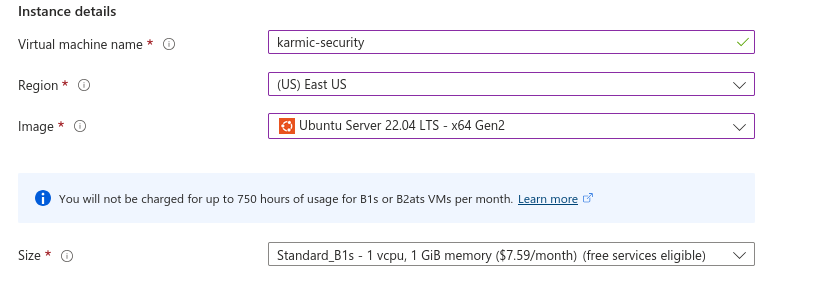 Under Instance details we get to name our VM, select our region (select whatever is closest to you) and then our machines Image. You can pick whatever Linux distro you’re most comfortable with, but I’m just going to be rocking good ol’ Ubuntu. Then for our machines Size we select how much computing power we want. For our personal little web servers we don’t need much so 1 virtual CPU and 1 gig of RAM will be fine.
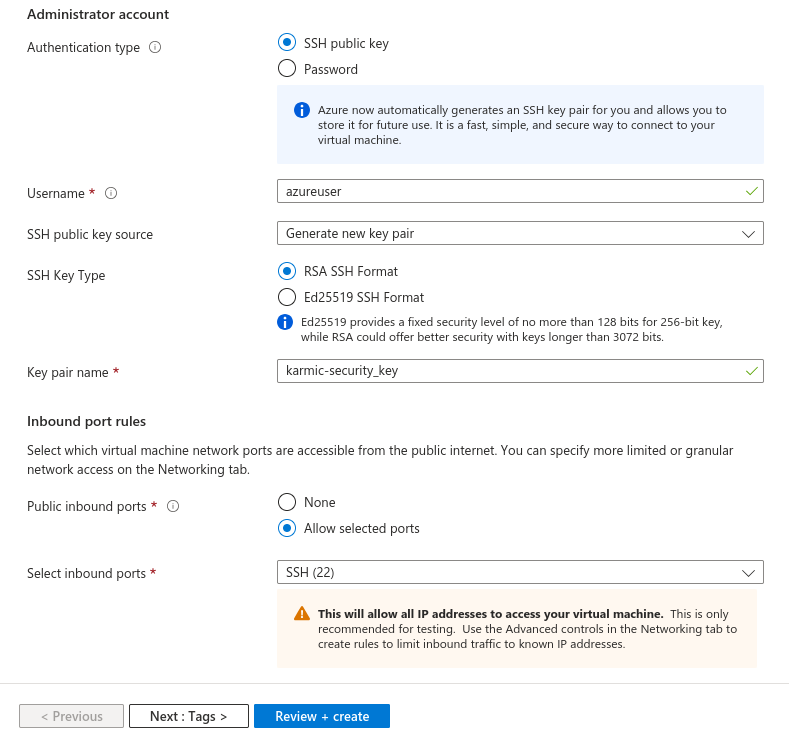 Okay, this next section here is very important regarding the security of our virtual machine, so I’m going to walk through each step here slowly. First option we see here is authentication type and we’re going to want to use the SSH public key option. We will download they key after we create the VM and add it to our SSH keys on our host machine shortly. Now, for the username that you can do whatever you want. For SSH Key Type leave that as RSA and the key pair name is fine as is. Now for Inbound Port Rules, we are going to select Allow Selected Ports and allow port 22 as we want to be able to remote in to our VM, so port kinda needs to be open.
After all of those setting have been set we can finally click on Review + Create.
Okay, this next section here is very important regarding the security of our virtual machine, so I’m going to walk through each step here slowly. First option we see here is authentication type and we’re going to want to use the SSH public key option. We will download they key after we create the VM and add it to our SSH keys on our host machine shortly. Now, for the username that you can do whatever you want. For SSH Key Type leave that as RSA and the key pair name is fine as is. Now for Inbound Port Rules, we are going to select Allow Selected Ports and allow port 22 as we want to be able to remote in to our VM, so port kinda needs to be open.
After all of those setting have been set we can finally click on Review + Create.
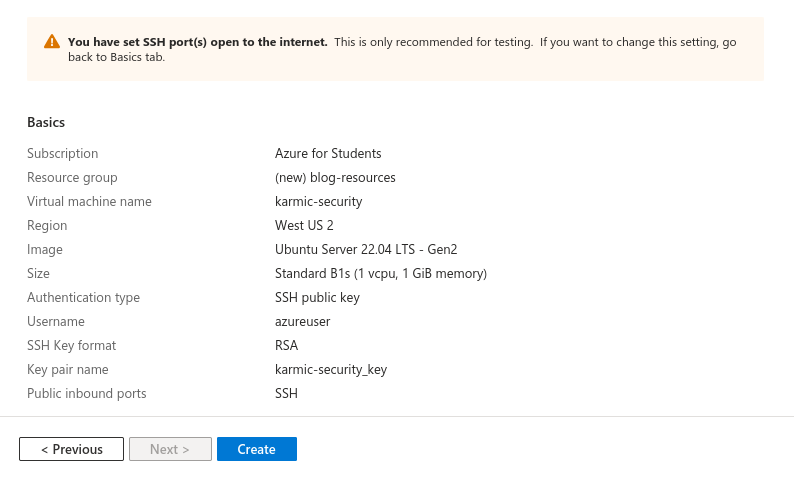 Azure will run a little validation routine, just to make sure everything looks good and we can review all of our configurations. Now to quickly address the SSH warning Azure keeps freaking out about. Yeah, exposing SSH to the public internet is not considered best practice, however, couple things. As we are using an SSH key for authentication, it’s not like someone is going to bruteforce login to our server. Additionally, we can configure the SSH daemon once we login to not even accept password based authentication, meaning you can’t even attempt to login to our server without a SSH key. So with that being said, let’s hit Create and finally have our own VPS.
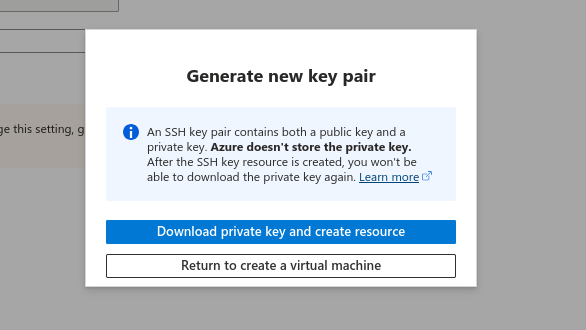 After hitting create you’ll receive this prompt. Go ahead and download our private key. A .pem file will be downloaded to your host and we’ll be needing it shortly.
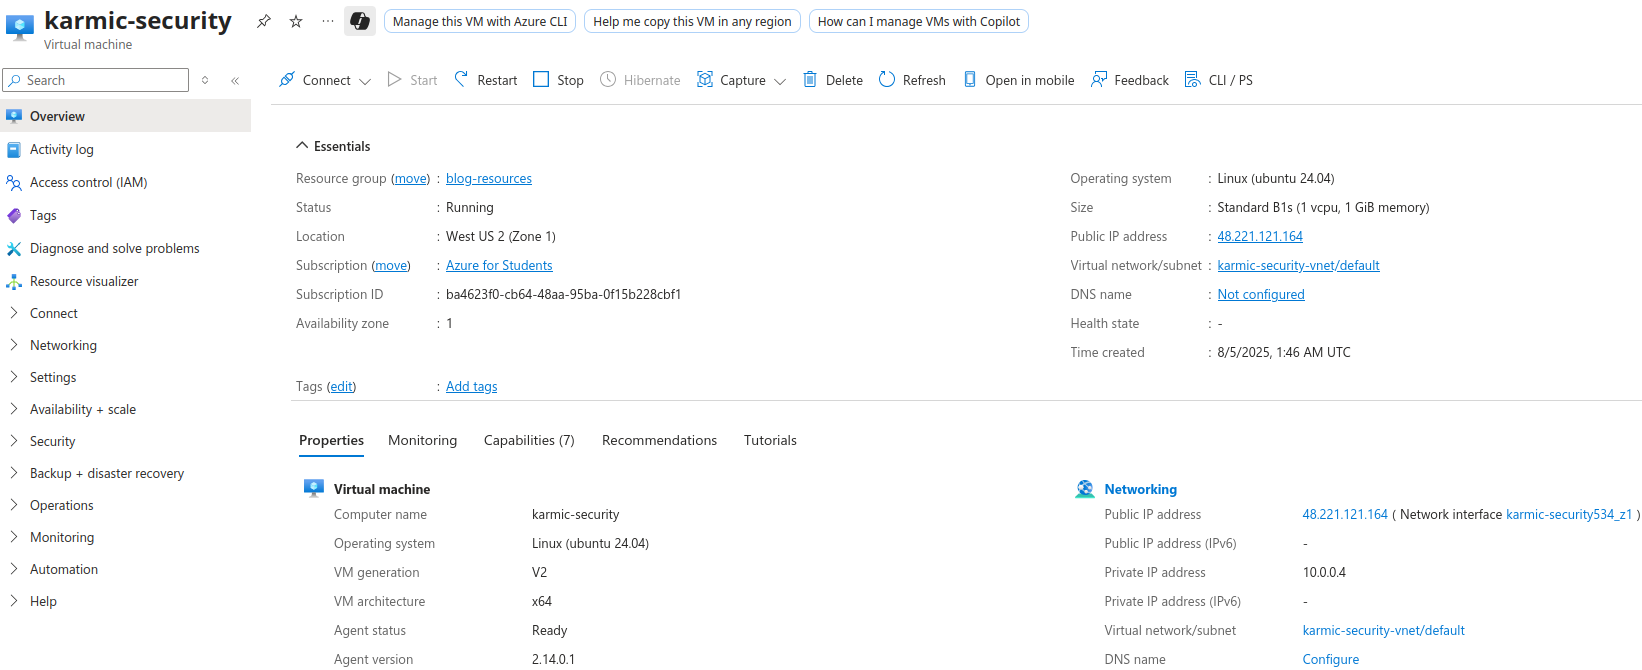 After our resource is deployed the Overview page for our resource will come up, as you can tell by the name. The most important part of this page (as far as we’re concerned) is the public IP address. This is the address we will use for our DNS records, which speaking of DNS…
Setting Up DNS
In order to navigate to our website using an actual website name, we’re gonna need a domain. For example my domain is karmicsecurity.com and we acquire domains through domain registrars. There are lots of domain registrars you could use and there are plenty of good options. I used to have my domain through Google domains, but now all those domain got moved to Squarespace so that’s my registrar now.
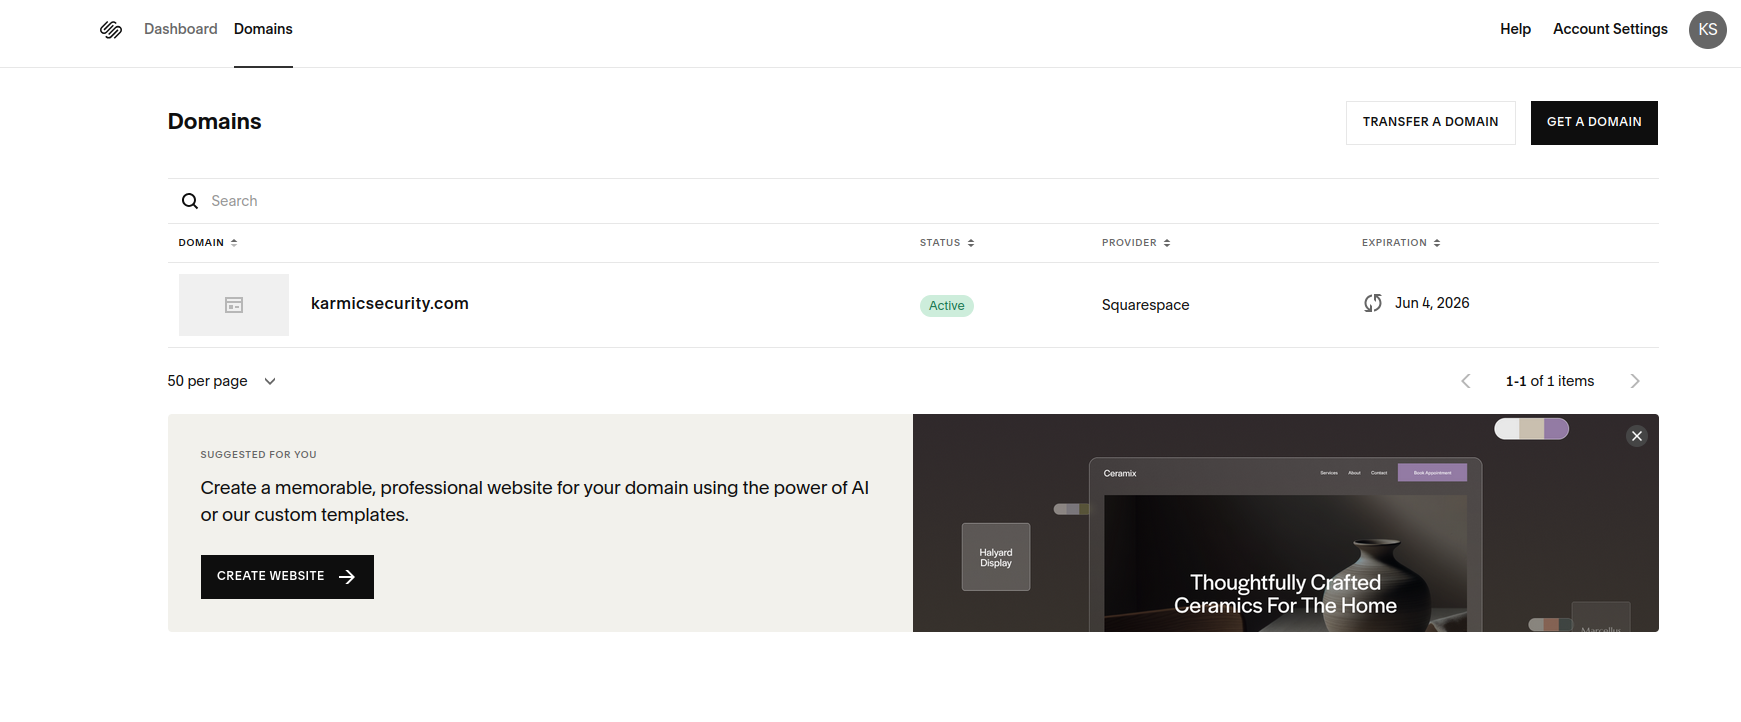 Here is my Squarespace dashboard, luckily setting up DNS records is a standardized process so while the dashboards may look different the process of setting up DNS is always the same. While this post is gonna be long enough, I’m not going to go in depth into everything about DNS so I’m just gonna tell you exactly what to do. First thing we’re going to need to do is setup some A records. A records allow us to use our domain name instead of our IPv4 public addresses. We’re going to to create two A records as I will show you shortly.
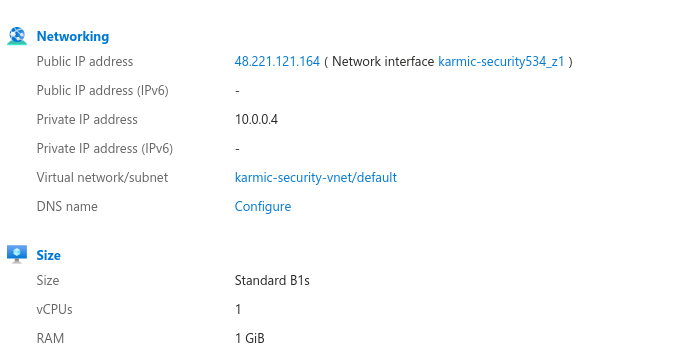 This is a snippet from the Azure Resource Overview page, at the top you can see my VM’s public IP. I would ping it in order to demonstrate, but Azure by default configures their VM’s to not respond to ICMP requests. So, going back to our Domain registrar we are going to add two A records that look like:
 The first one, with the @ symbol in the host field, means that the root of our domain (in my case karmicsecurity,com) can be found at the listed IPv4 address. The one below that with the * is a wildcard. Meaning that any subdomains (mail.karmicsecurity.com, app.karmicsecurity.com, etc.) will be redirected to the listed IPv4 address, in this case they are the same address. After setting these records up we can test it with the following.
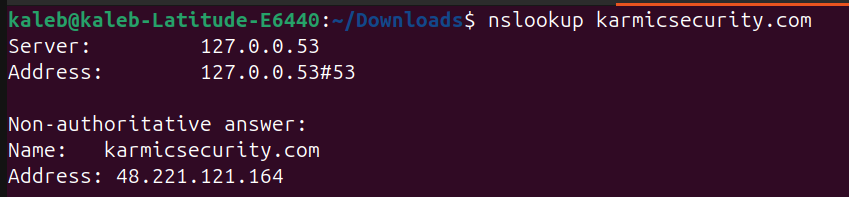
nslookup allows us to query DNS servers for any records associated to a domain, so the fact the we can query our domain and the DNS server responds with our configured address means that we’re looking good. Now, we should also add some AAAA records for IPv6, but Azure doesn’t provide a public IPv6 by default and A records will suffice for now, but I would recommend setting them up. Now that our DNS records are (essentially) set up, we can move onto actually configuring our webserver.
Deploying NginX
Now it is finally time to access our server and configure our web server, which for our case will be NginX. So in order for us to start to configure said web server, we kinda need to connect to it. So we are going to need to ssh into our VPS and if you’re following your own path when it comes to setting up your VPS then just ssh into it, but if you’re following along with me then let’s go ahead and get started. So that .pem file we downloaded after deploying our Azure VM, this is where that comes into play. That .pem file is an ssh key that we will be using to authenticate and connect to our VM.
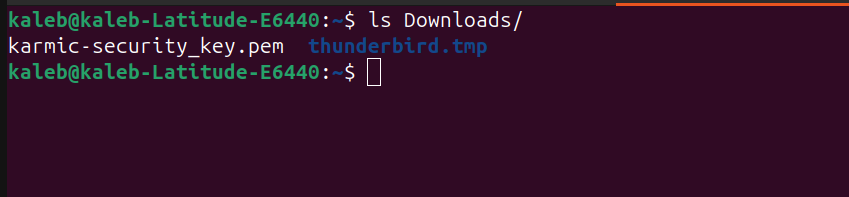 Here we can see the key in my Downloads directory, but before we can use it we need to quick change the permissions on it as other people cannot be able to view the key.
 The first command here sets the proper permissions on our file, the second is just showing the permissions and then the file command is just to show that this is indeed an ssh key. So now in order to use the key to login to our sever, we are going to need to use the ssh command with the -i flag pointing to your key. This for me looks like:
 After firing that off
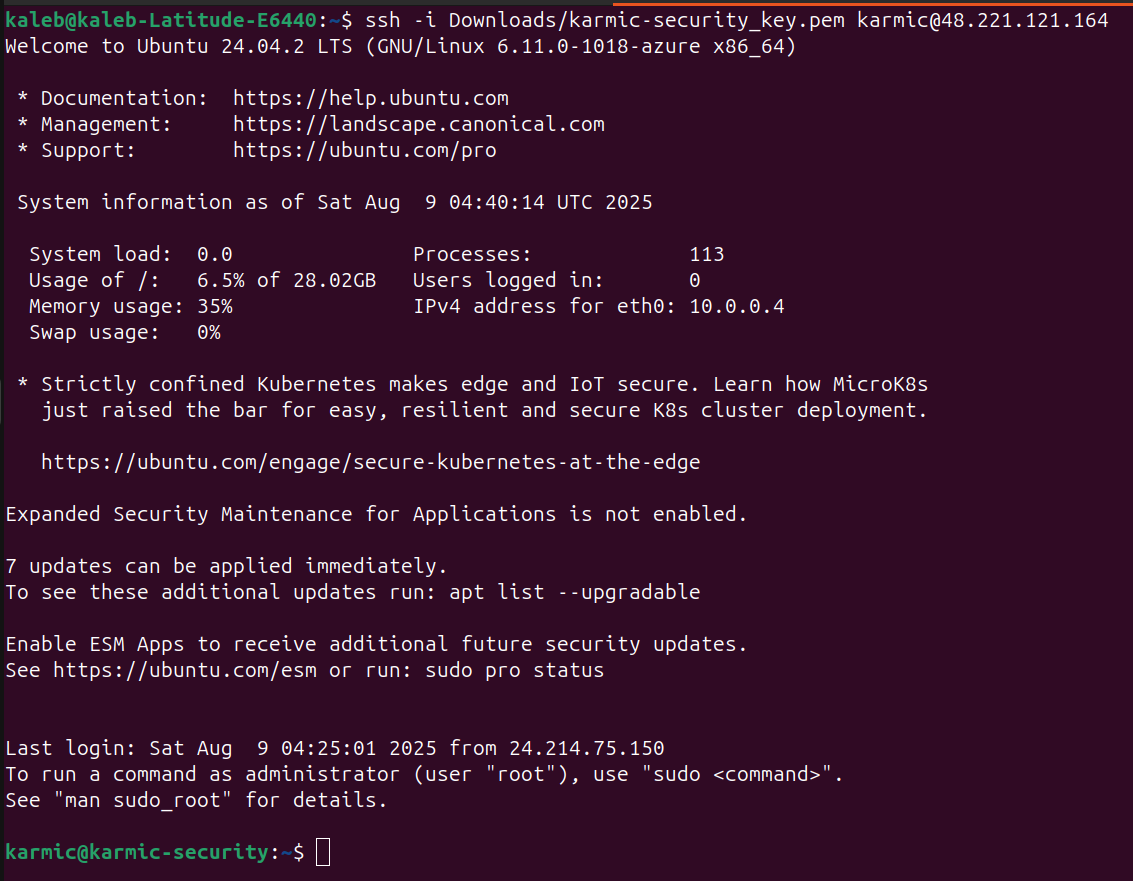 We can see that I am logged into my VPS. After logging into our VPS we are immediately going to run three commands to hit the ground running.
sudo apt update
sudo apt upgrade
sudo apt install nginx
After running these commands, Nginx has now been installed on our server. Configuration files for Nginx are stored under /etc/nginx and there’s a few things in there we’ll be tweaking. First thing we’ll be doing is creating a new file under /etc/nginx/sites-available that will contain some configuration information for our server. You can use whatever text editor you would like, however I will be using vim so my command will look like
sudo vim /etc/nginx/site-available/karmic_security
And then the content of said file would look like
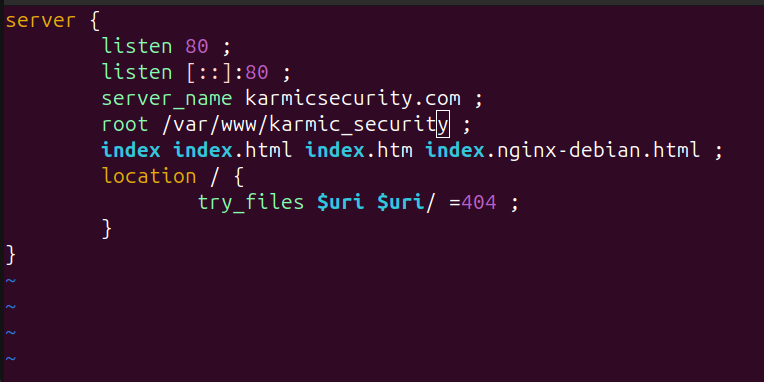 Alright after you save this file, we are now going to make a symbolic link to this file in the /etc/nginx/sites-enabled directory.
 The default link in there is created when nginx is first installed so we can ignore that for now. Alright, now is when we want to make the root directory we configured in our websites config file we made earlier. In my case, /var/www/karmic_security and in that directory we are going to create an index.html file with whatever content in it you want for now cause we’re just testing it.
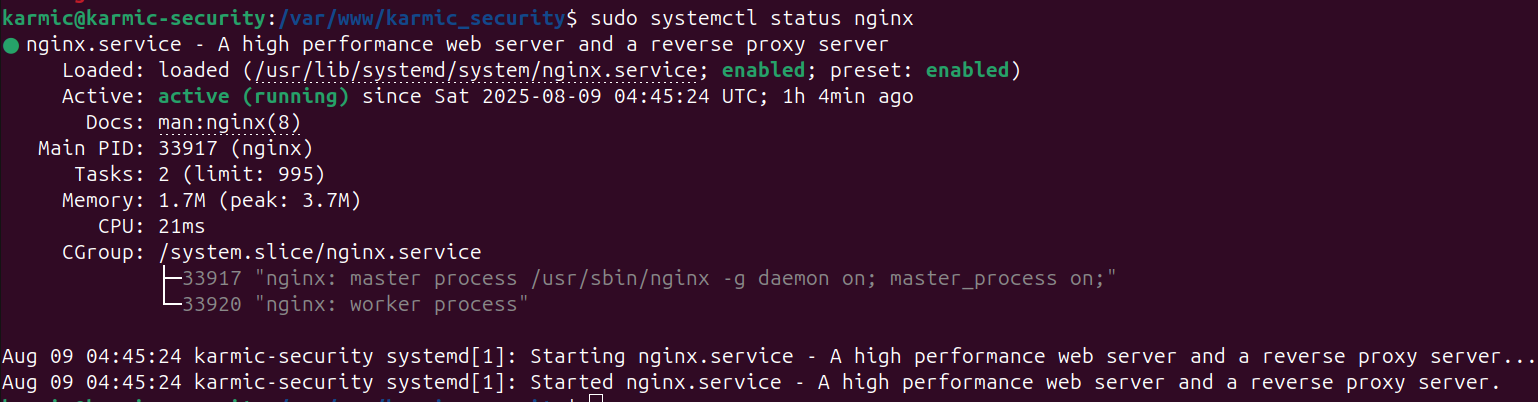
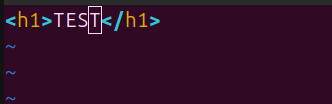 This is literally all that’s in mine. Now we need to actually start nginx like so
 You can also see me fat finger that last command there, you want to spell nginx correctly.
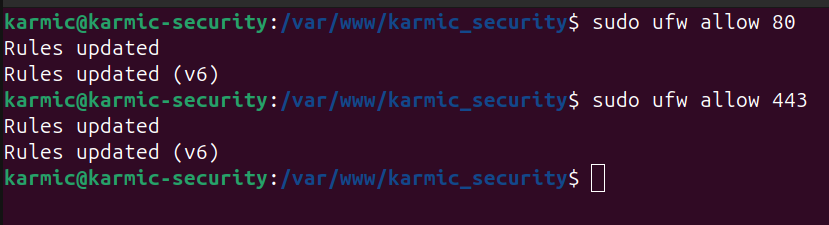
 Finally we want to open up our servers firewall to expose ports 80 and 443 so that way we can actually navigate to our web page.
 Now if you haven’t been using Azure with me, it’s very likely you can navigate to your website now by entering the URL. If you have been following along in Azure, or you’re not able to access your page you may need to make a firewall rule with your VPS provider. In my case I need to go to my resources network settings.
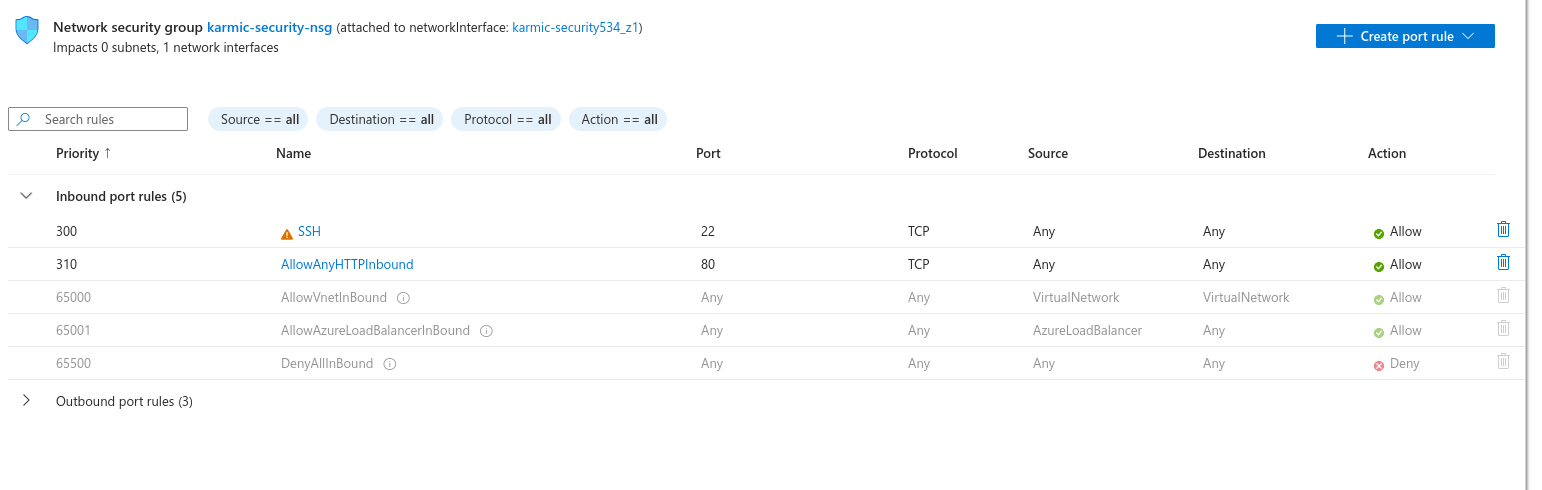
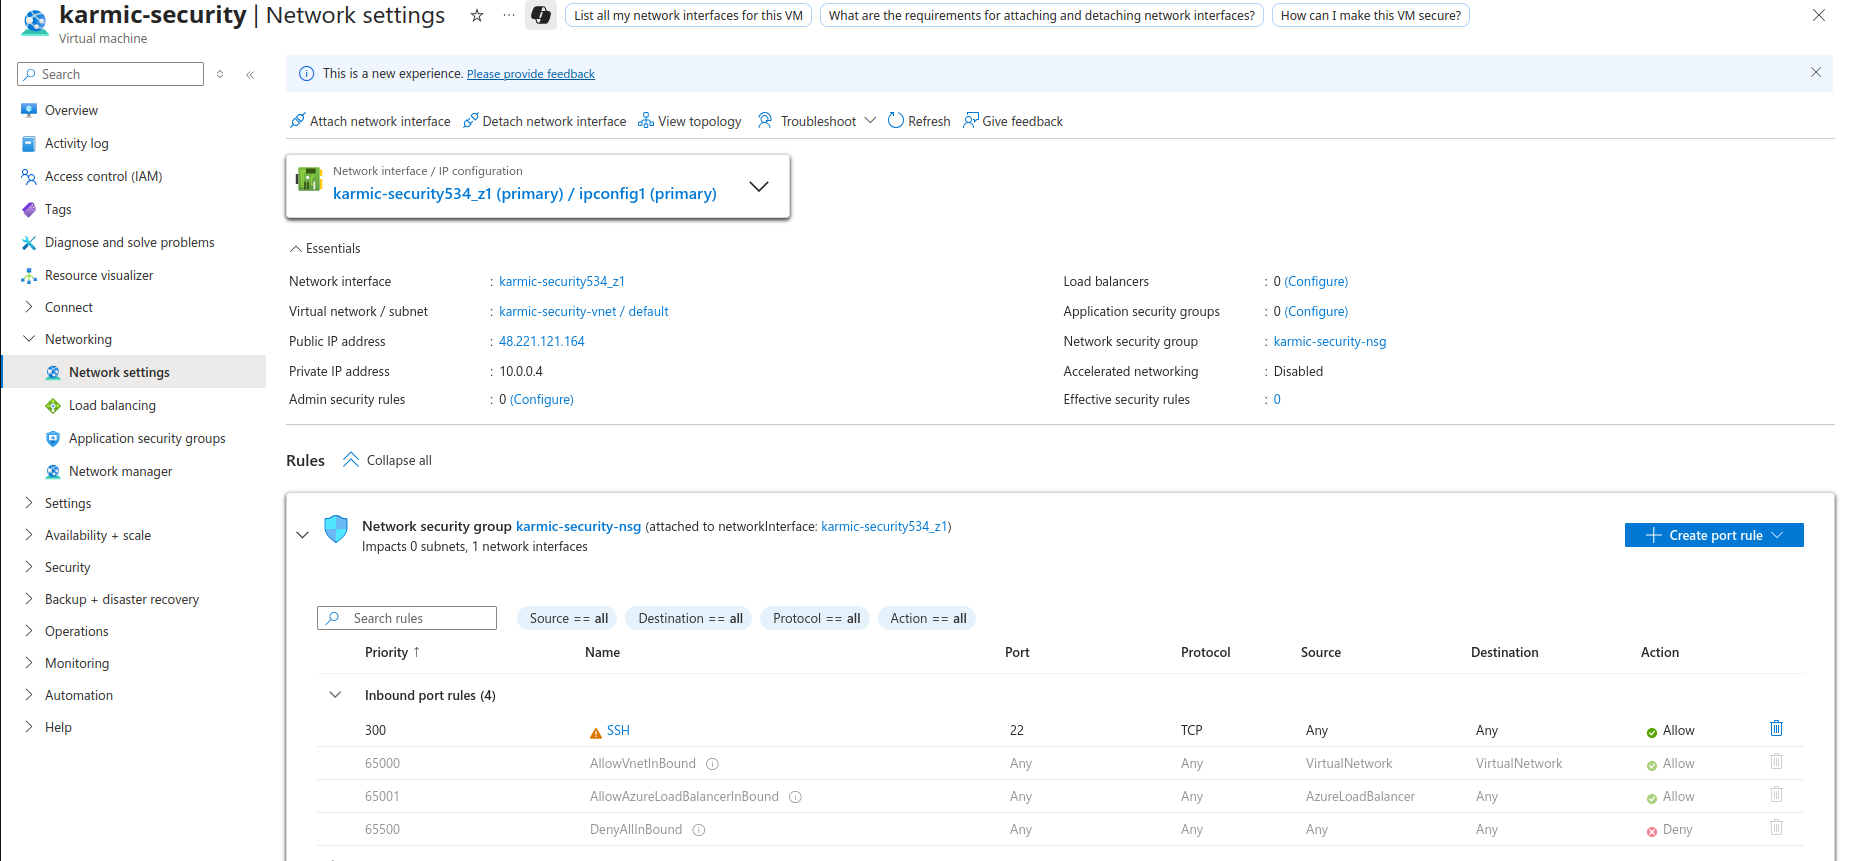 Here we can see all of the port rules for my VM and we can see the currently only inbound SSH access is allowed. Let’s create a couple rules. Click on Create port rule and then Inbound Rule.
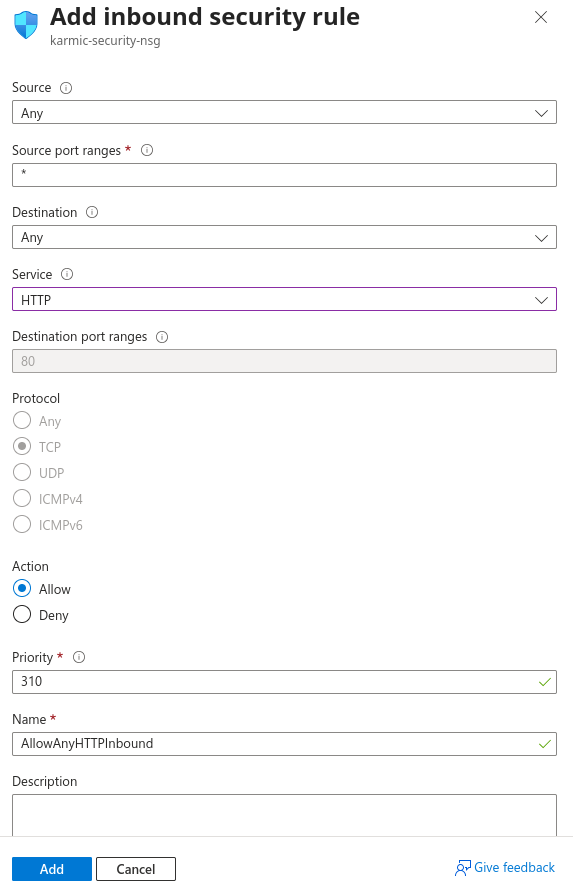 This is what my rule to allow HTTP traffic looks like. Just make sure yours looks like this and we’ll be good to go. We’ll make another rule for HTTPS traffic in just a minute, let’s just make sure we can connect to our page after this. Go ahead and hit Add.
 Alright, looks good to me. Let’s try to access our webpage now.
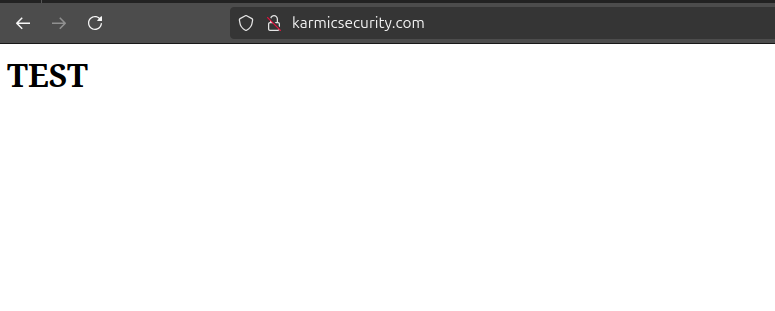 Well hot dog look at that, we have ourselves a webpage. Now this is a great and all, but we’re still not quite yet done. You may have gotten a security warning before navigating to this page or noticed the lock next to our URL is crossed out or red. This is because we are not using HTTPS as our server does not have a valid certificate to encrypt communications. Getting what is called an SSL certificate (even though the protocol is now called TLS, but jargon is hard to change) is actually really not that hard now a days and that is what we will be covering next.
Upgrading to HTTPS
Now that we have our web server operational and have some kind of landing page, let’s take this moment to secure our visitors connections to our page. HTTPS in the encrypted version of HTTP and in order to utilize it we are going to need a digital certificate. Luckily now a days these are incredibly easy to obtain and setup so just stick with me and we’ll get it going.
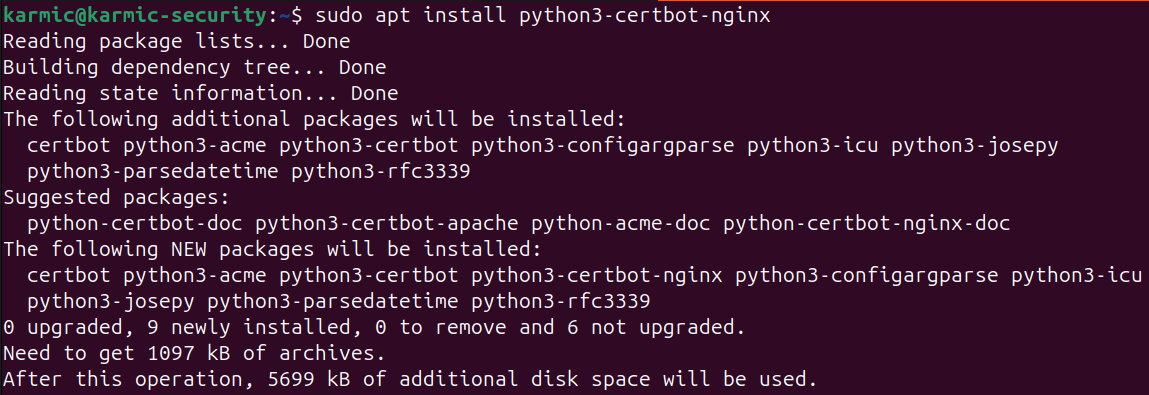
To setup our digital certificates we will be leveraging a program called Certbot. To install Certbot on our VPS let’s go ahead and run sudo apt install python3-certbot-nginx.
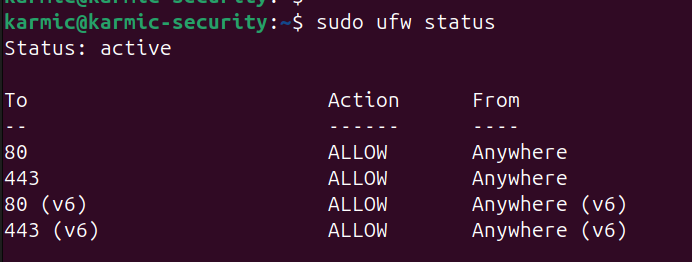
 After installing Certbot be sure to double check that your firewall rules allow connections to port 443. To double check that we did that properly we can run
 sudo ufw status to verify our firewall configuration.
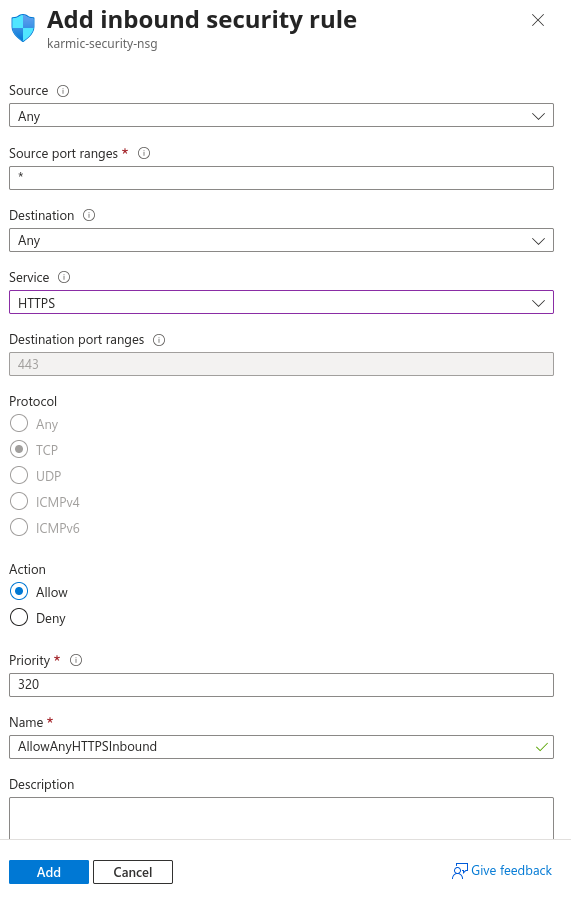
 Very nice. Now, if you’re following along with me in Azure, we are going to need to make another port rule in our network security group to allow HTTPS traffic.
 Now after all that is squared away, back in our VPS just run
 sudo certbot --nginx. It’s going to ask you for an email address to send you reminders about renewing your certificate so go ahead and enter that. It will also ask you to accept Let’s Encrypts terms of service, go ahead and do that. It will then ask you if you want to share your email address with so and so and honestly I decided not to do that, but you can if you’d like. After doing all that we’ll see what domains we can activate HTTPS for.
 For this I’m going to hit 1 and enter. After that we’ll see:
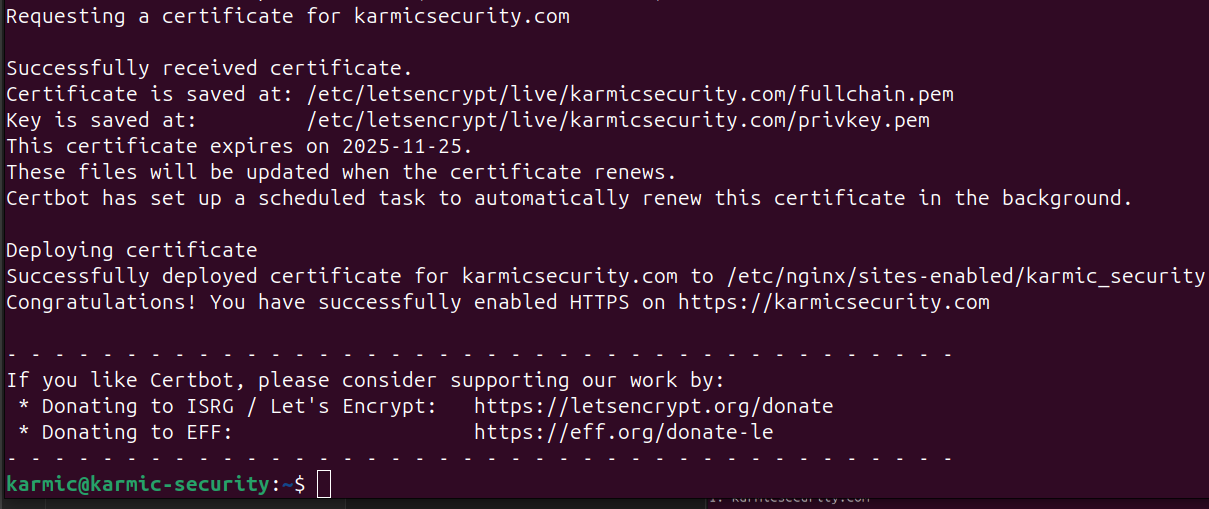 And just like that…
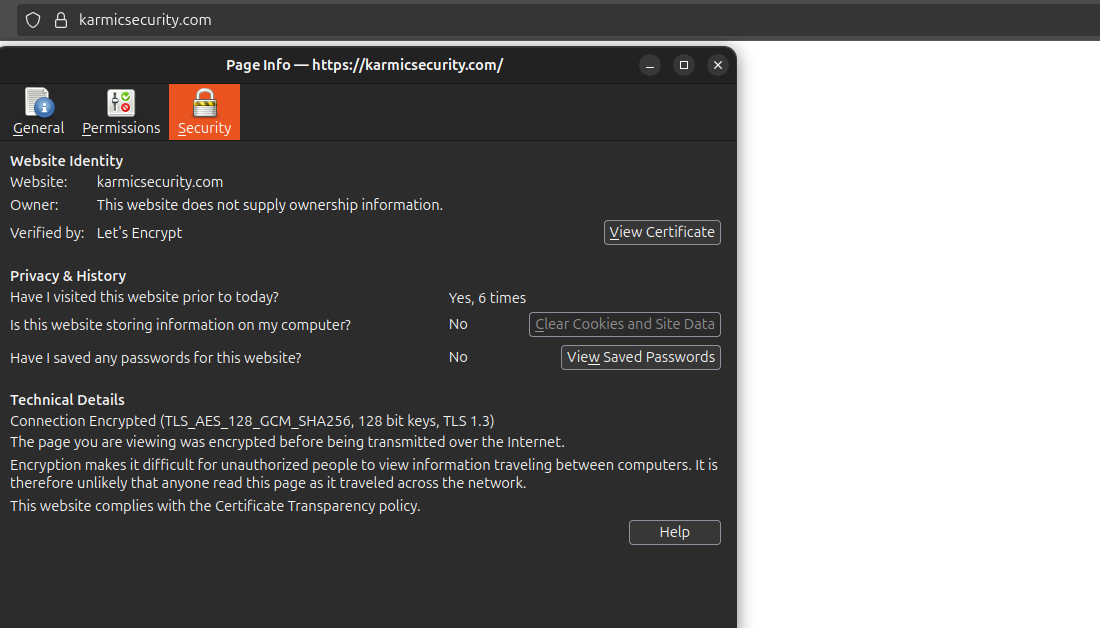 We see that our little lock next to our URL is good to go and we can even view information about our digital cert by clicking on the lock and viewing more information. And just like that, we’ve encrypted our web server.
A Very Brief Hugo Overview
So we’ve got our web server, it’s encrypted and that’s great and all, but we don’t have any real content on there and it doesn’t look very pretty. Now, there are tons of different ways you could go about adding content or using different frameworks or whatever, I personally like to use a tool called Hugo. Now this is not going to be a full blown Hugo tutorial, God knows this post is long enough as it is. I am just going to go about showing how I like to use Hugo and how I create content and then push it to my website.
What Exactly is Hugo?
Great question my friend, Hugo is a static web page generator that generates HTML and CSS files from Markdown files. Markdown is a very common format for note taking or journaling and is actually the format my favorite note taking app, Obsidian, uses. This makes my workflow really easy as I can take notes in Obsidian, edit some of my verbiage and then easily turn it into a pretty looking web page. Hugo uses prebuilt themes you can select or make yourself to make your website look however you want. Like I said, this isn’t really a tutorial for Hugo, I’m just going to show you how I use it and then push updates to my website.
Using Hugo
So just jumping into where I’m at, I’ve already created a Hugo directory with a new site in it and have selected a theme. All Hugo directories share the same architecture and look like this.
 All of these directories and files are important to Hugo’s functionality , but if we look under content here we see that I have an about and posts directory.
 In the about directory there is a file called index.md which is a Markdown file that will be turned into a webpage here shortly. Here’s what it looks like currently.
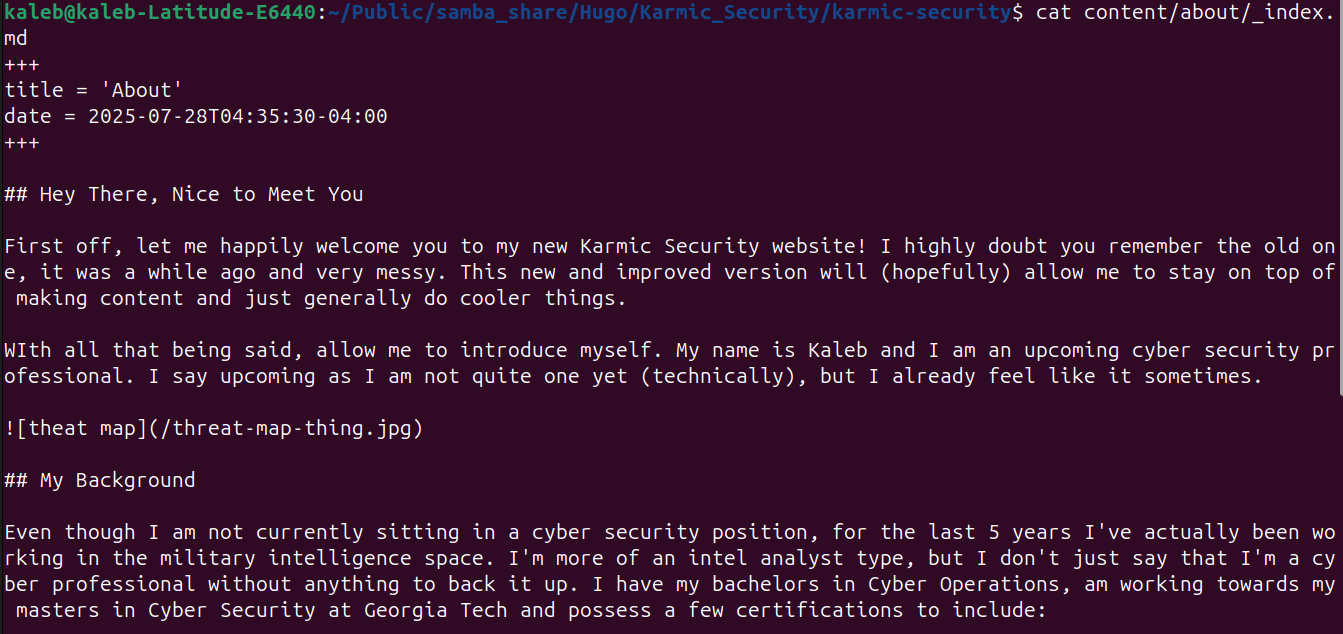 This is Markdown and although it may look scary at first, it’s really not that bad once you get it down. Now, using Hugo we are going to turn it into a web page. In the root of your Hugo directory structure if we run hugo server, we will run a little server accessible only on our local host that we can check out how our website looks.
 So if we navigate to that localhost address there at the bottom of that output…
 Again, I’m not doing a great job at teaching you Hugo right now, I just want to show you want you can do.
Back in the root of our Hugo directory if we just run
Again, I’m not doing a great job at teaching you Hugo right now, I just want to show you want you can do.
Back in the root of our Hugo directory if we just run hugo with no arguments Hugo will generate all of the necessary HTML and CSS in the public directory.
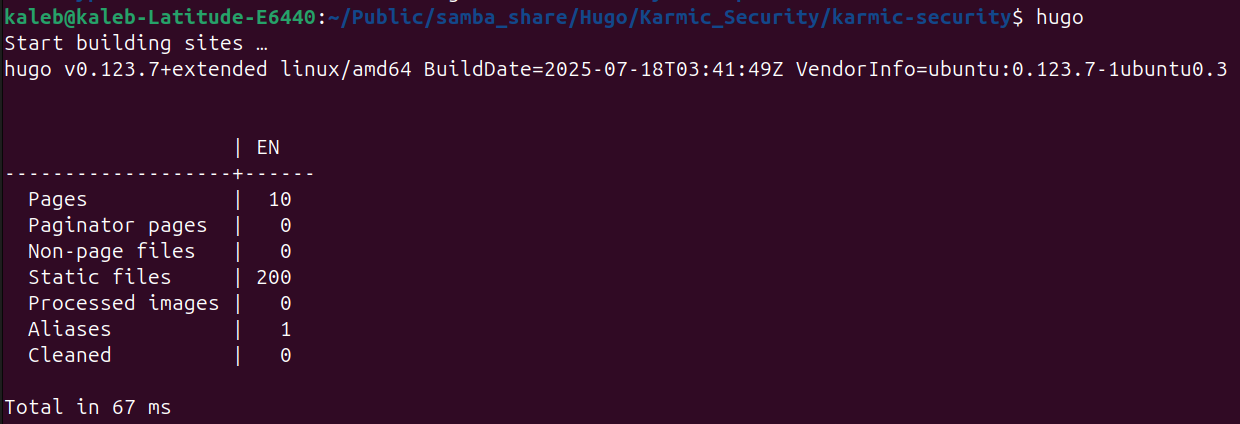
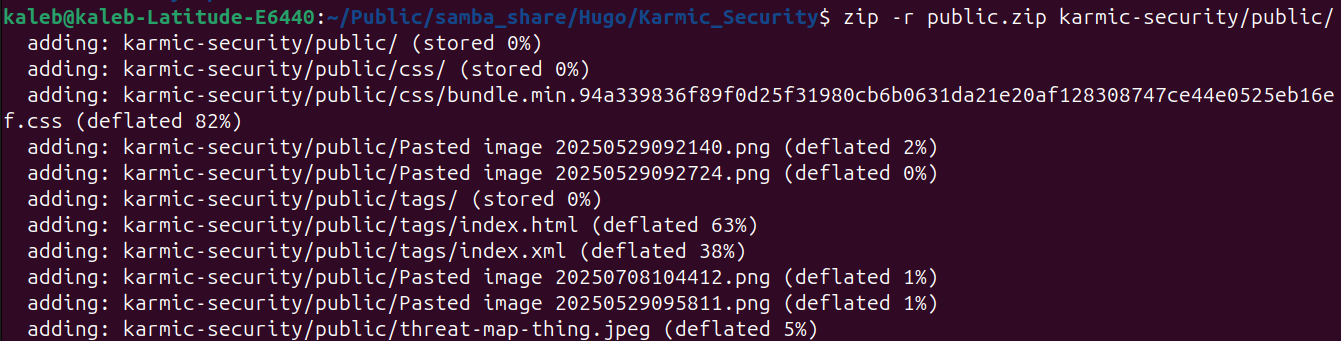
 Alright, our content is now all generated we just need to move it to our web servers directory. In order to make this as efficient as possible, we’re going to zip our public directory and then transfer that zip file over to our VPS. To zip our public directory and make public.zip we’ll run
 zip -r public.zip public.
 Now to transfer it, we’re going to use a command called secure copy or scp. Scp has a very similar syntax as SSH (as scp uses SSH for file transfers) and looks like:
scp [file] [user@host]:/[file path]
For me this is going to look like
 We see that the transfer is a success, so if we SSH into our VPS and check my home directory…
 Very nice. To unzip a file we just use
 unzip and we can use the -d flag to specify the directory we want the files sent to.
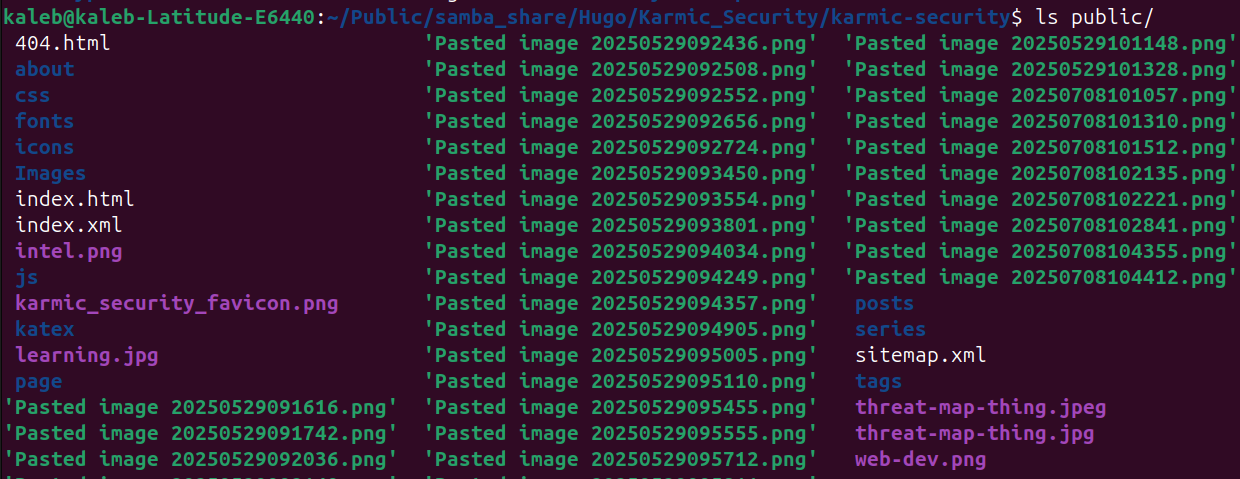
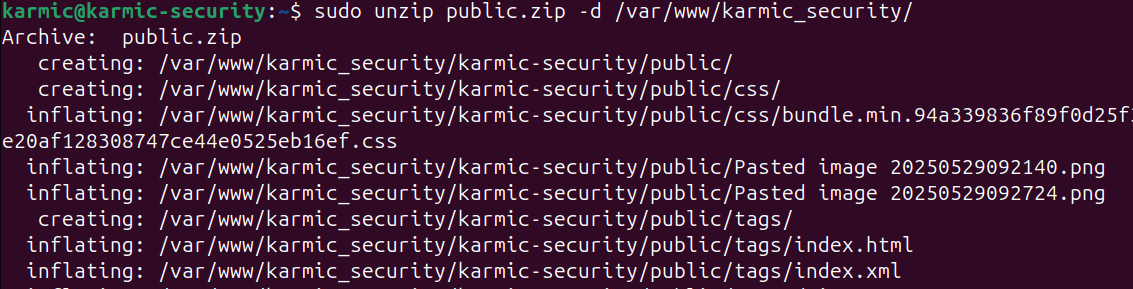 Here we see me unzipping the zip file and sending them to my websites root directory which if we go and check that now we should see all those files there ready to be browsed to.
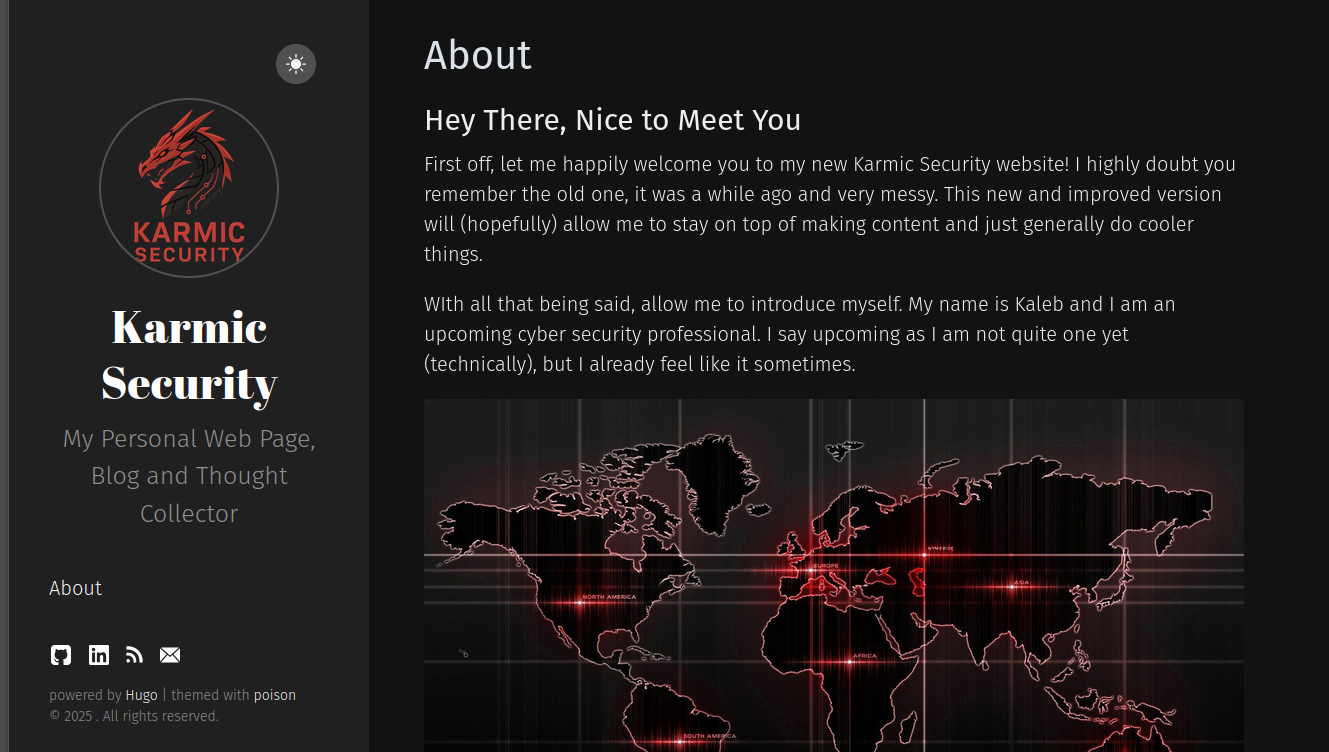
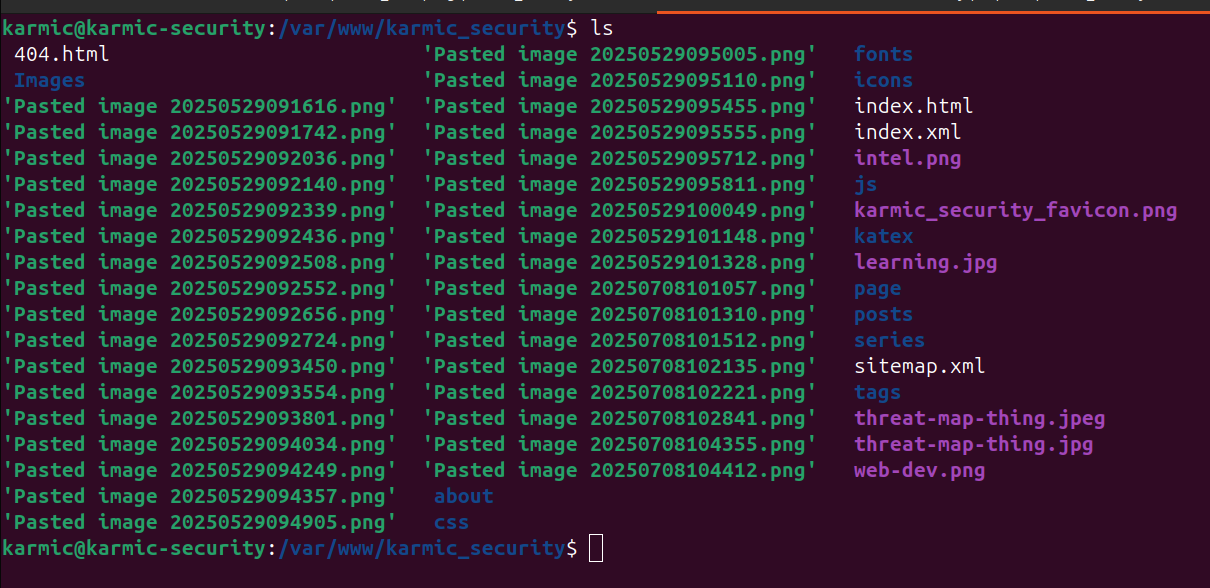 Here we can now see all of my Hugo generated files in my web servers root directory I configured back when we were setting up Nginx. So, now when I navigate to my website we should see…
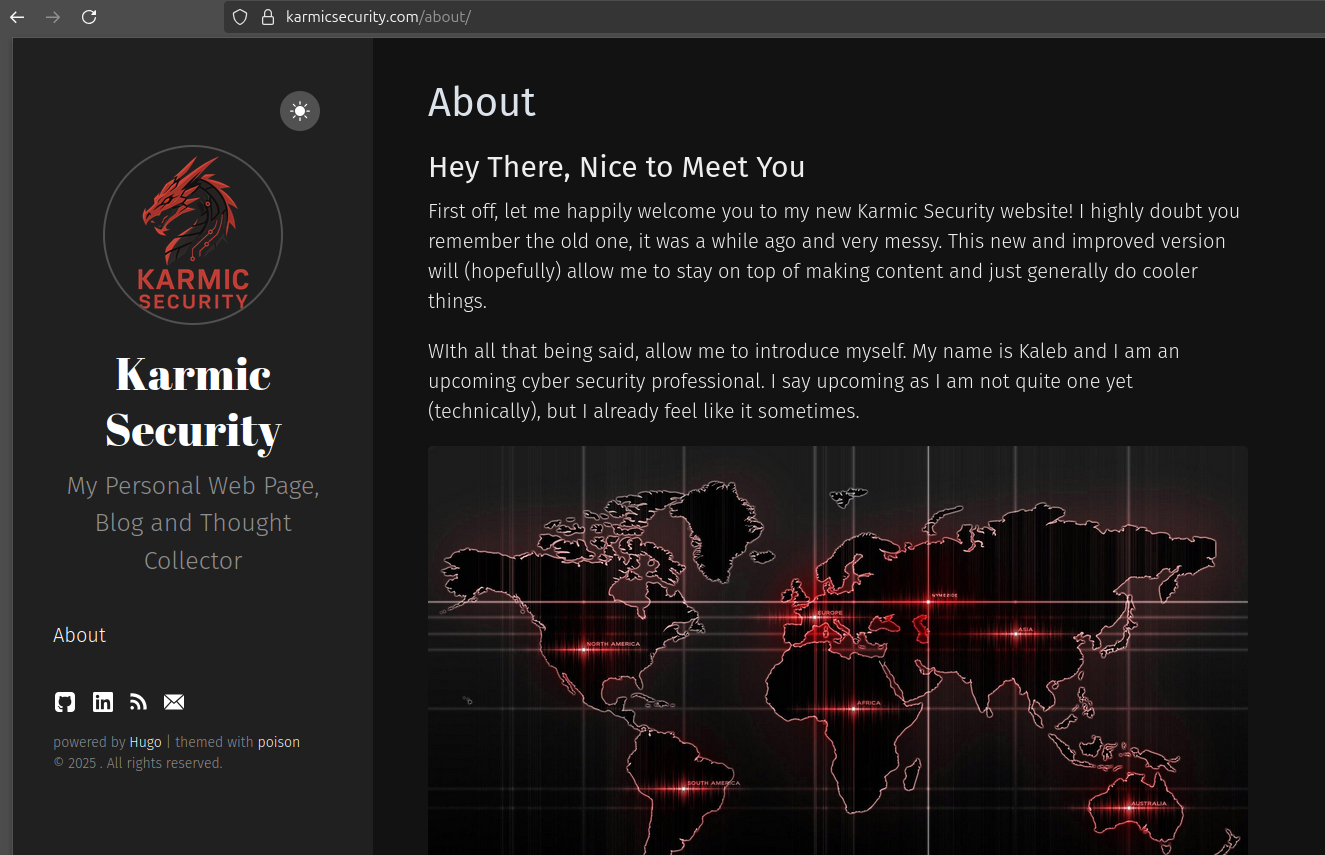 A proper SSL digital certificate, our domain name works and all of our content is loaded. We have officially set up a whole cyber security website.
Conclusion
First all of, if you actually stuck with me through this whole project thank you so much for your time. I hope you enjoyed and found this guide useful.