Introduction
I don’t usually start these off with a disclaimer, but I definitely am this time. This post is an absolute doozy as we are configuring multiple services here on OPNsense. Each of these could be a separate post, but I decided to do this whole thing in one go. Now you are totally good to just skip to the sections you are interested in reading, in fact I encourage it. I just for whatever reason wanted this OPNsense setup to kinda be all in one go. Now there is also the assumption you have at least gone through the basic installation of OPNsense either in a virtual machine or on dedicated hardware. This setup was done on bare metal, so I apologize if there are any major differences I am not aware of, but whether you’re doing this for a local network or a virtual network it should be the same, or at least similar. Alrighty, with all of that out of the way, I suppose we can kick off this OPNsense gauntlet.
Setting Up Our Internal Domain
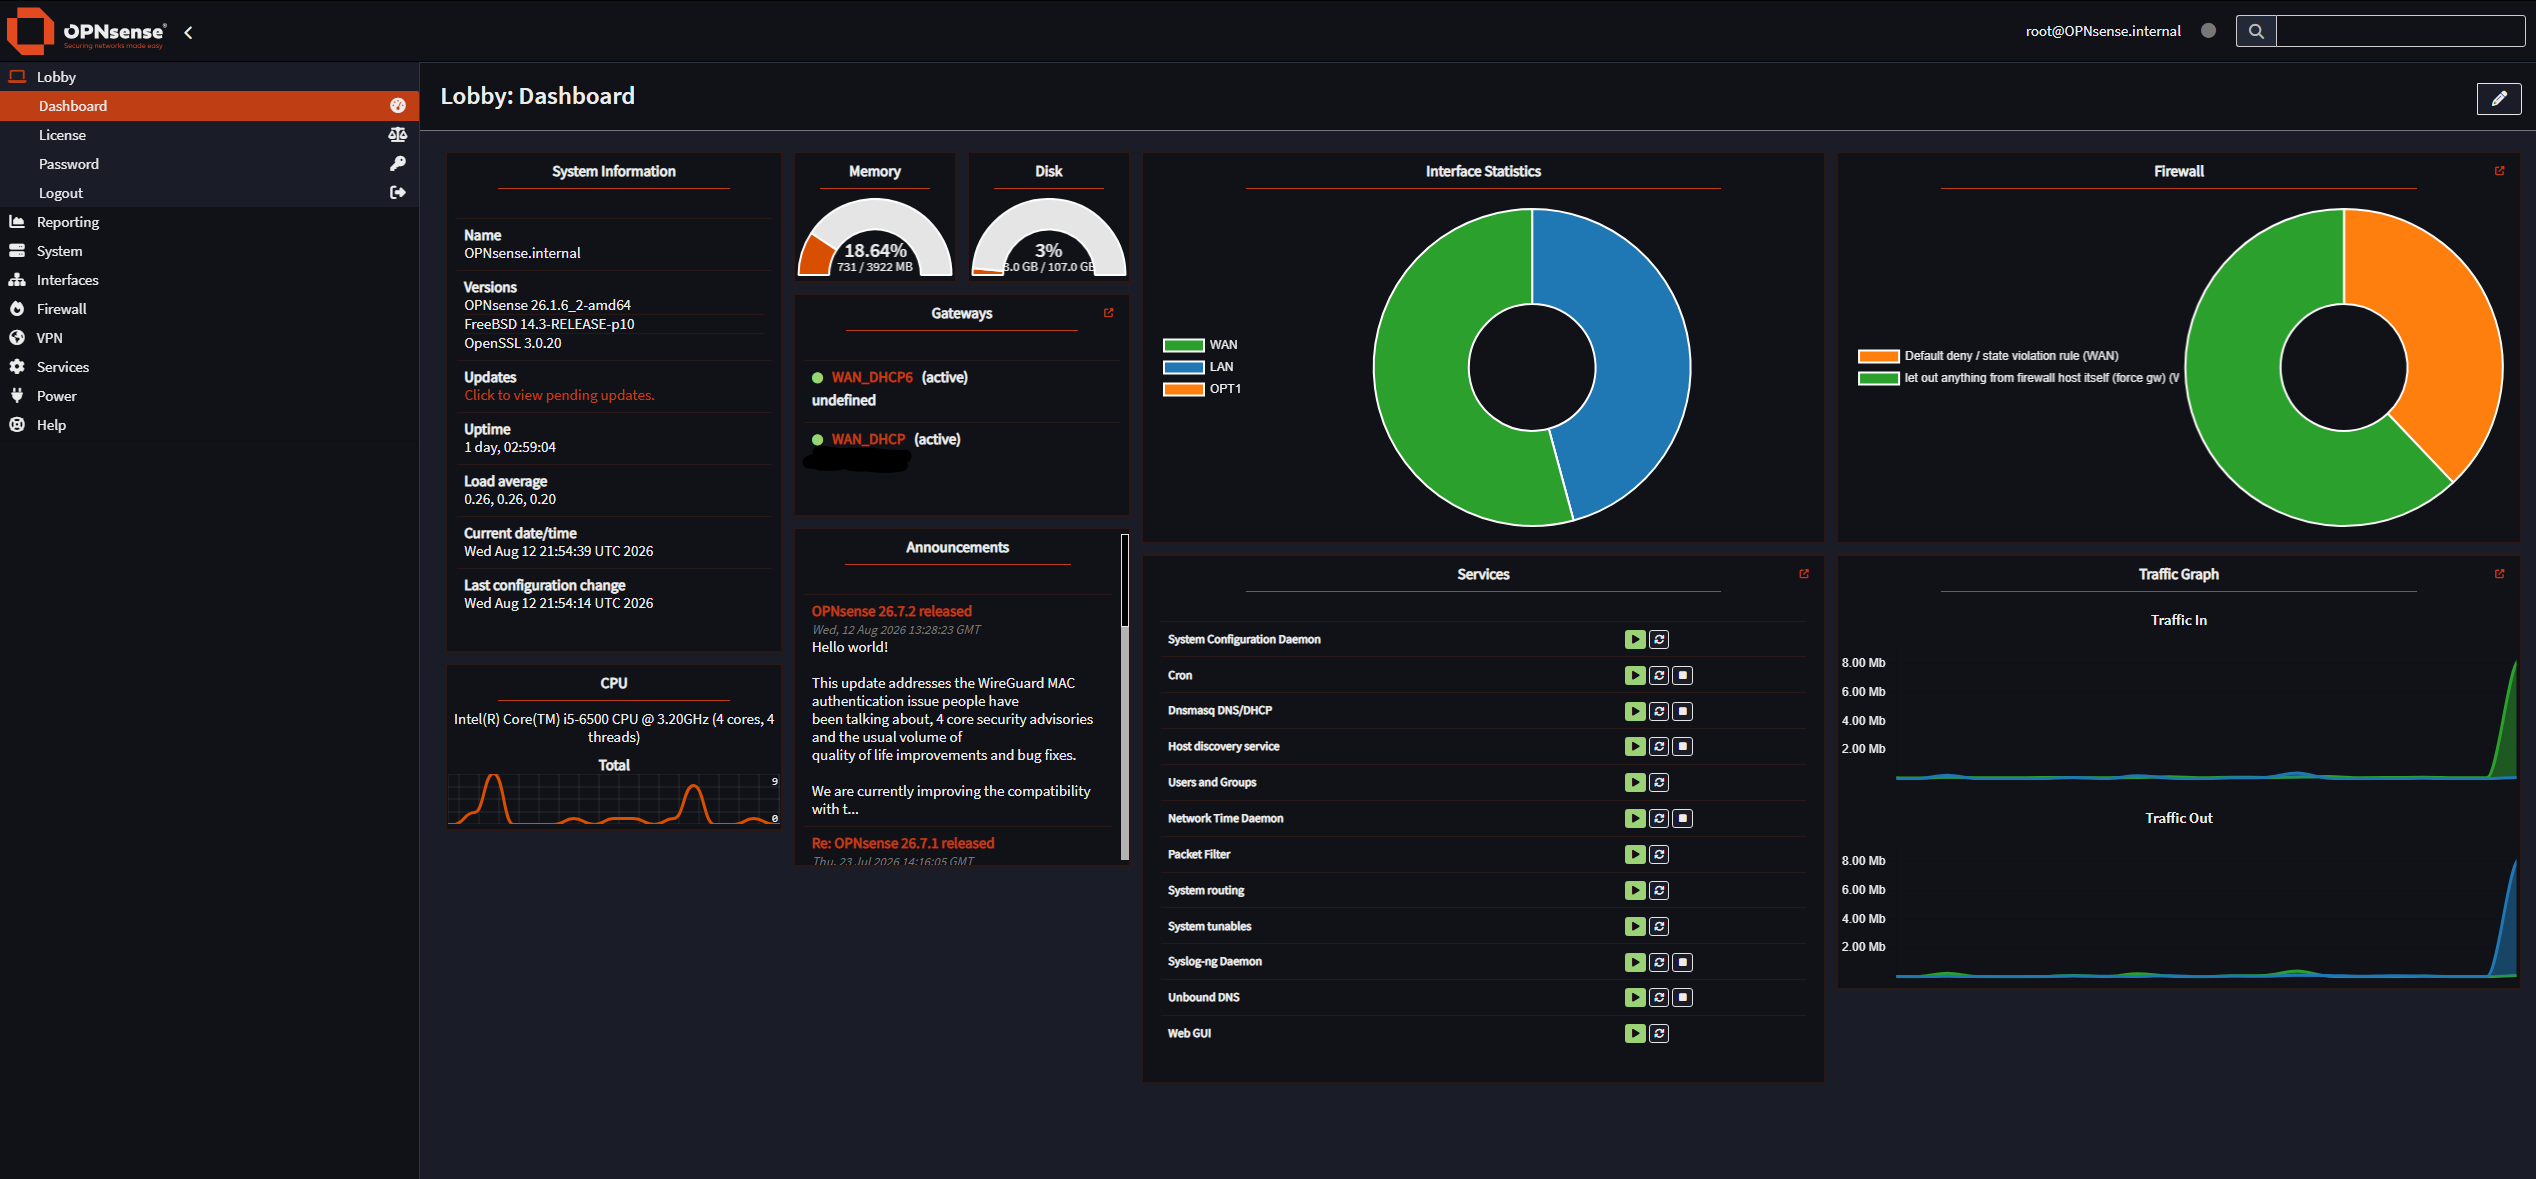 Alright, here we are at our OPNsense main dashboard. There’s a lot of good information we can see right from here, such as stats for our interfaces, current network throughput, Firewall stats and CPU/memory utilization. Now, during some of these steps we may need to keep a second browser tab of OPNsense open just in case we get booted off. So just open a copy of the dashboard here. Alright first step, setting up our internal domain name.
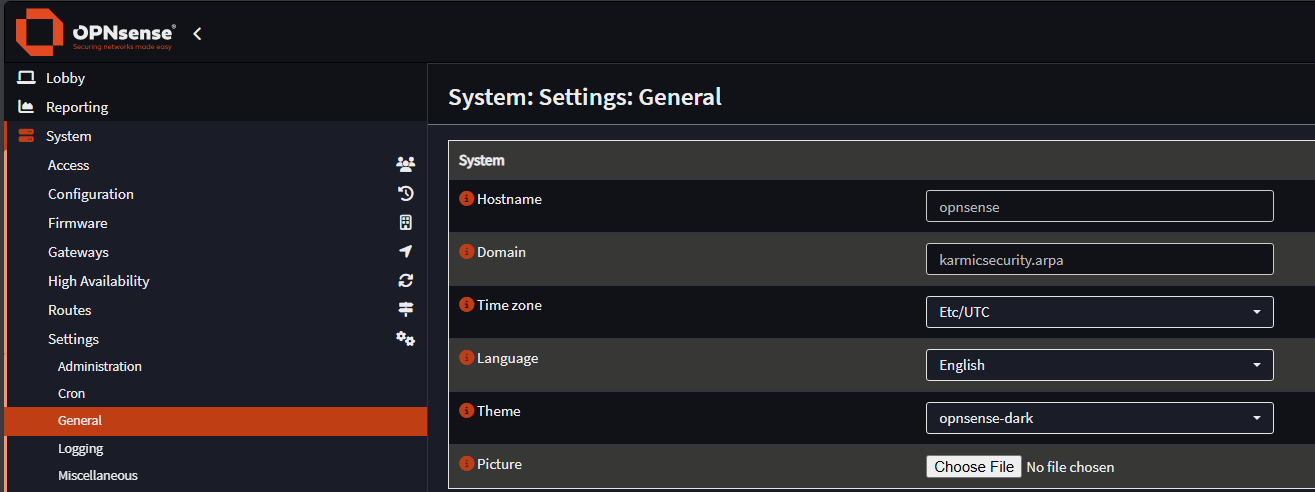 So under: System -> Settings -> General. We can set our internal domain. Now it can’t actually be just whatever you want, expertly demonstrated by yours truly. .arpa is actually a reserved Top Level Domain (TLD) per RFC 3172 and can’t just be used willy nilly. Now, home.arpa has been approved for home network use (RFC 8375), but I want to be cringe and use my whole “karmicsecurity” naming scheme so I’m using .internal which is approved. Oh and then we change the hostname to whatever you want and then set the theme to dark because that’s why. Make sure to save and apply for every change we make as we go by the way, unless you want to do all of this twice.
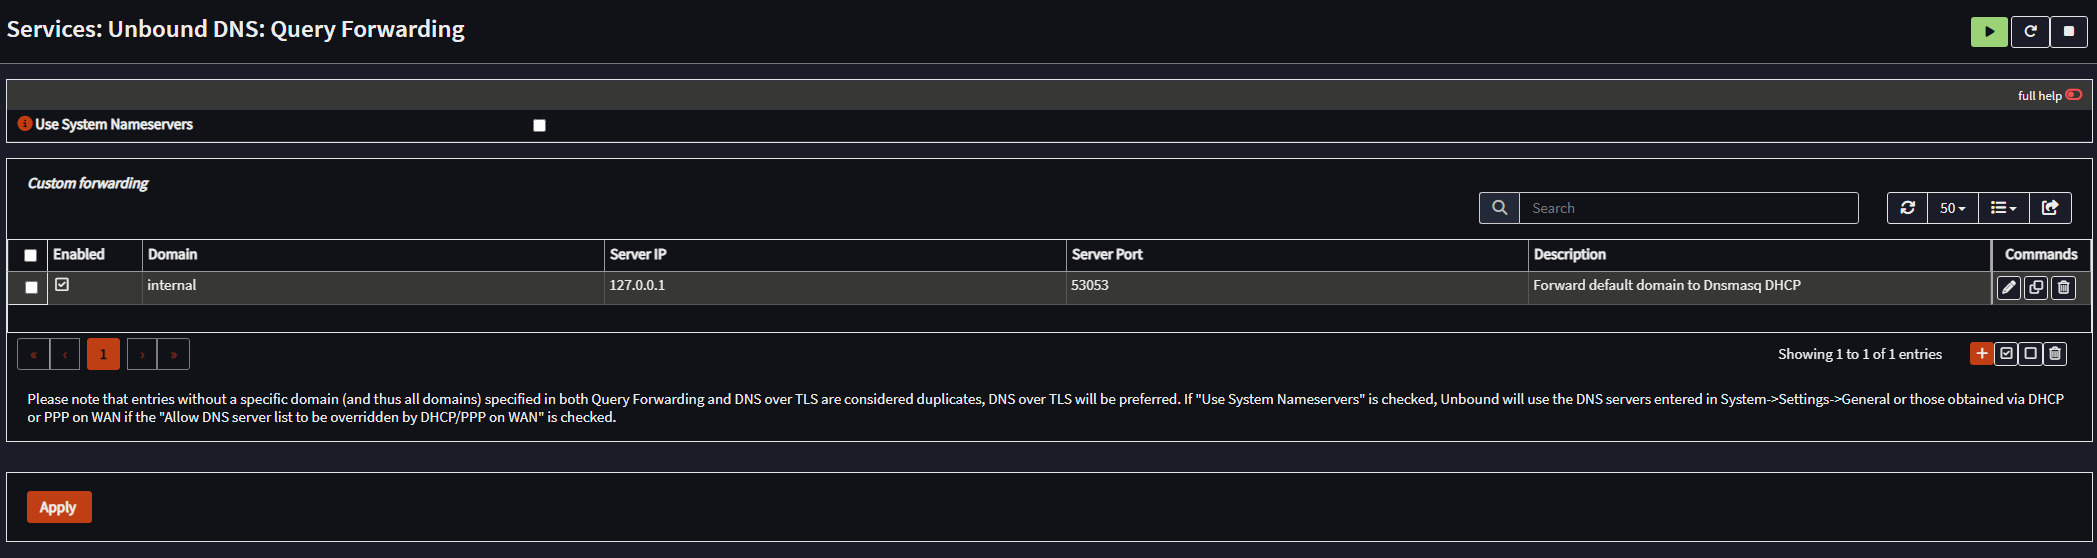 Okay now we go to: Services -> Unbound DNS -> Query Forwarding. Then under Unbound you’re going to be clicking that orange plus sign. We will be clicking that button a lot as we go, so going forward, I will be saying click + as shorthand to save me cumulatively 5 minutes of typing or something. So click +.
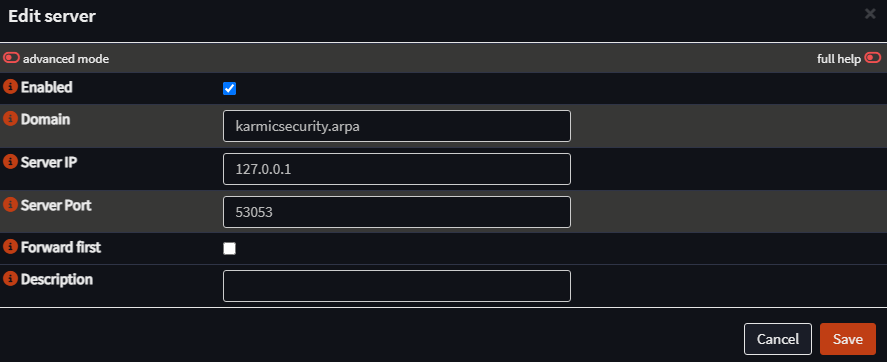 Alright, put in your internal domain name and make sure your Server IP points to localhost and the server port is 53053. Hit Save.
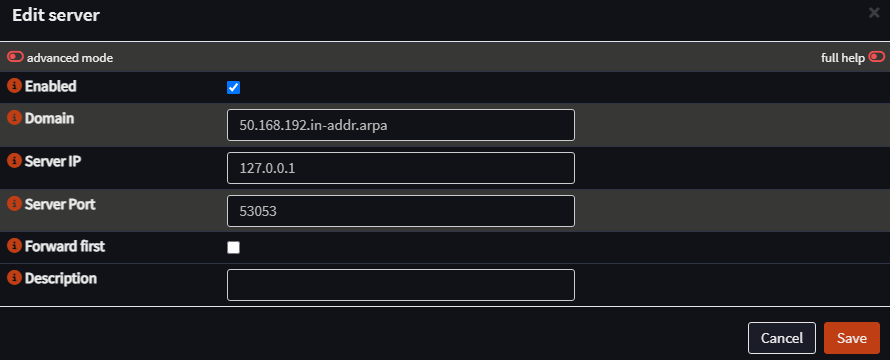 Okay we also need a query-forwarding entry for the reverse-DNS zone. For my 192.168.50.0/24 network, the corresponding reverse zone is
 50.168.192.in-addr.arpa. I enter that value in the Domain field and forward it to 127.0.0.1 on port 53053.
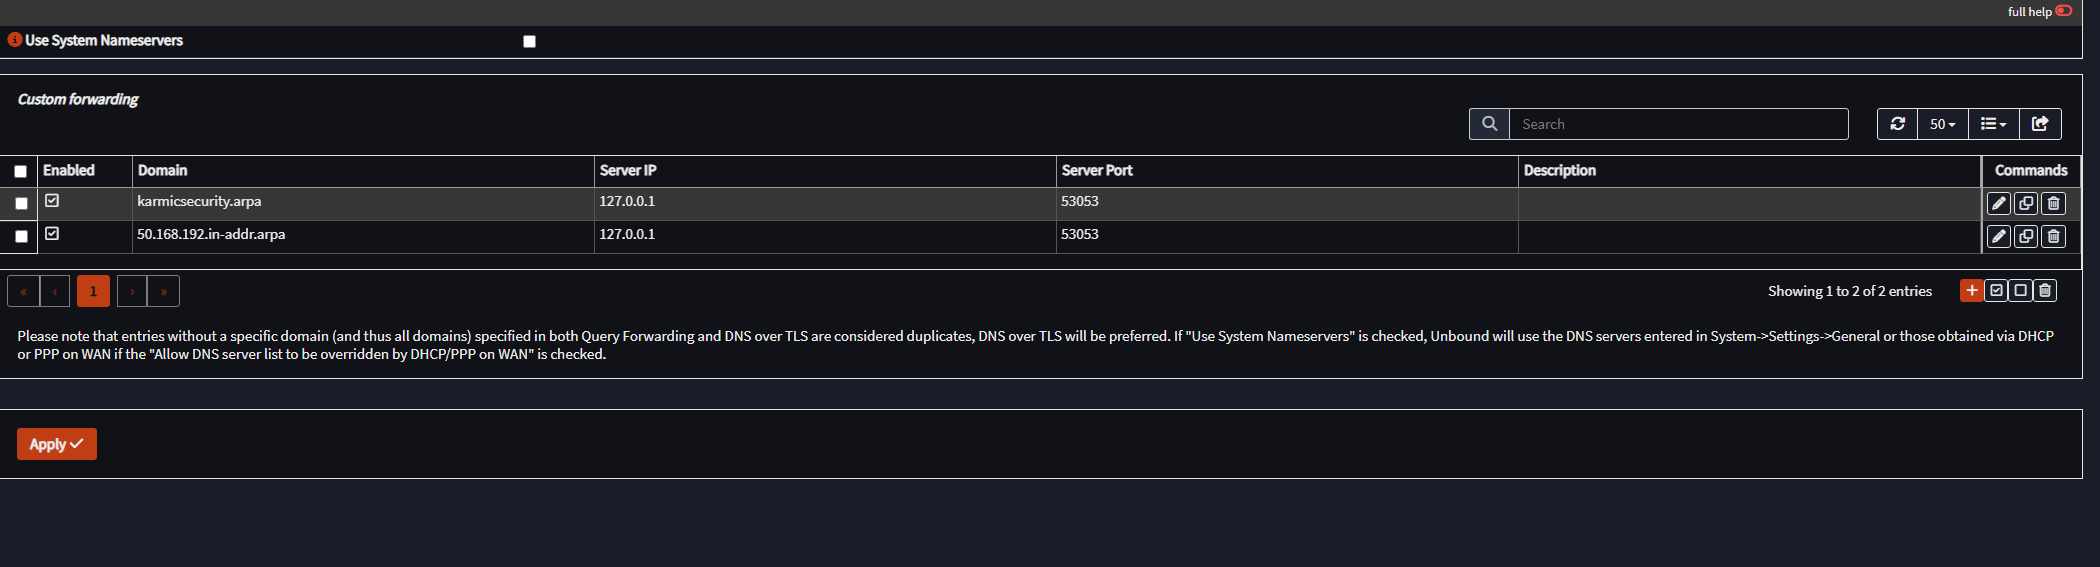 Okay after that, this is how my settings look. Let’s move onto the next step.
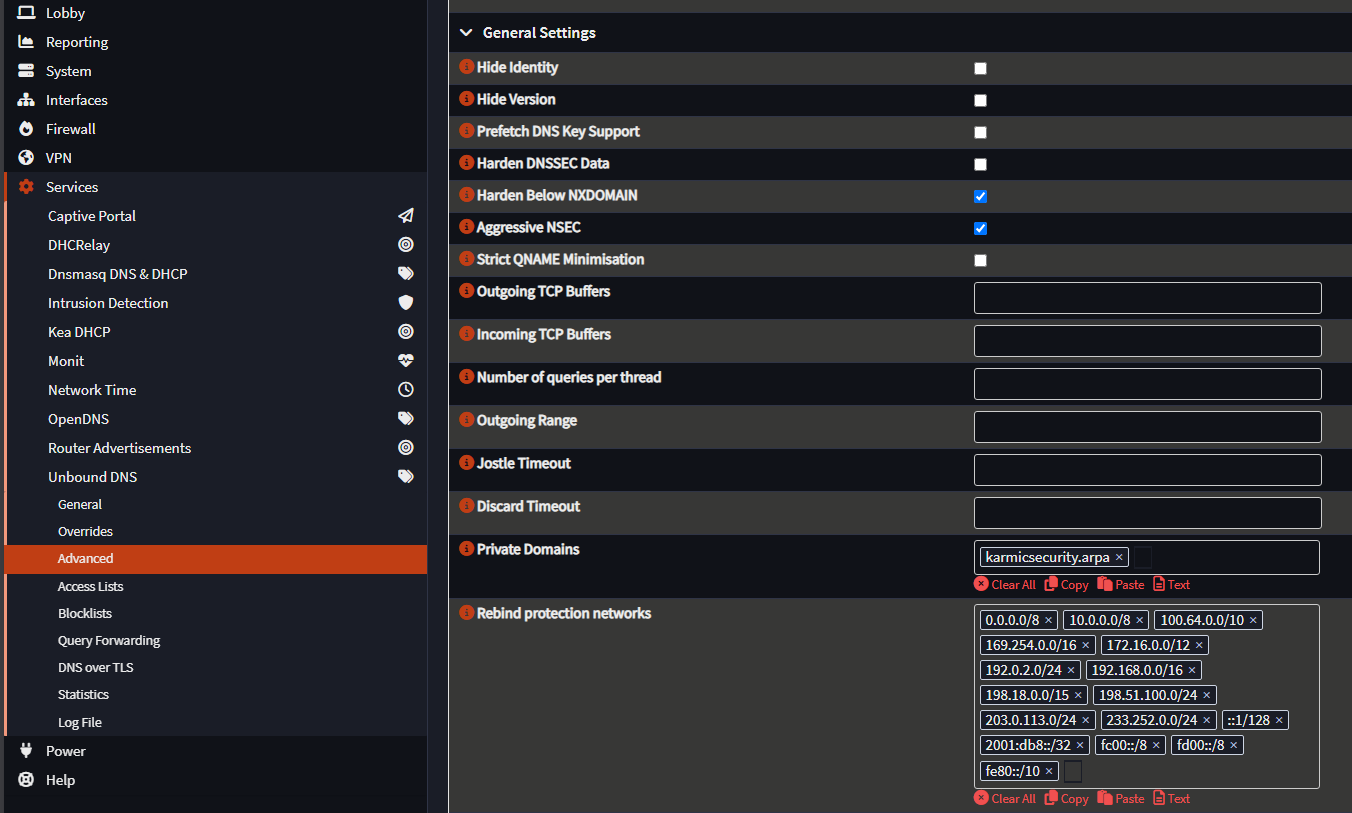 Under Services -> Unbound DNS -> Advanced, we’re going to add our internal domain to the Private Domains box. This tells Unbound that private address responses are expected for this namespace, preventing DNS protections from removing or rejecting those DNS answers. Should be all we need to do, friendly reminder to go ahead and save/apply.
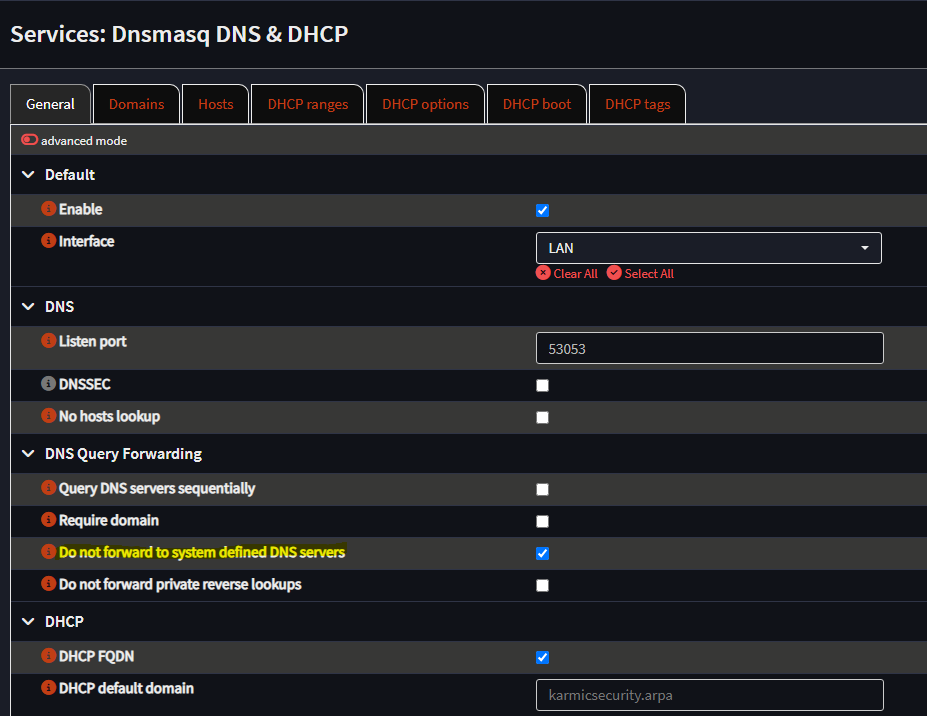 Now go to: Services -> Dnsmasq DNS & DHCP -> General, and check Highlighted box as we do not want our DNS queries to our internal resources going to external DNS servers. Next.
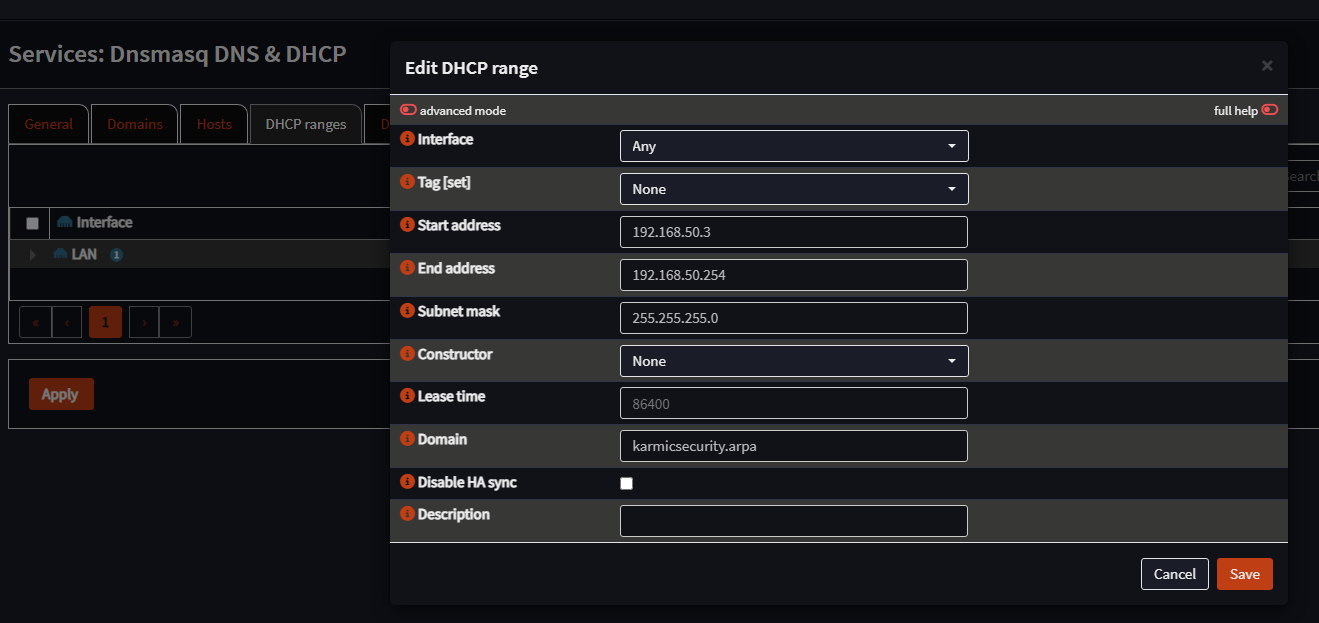 Still in Dnsmasq, under the DHCP ranges tab, add the DHCP range of your local network and your internal domain. Mine starts at .3 because my Wi-Fi AP is statically assigned to .2. Do whatever is best for your situation.
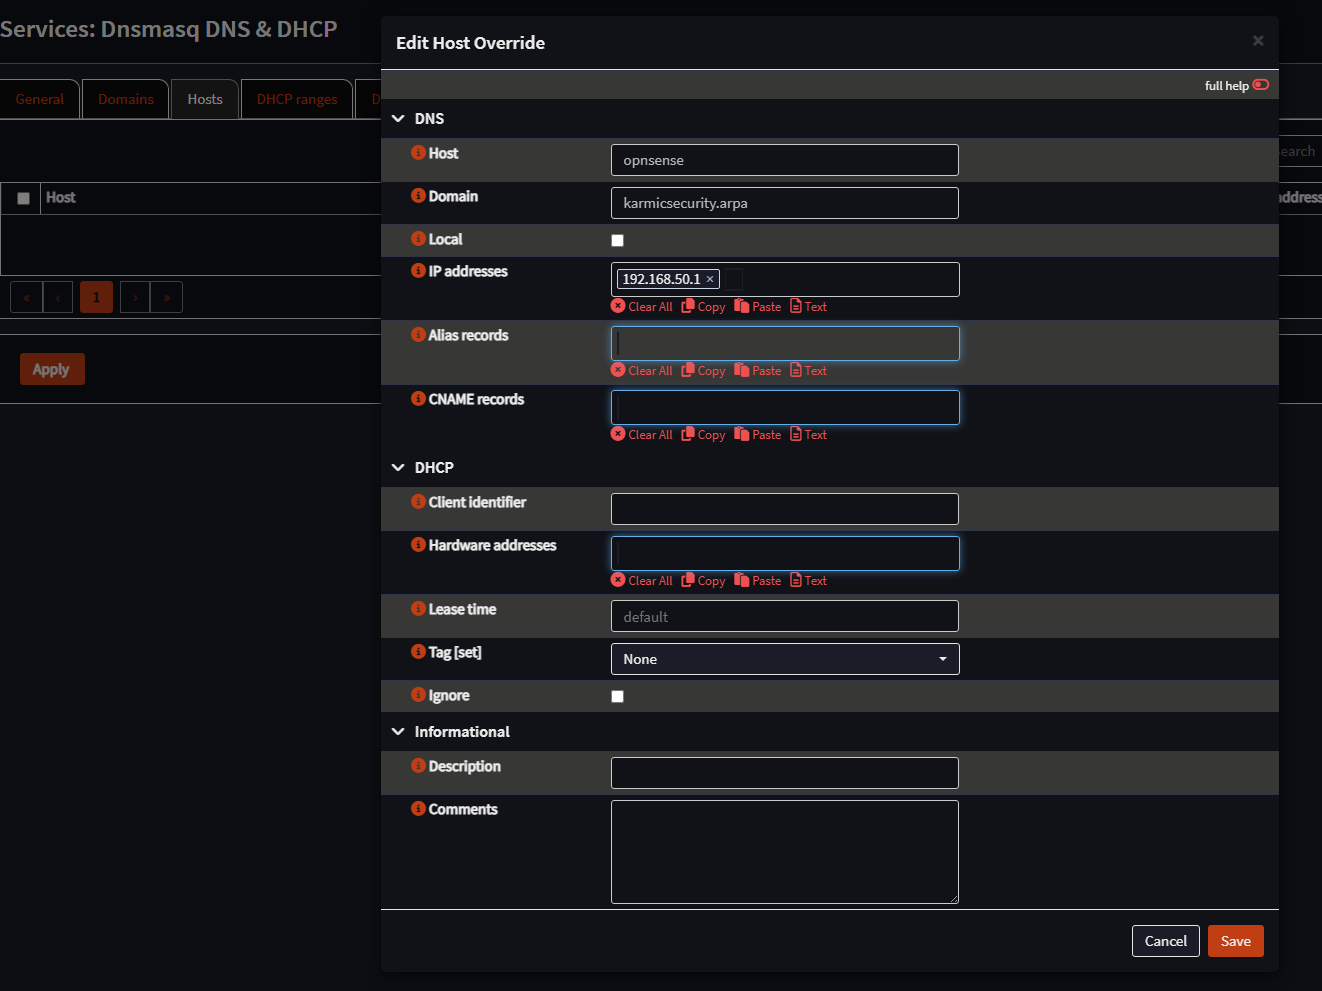 Now under the Dnsmasq Hosts tab, add the hostname of your OPNsense box, internal domain and OPNsense’s local IP. Repeat for all devices. After you do that you’re doing to want to repeat that process for all the devices on your network you want to have domain names for. After you’re done it should look a little like…
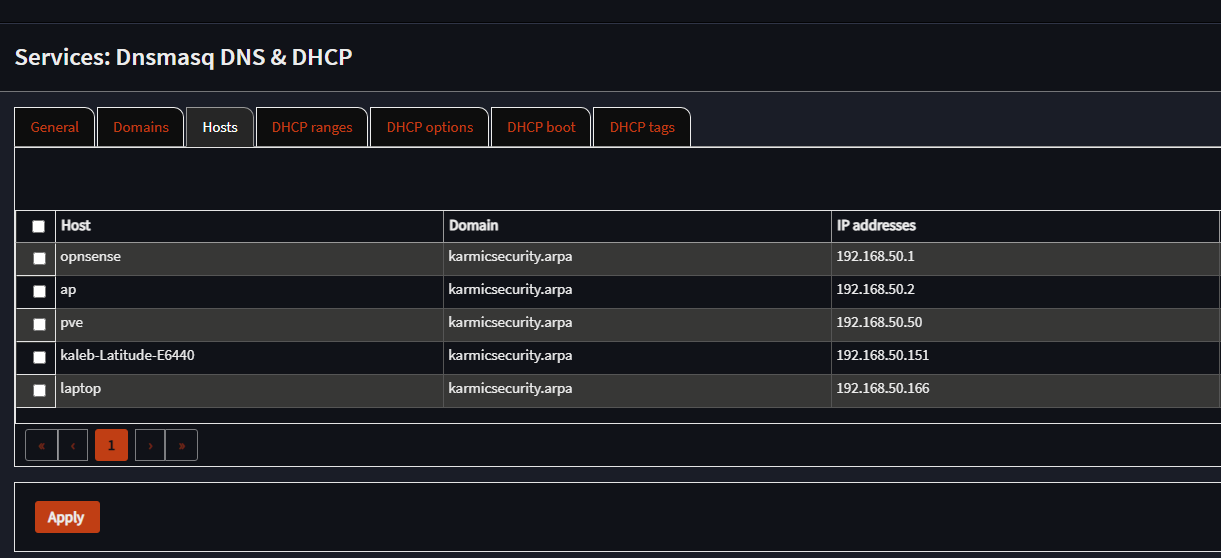 This. Alright, all of mine are made. Now the next step for me is going to be to add some CNAME records to each host for each service I plan on running on that host.
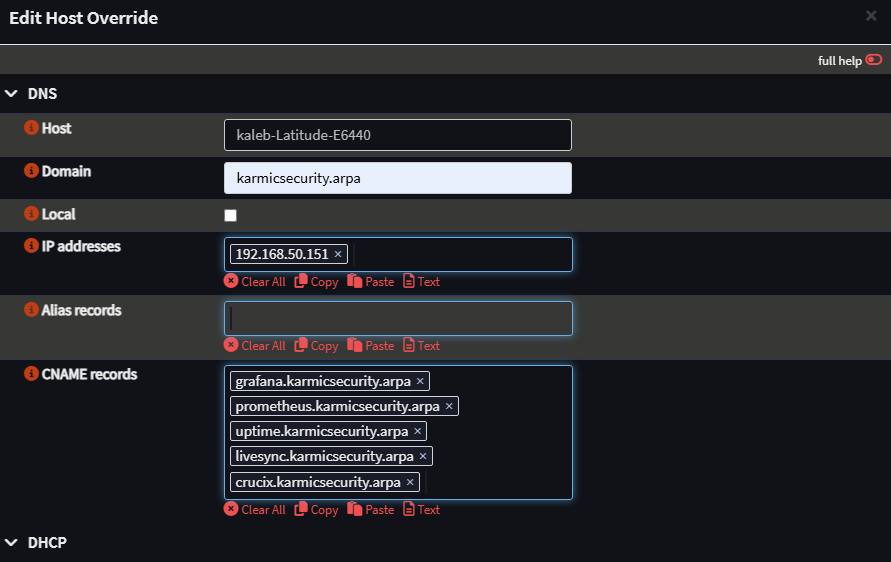 So I add all of these CNAME records to my Latitude laptop. Now, full transparency we are probably just going to delete these later when we set up our HTTP reverse proxy. So you can choose to add these if you want to test your name resolution. Speaking of testing name resolution, let’s do that!
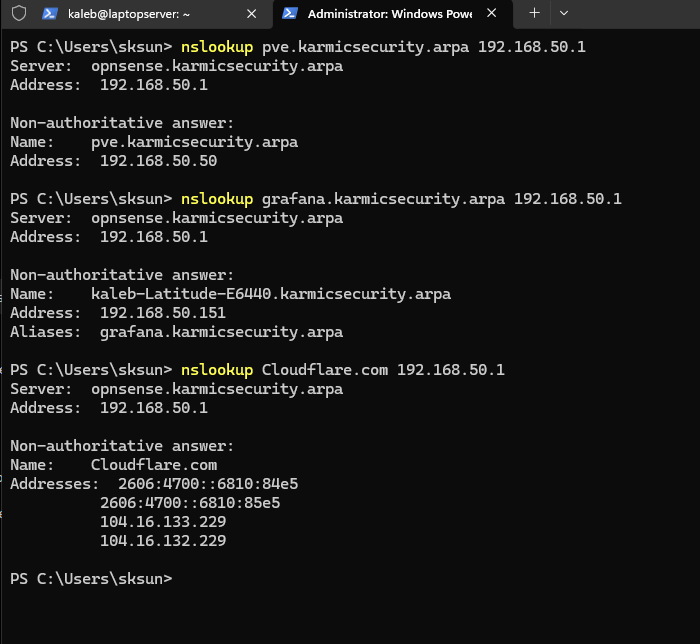 So we run
 nslookup on a couple (sub)domains here, all specifying our OPNsense box as the DNS server to query. All the queries look good to me, so seems like we set up all our records correctly. Okay, so that’s super cool, although none of those URLs will get us to our the service we want to get to yet. There’s no way to forward to a specific port, so we’ll need a HTTP reverse proxy, such as Caddy. However, before we set up Caddy, we’re going to need to set up a Certificate Authority (CA) server for our local domain.
OPNsense CA Server
Okey dokey, time to deploy our own local PKI. Now you don’t have to do this, but one, I kinda want to and two I want all of my services to be rocking HTTPS, not just HTTP. It’s honestly not too bad, the first thing we need to do is create our local Root Certificate Authority (CA).
 Alright, let’s navigate to: System → Trust → Authorities. We don’t have any CAs configured yet, so that should be blank. Let’s first add our Root CA.
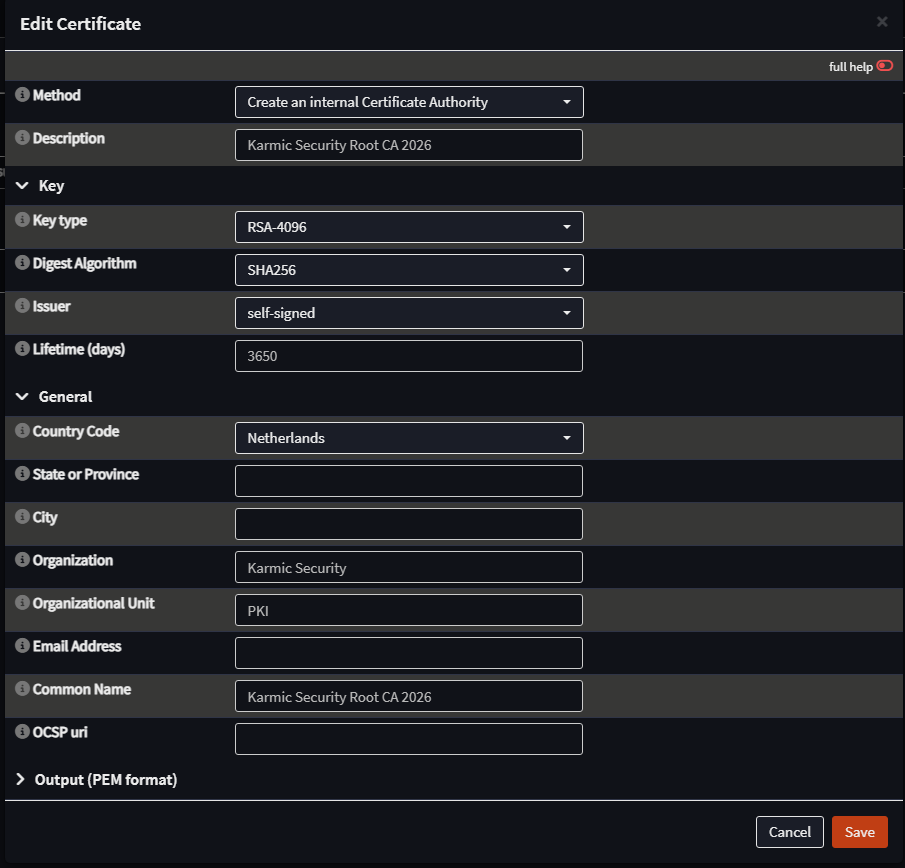 Configuration should look a little something like this. This will be our Root CA. Make sure to save and apply. Now we’re going to want to make our Issuing CA which will be signed by our root CA. It’s bad practice to have the Root CA online, it’s typically used to sign the Issuing CA and then taken offline. Because this is just for my homelab, I am leaving it online, but you should export and store the root CA private key offline, then remove the private key of the root CA from OPNsense. Okay, with that being said, let’s make our Issuing CA.
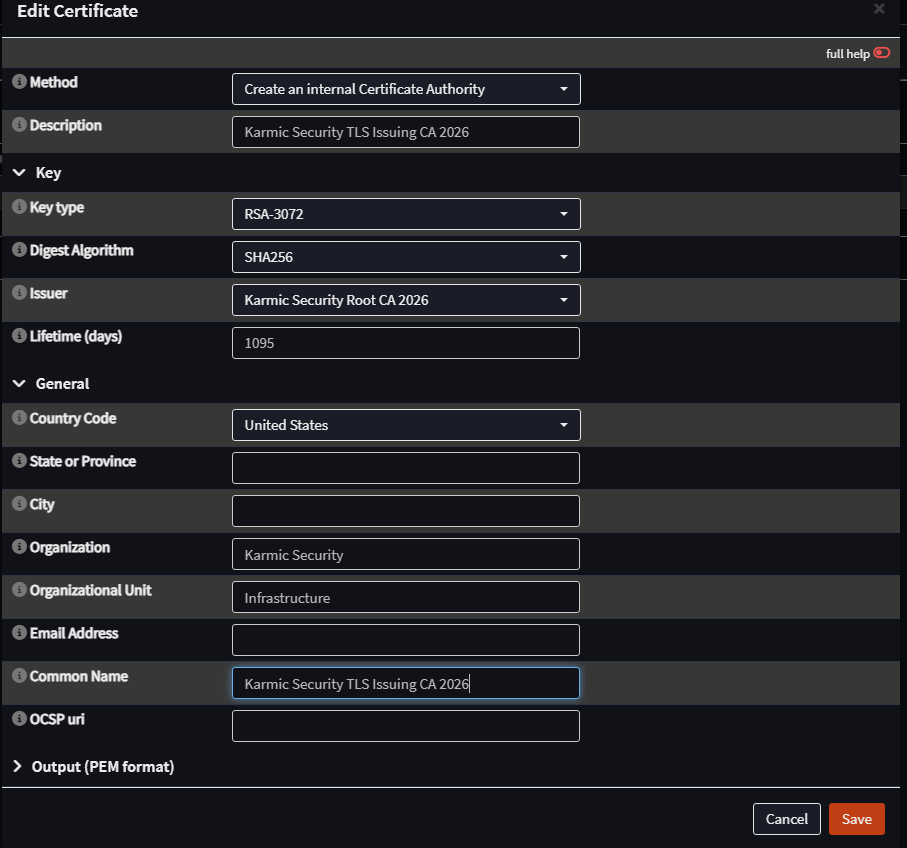 And that’s our Issuing CA done. Awesome, now we’re going to create a couple certificates, not anymore CAs. So go ahead and under Trust, click on Certificates. Now, we’re going to create two certificates. One for OPNsense’s web GUI and another for Caddy that’s going to be a wildcard certificate. Caddy is going to point to several of our subdomains, hence the need for the wildcard. Let’s do Caddy first.
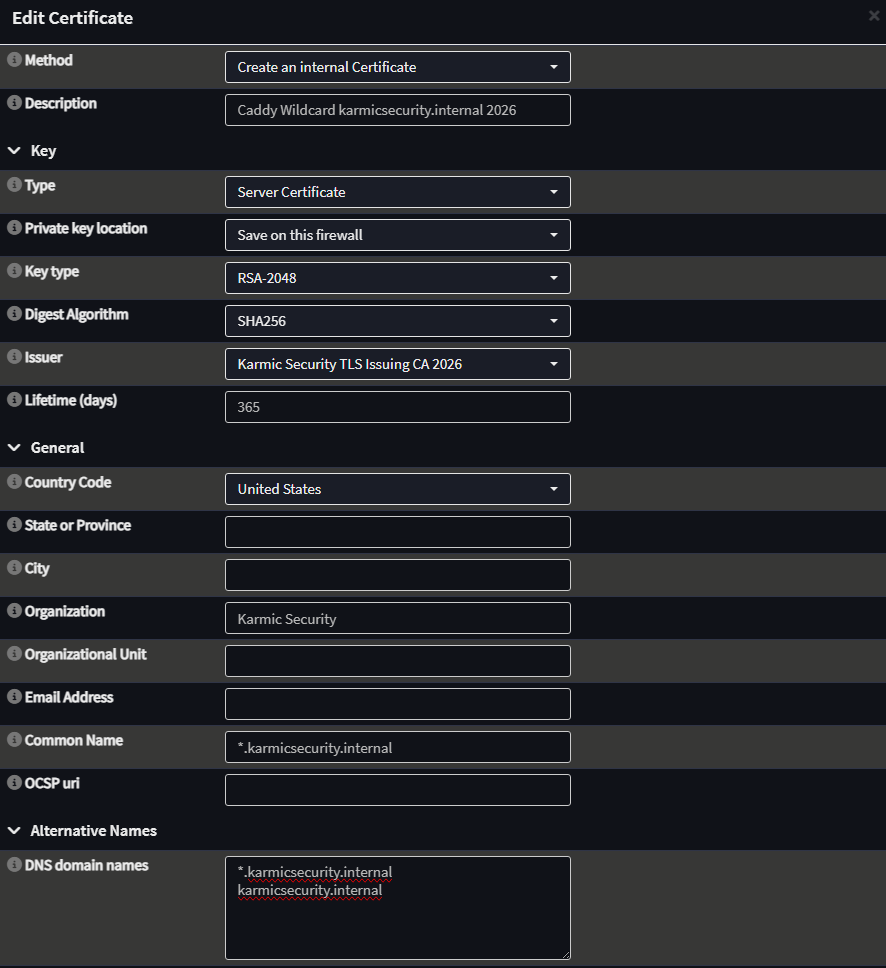 So we have the Issuing CA be the issuer for this cert and then use a wildcard for the subdomain so we can make as many as we want later. Next we need to make a certificate for the OPNsense web GUI itself. Let’s do that.
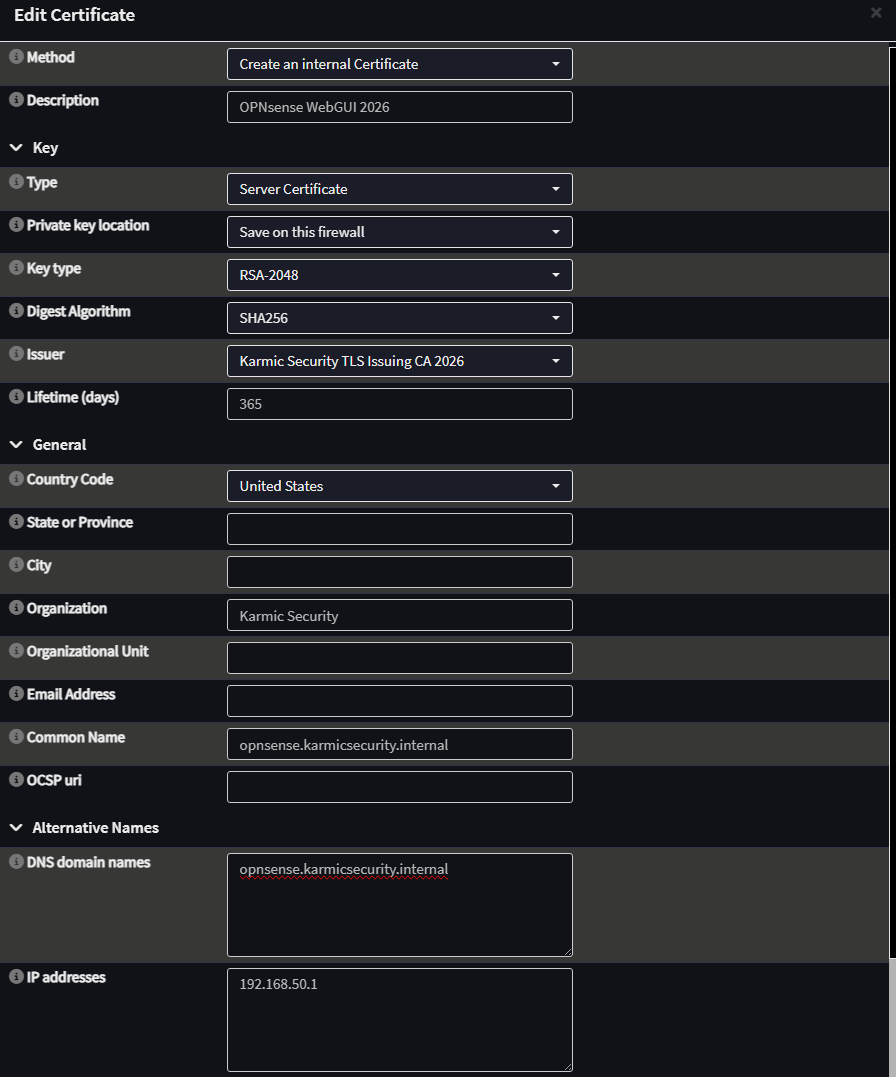 Pretty much the same as the Caddy certificate, except the domain name and this time we specify an IP address.
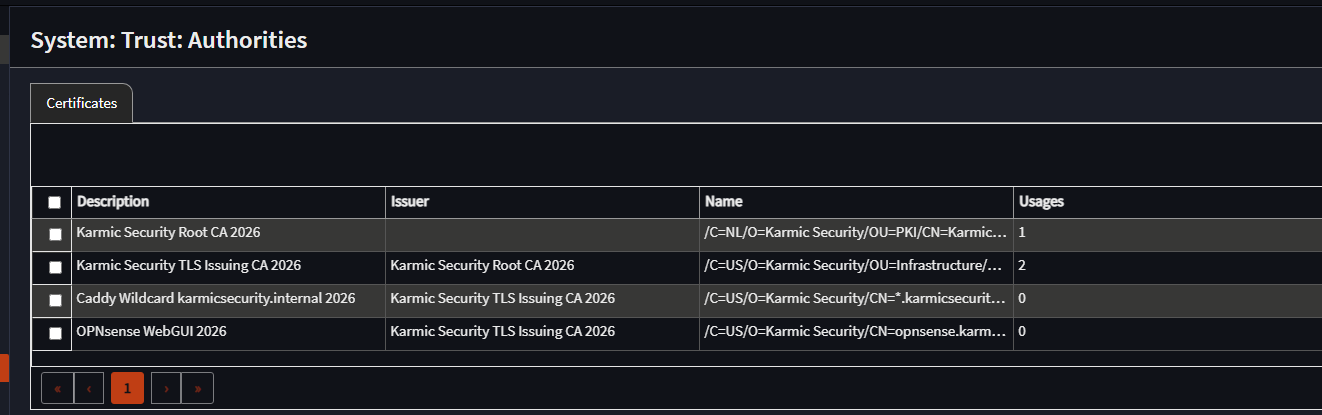 And here we have all of our certificates, yippee! Before we go ahead and apply these certificates to their respective services, we need to configure all of our local devices to trust the Root CA. I will demonstrate how to do this on my Windows host and I’ll link to a link for mobile devices, cause you probably want to access your services from your phone sometimes. In order to do this we will first need to download the Root CA file.
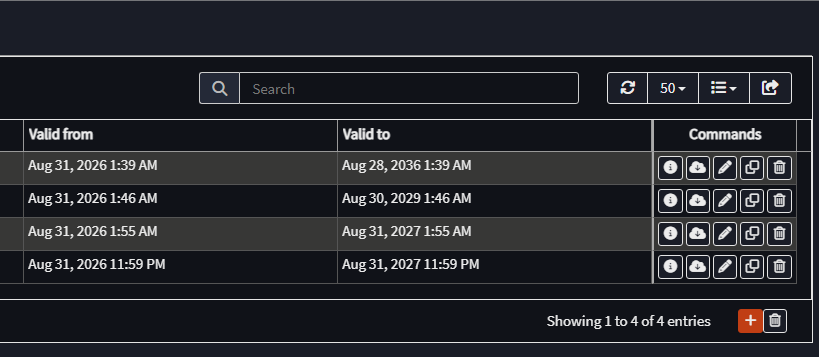 On the right side of your CAs you’ll see some icons, one being a little cloud, click the cloud on the row of your Root CA. That’ll be the first row for me.
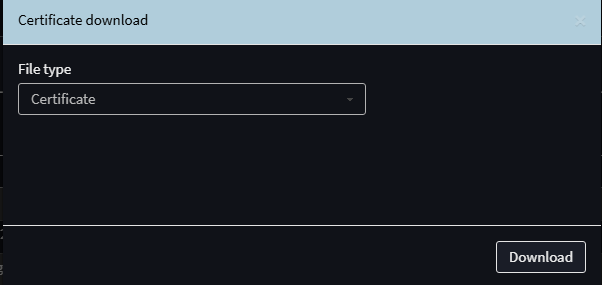 File type Certificate and Download.
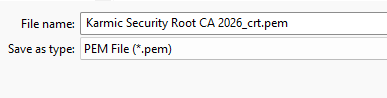 We will save this as a
 .pem file, save it somewhere you won’t forget. Okay now, from a Windows host, click Windows key + R on your keyboard at the same time.
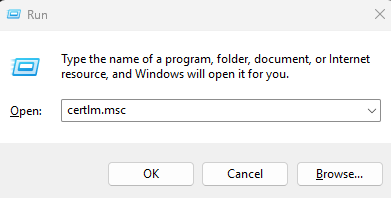 Cool, enter
 certlm.msc and hit enter and click Yes at the system prompt.
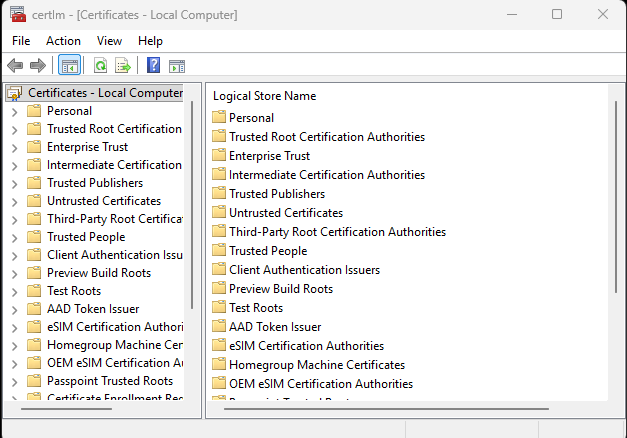 Cool, here’s our certificate manager where we can see all of our trusted certs and what not.
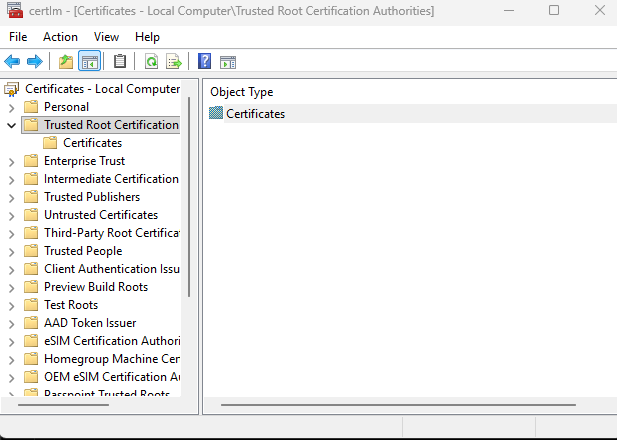 Now we’re gonna go to Trusted Root Certification Authorities and right click on Certificates. Hover your mouse over All Tasks and click Import.
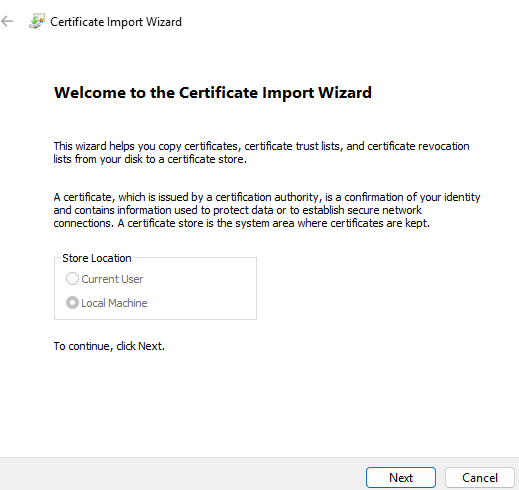 We want Local Machine and can’t change it anyhow so that’s perfect, Next.
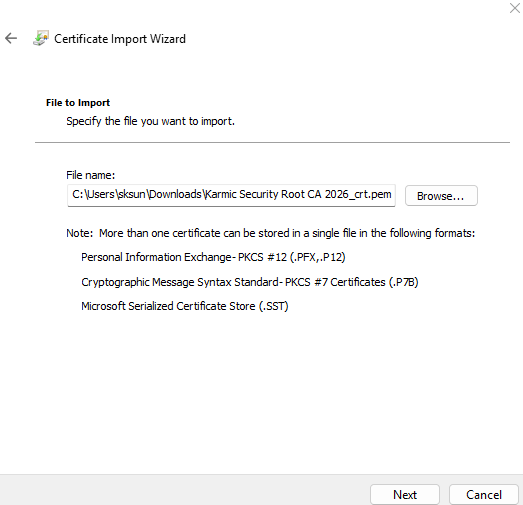 Browse to the
 .pem file you saved. Perfect, Next.
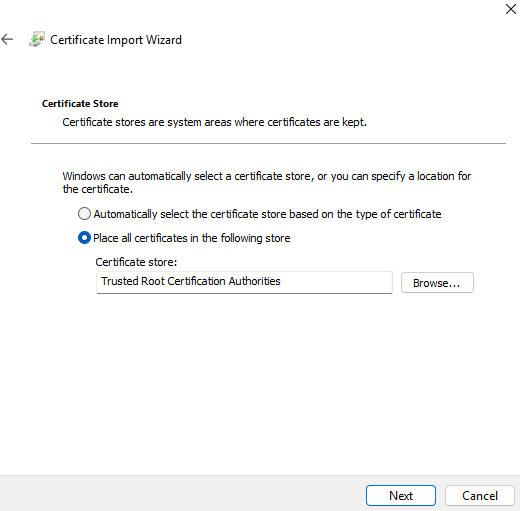 This is fine, Next.
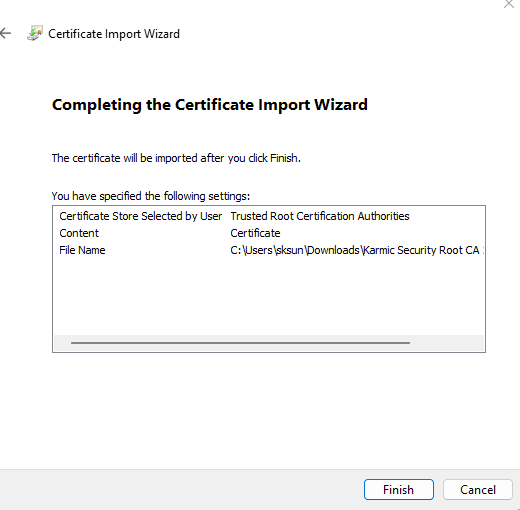 Verify your information and Finish.
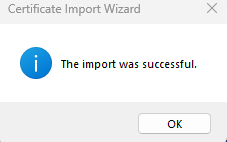 Amazing. Okay we’re going to need to restart our browsers. Now certain browsers reference the Windows trust store by default, mainly Chromium based browsers, so I should be good. If you use Firefox you will need to do some additional steps, just google
 How to import CA Firefox or something.
Okay, now, after our browsers restart keep your existing OPNsense login and open up another tab and login again.
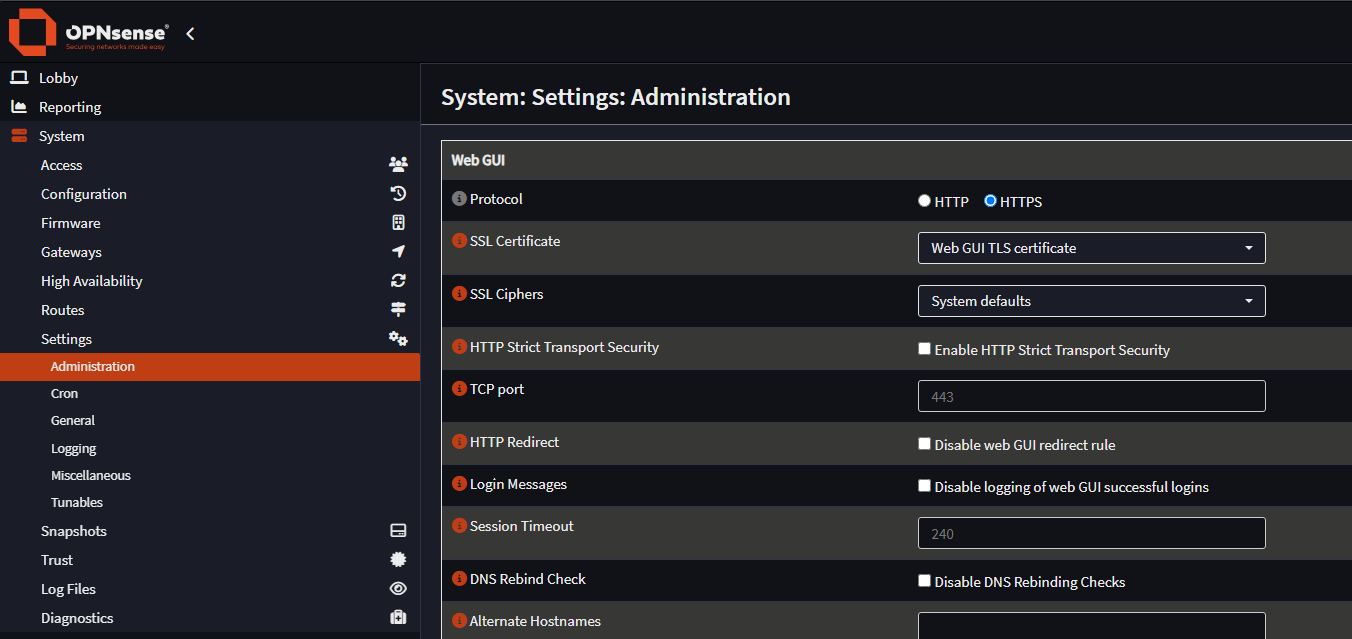 Okay, from our second OPNsense tab, go to System -> Settings -> Administration.
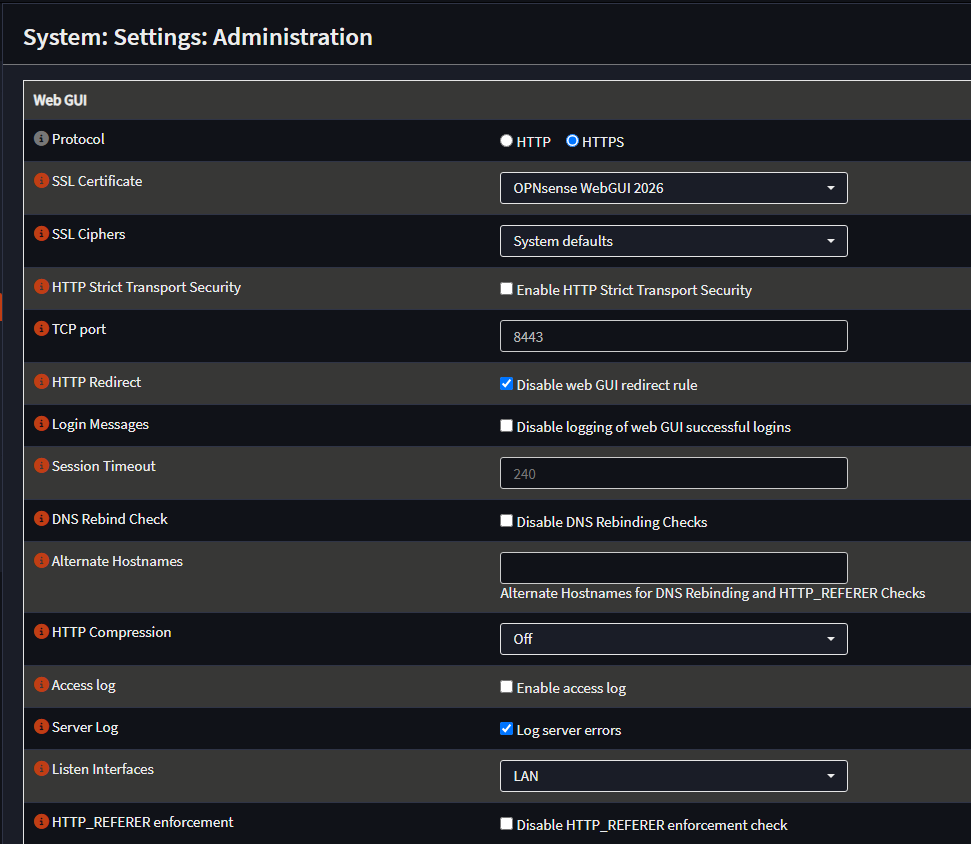 And we actually change a few things here. For the SSL Certificate, choose the certificate we created. We’re going to change the Web GUI port to 8443 and check the box for Disable web GUI redirect rule. Also, for Listening interfaces there, change that to LAN instead of All. Don’t worry, your web GUI wasn’t exposed to the internet, default firewalls rules block access, but we’re disabling it anyways. Scroll down to the bottom and click Save. The web GUI will need to reload, but after it does…
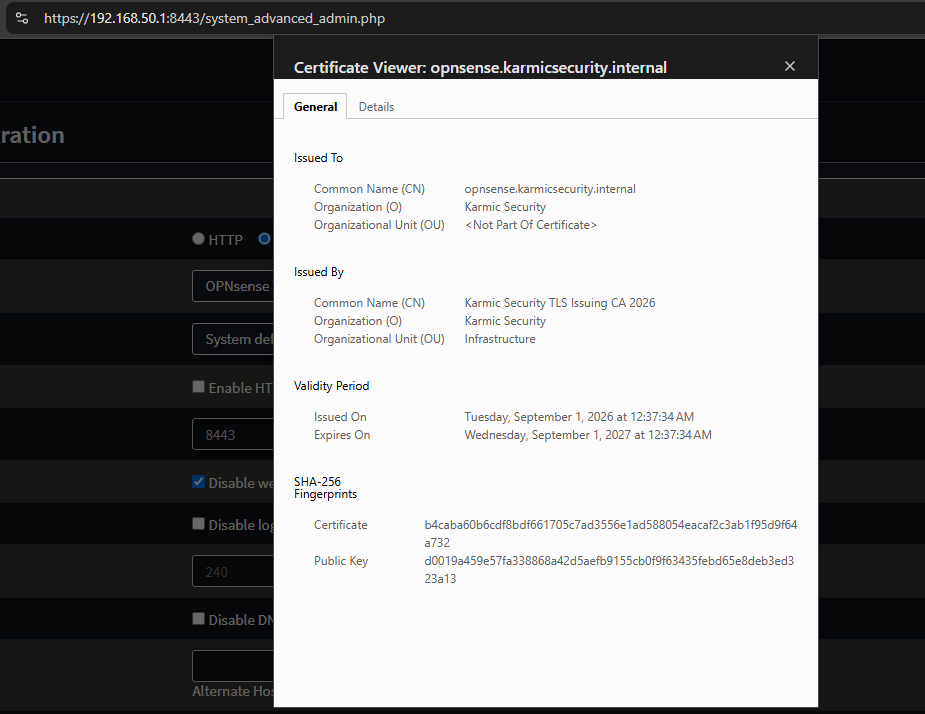 Ayooo, HTTPS is rocking and rolling and our internal CA is trusted, you love to see it. Okay, now it’s time to install and configure Caddy.
Caddy Reverse Proxy Setup
Okay so, big part of our homelab configuration is this part right here. If you’ve been following along you know that most of our services are containerized. Which is great, love containers. Only issue is that DNS records don’t take port numbers. This is fine unless you are hosting a ton of stuff on the same machine. Now, at this point in our configuration, you could navigate to a service by going service.example.com:port. DNS resolves the domain name, but you still need to specify the port. To me, that makes the whole name resolution thing kinda pointless as it’s not the IPs I’m forgetting. So, we are going to fix this with Caddy, which can function as our HTTP reverse proxy. Forwarding our requests from it to the right IP and port number. Sounds cool? I think so, let’s get it running.
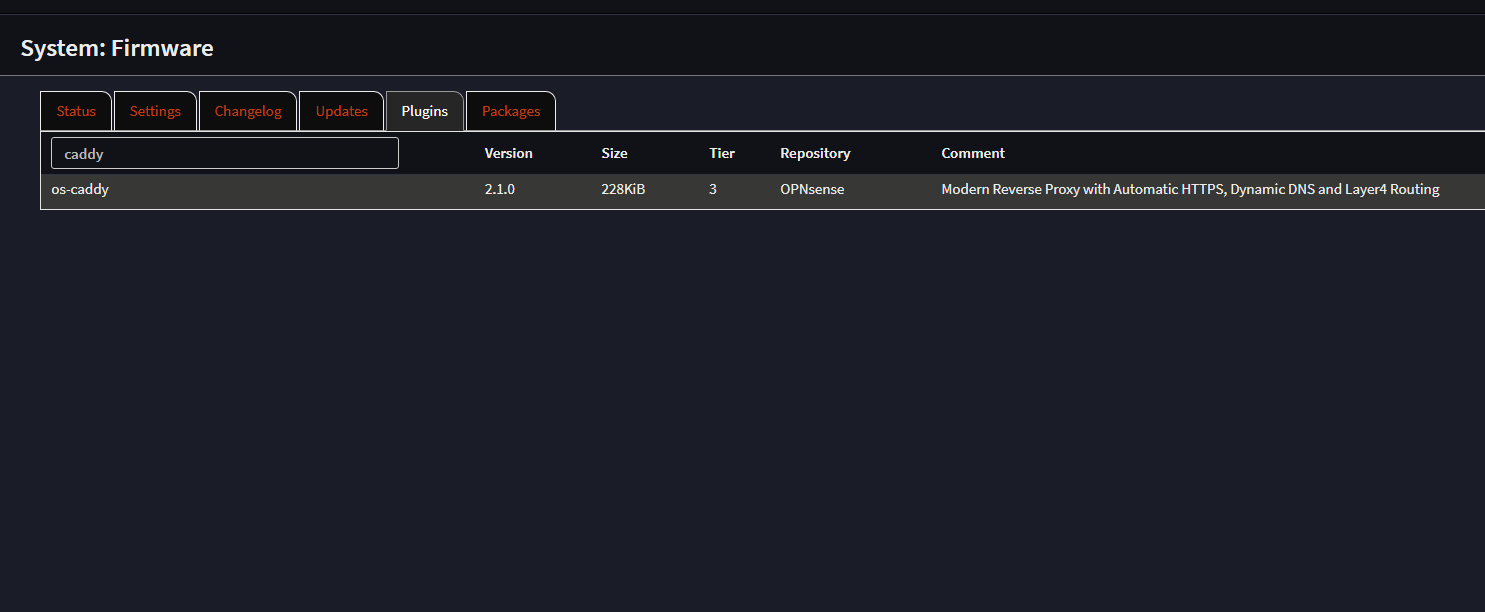 Under System Firmware Plugins, Enable Community Plugins in the top right and then search
 caddy. Click plus sign on far right.
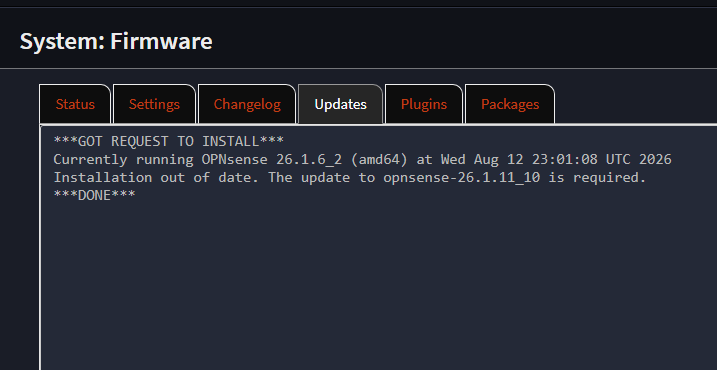 Ah, it appears my firmware is out of date. Alright, quick update our firmware.
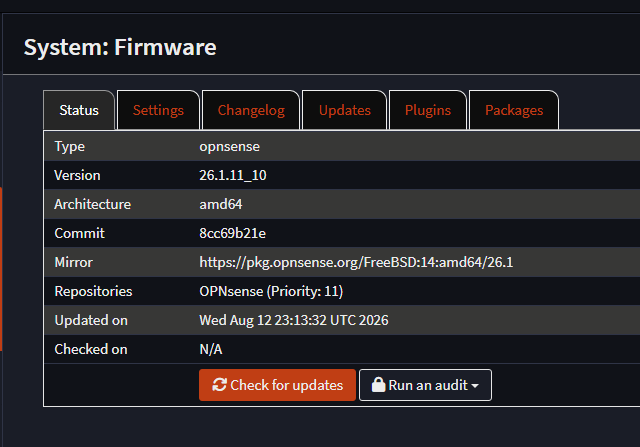 Hit check for updates and let it do its thing and then install Caddy by searching for it under System -> Firmware -> Plugins.
Okay perfect, it should be available now after it’s done installing, but we need to enable it. Under Services -> Caddy -> General Settings.
Hit check for updates and let it do its thing and then install Caddy by searching for it under System -> Firmware -> Plugins.
Okay perfect, it should be available now after it’s done installing, but we need to enable it. Under Services -> Caddy -> General Settings.
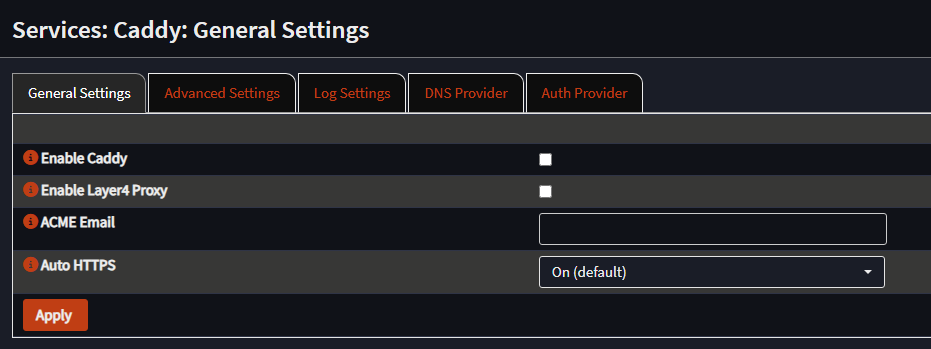 Okay, we’re going to want to check the box next to Enable Caddy. We’re also going to want to change Auto HTTPS from On to Disable Certs
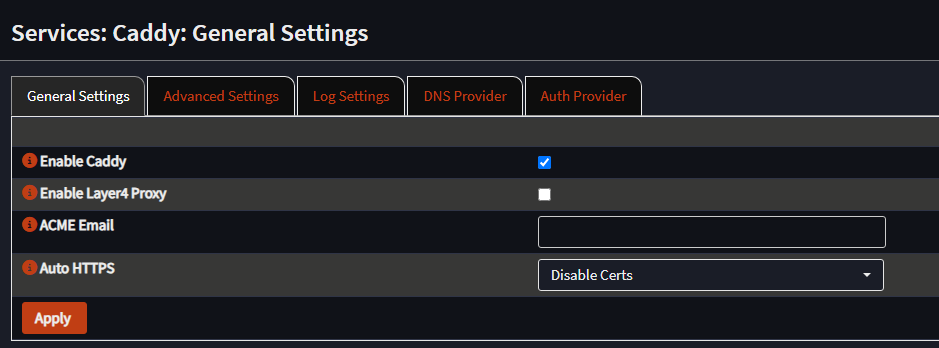 Click Apply. Now Caddy is actually running. Okay, time to actually configure the reverse proxy.
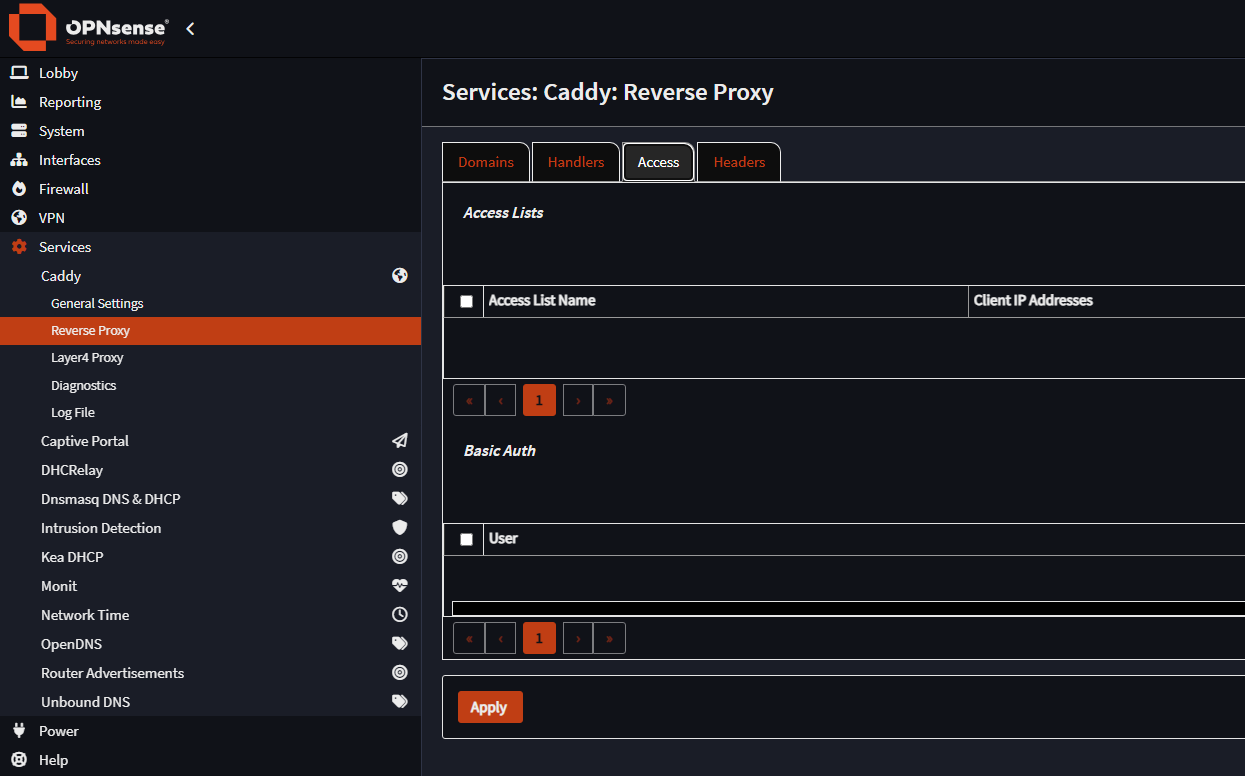 So under Caddy -> Reverse Proxy, click on the Access tab. On the right hand side, under the Access Lists section, click the orange +.
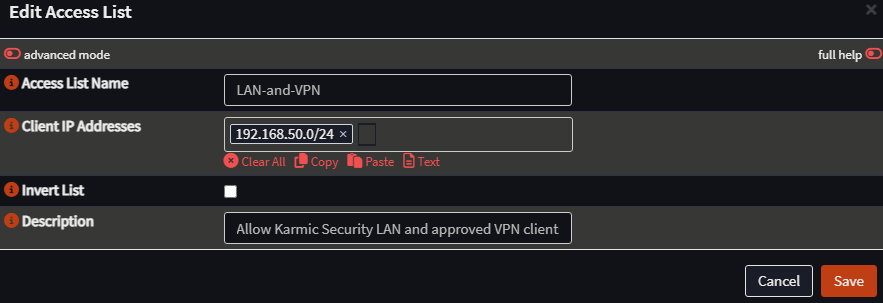 And this is what my settings look like. I call mine LAN-and-VPN, because when we configure remote access later we will need to add our VPN client addresses here. Click Save.
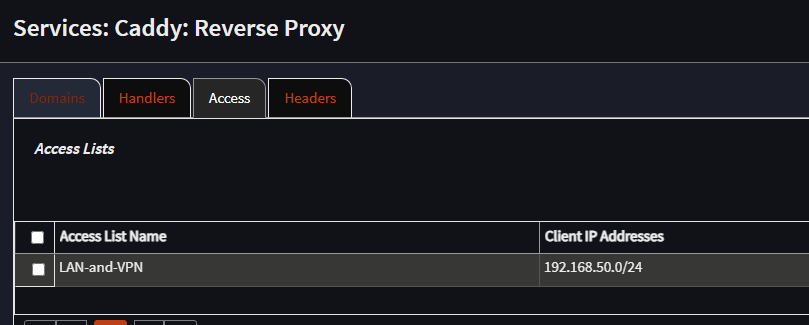 Looking good, alright time to create the wildcard domain. Click on the Domain tab there. Similar to the Access Lists, and then click + under Domains.
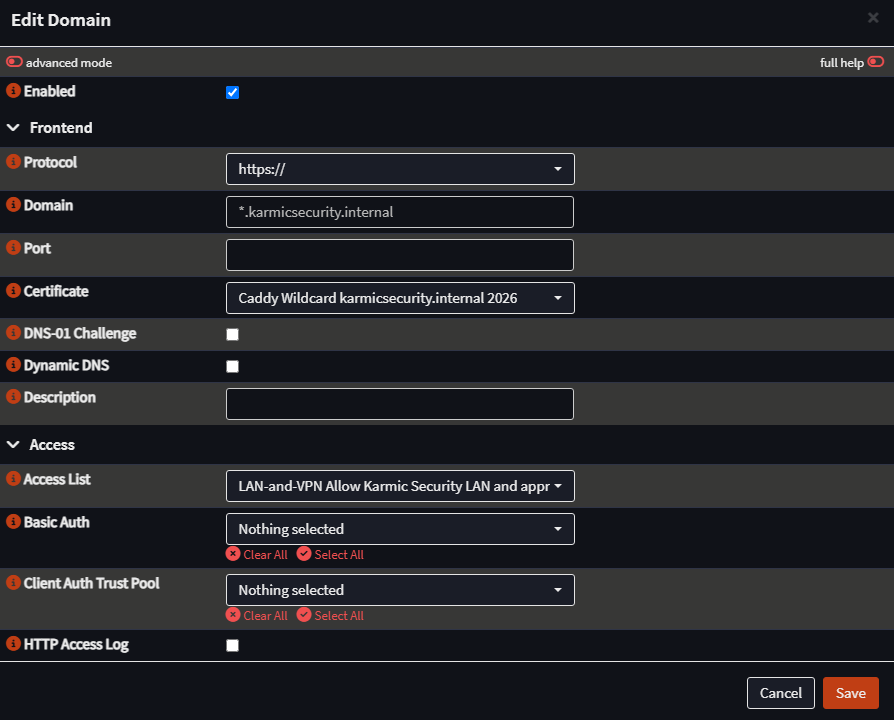 Make sure the box next to Enabled is checked, protocol is HTTPS. We have the domain set to our wildcard domain, the certificate is our Caddy Wildcard cert and the access list is the one we just set up. Click Save. Now here the fun begins. Still on the Domains page, we are going to add a subdomain for each of our services. So under Subdomain, click the orange +.
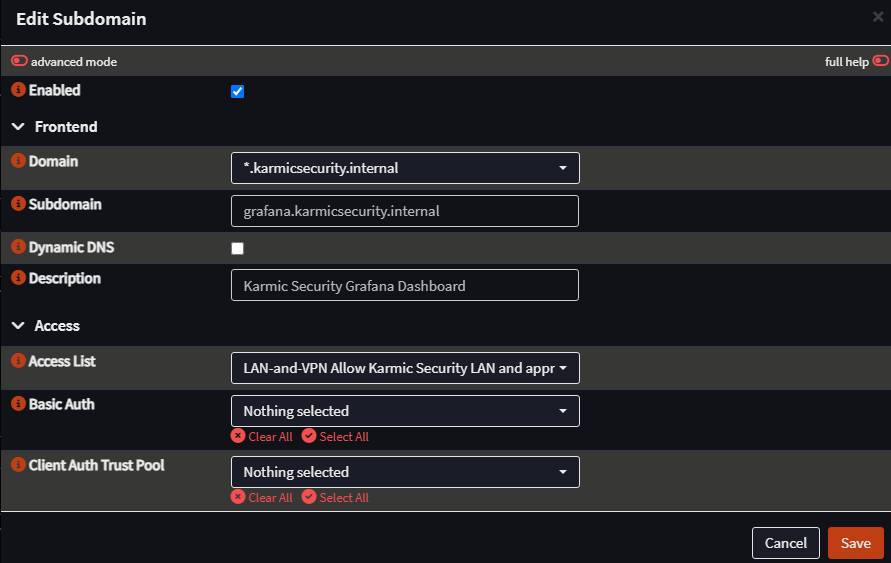 Here’s the config for our Grafana subdomain. Now we’re going to do this for every subdomain we want, so, I’ll be back in a second.
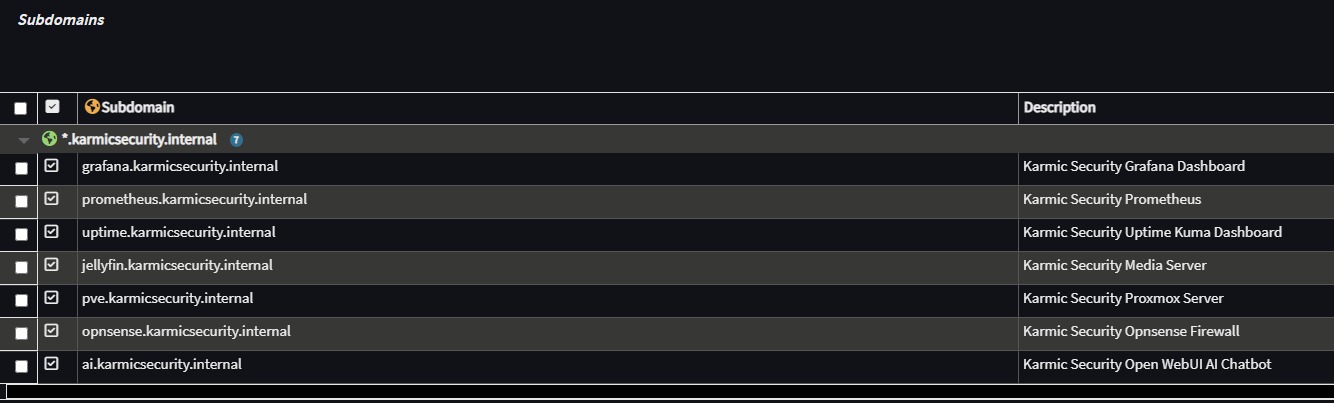 Okay, that is what we’ve got going on for now. Make sure to Save and Apply. Okay now we’re going to the Handlers tab to enable the HTTP reverse proxying. As we’ve been doing, orange +.
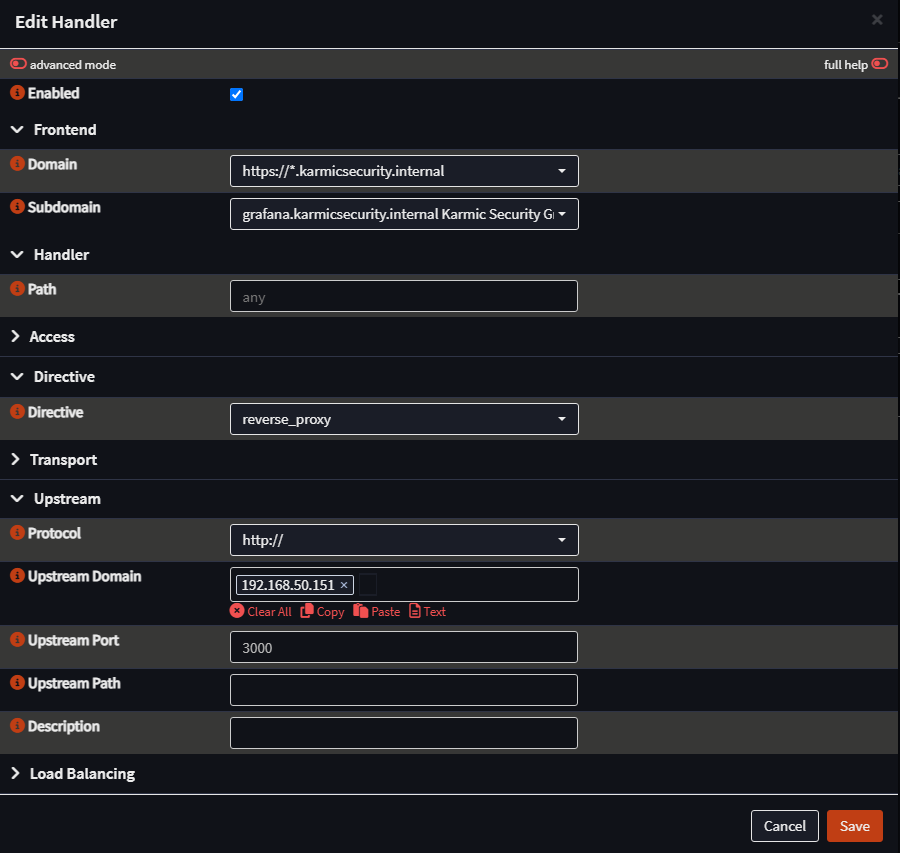 Choose the subdomain you want, protocol HTTP and the applicable port number in the Upstream Port box. And now repeat for each service.
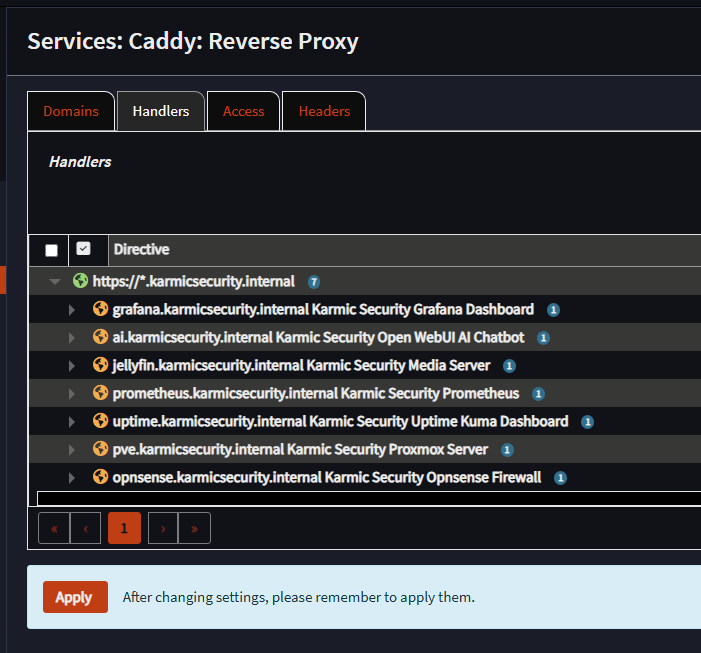 Very cool, Apply. Okay after all of that, we now need to make local DNS records here on the OPNsense box.
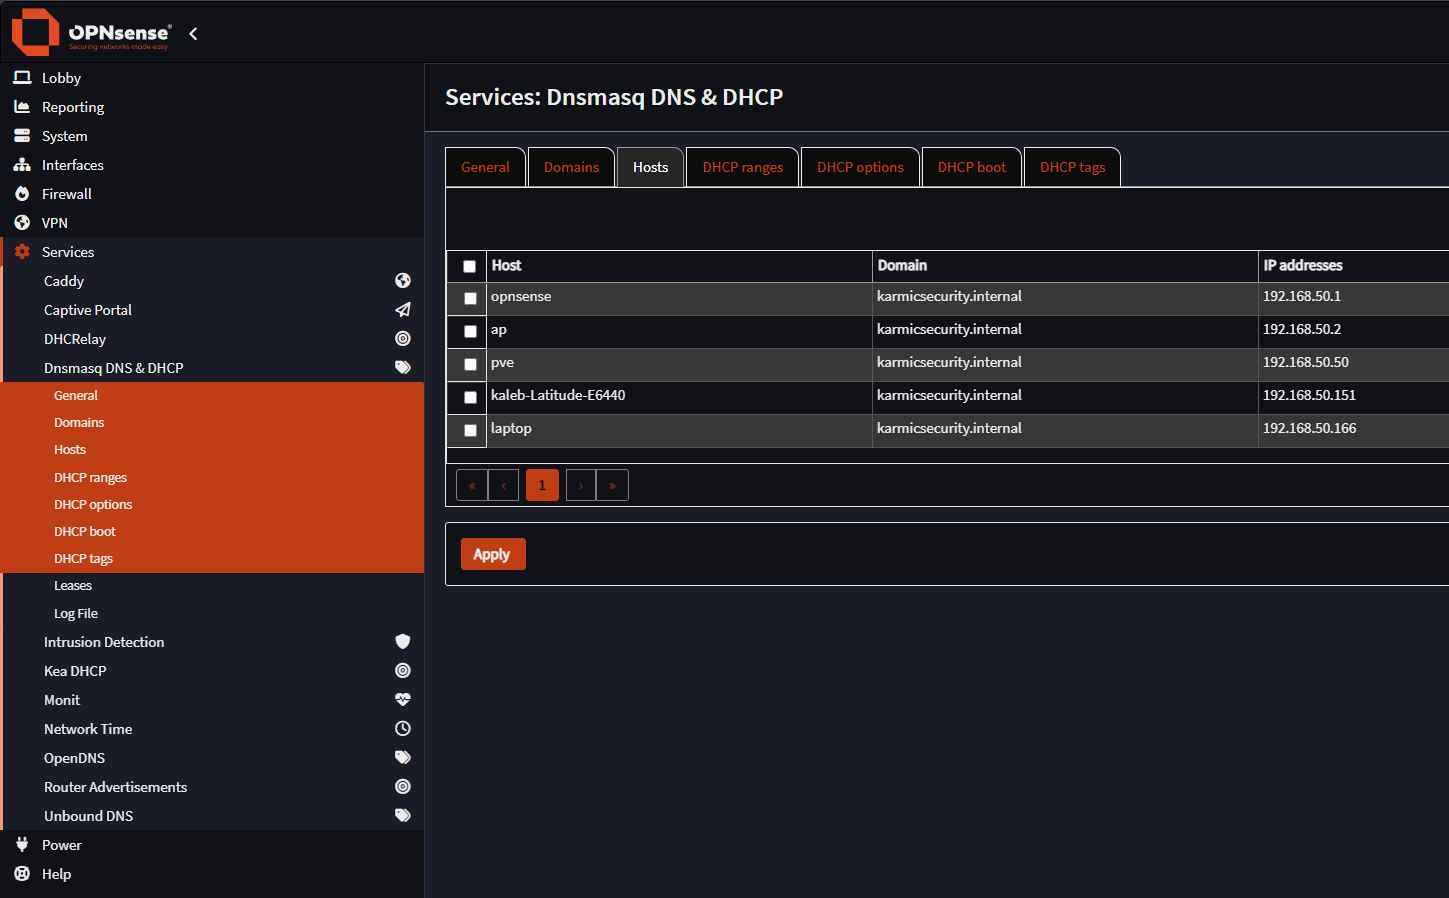 Under Services -> Dnsmasq DNS and DHCP -> Hosts. We have some records setup from earlier, but with the Caddy reverse proxy now in play, it’s time to add some records. Orange +.
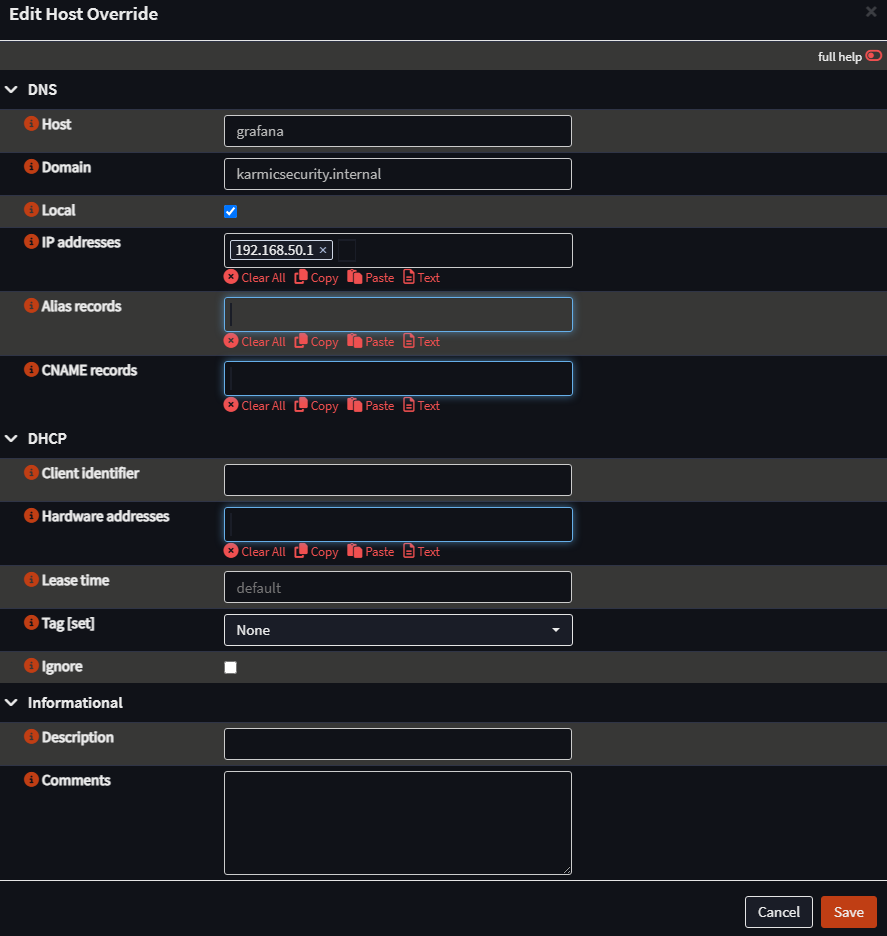 Our Host section will be the service we’re setting up the record for and Domain our local domain. Check the box next to Local so DNS queries for our subdomains don’t get forwarded to other DNS servers. Now, for all of these records the IP will be the IP of the OPNsense box. Caddy will forward requests to the appropriate service.
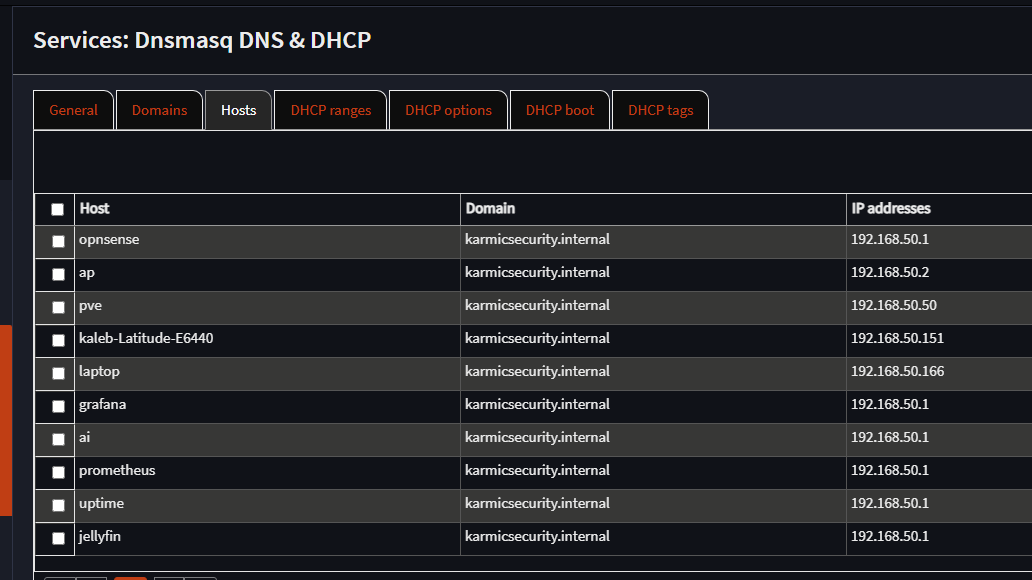 Looking good. Make sure to Apply. Okay, well, our HTTP reverse proxy should be up and running for the services we’ve configured thus far, let’s test it.
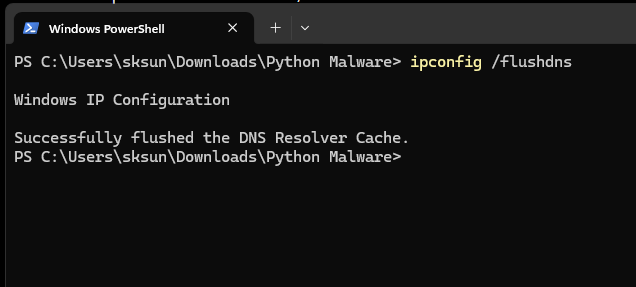 On our Windows host, let’s flush our DNS so we can reload our DNS settings. Okay, let’s see if our subdomains resolve.
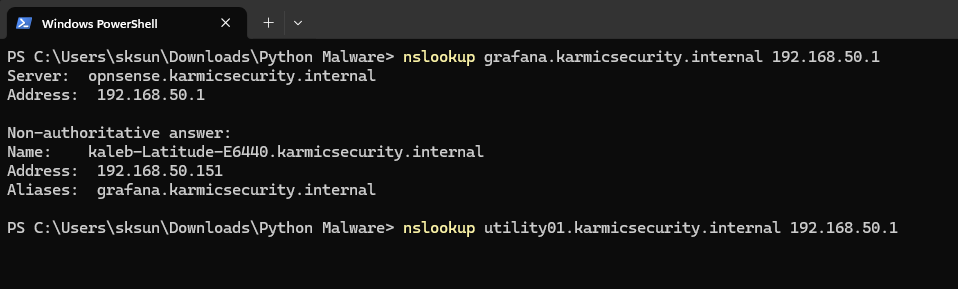 Okay, that’s all correct. Time for the moment of truth.
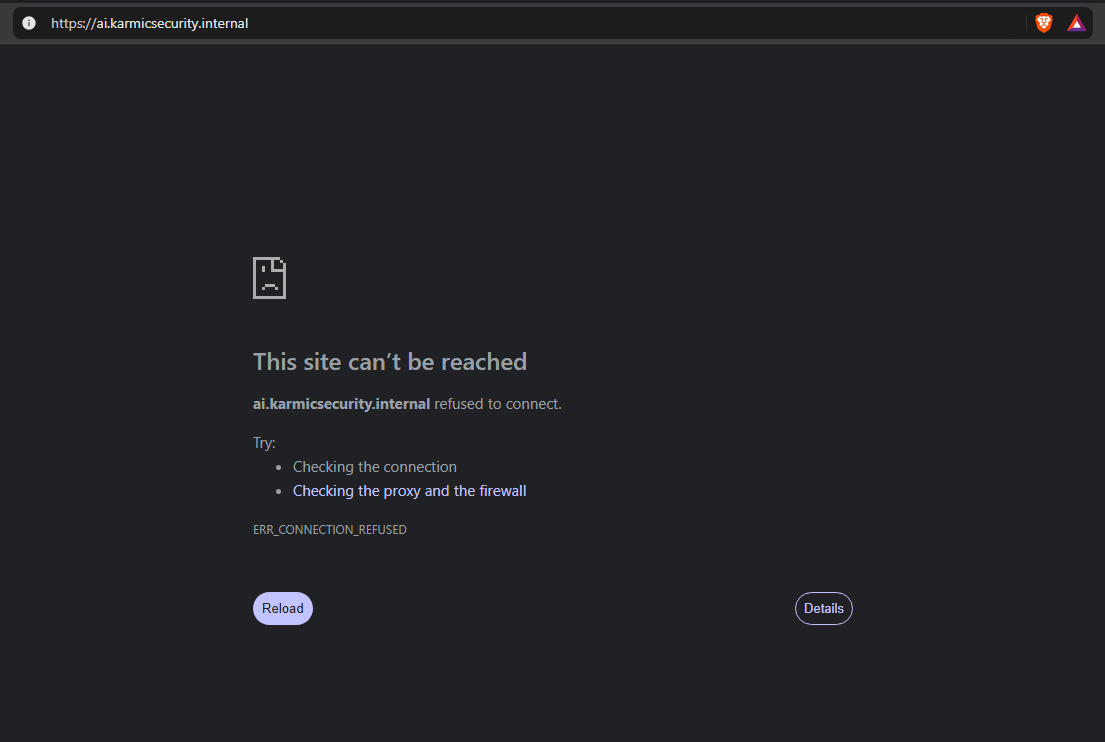 Welp, that’s disappointing. Hold on, quick live troubleshooting.
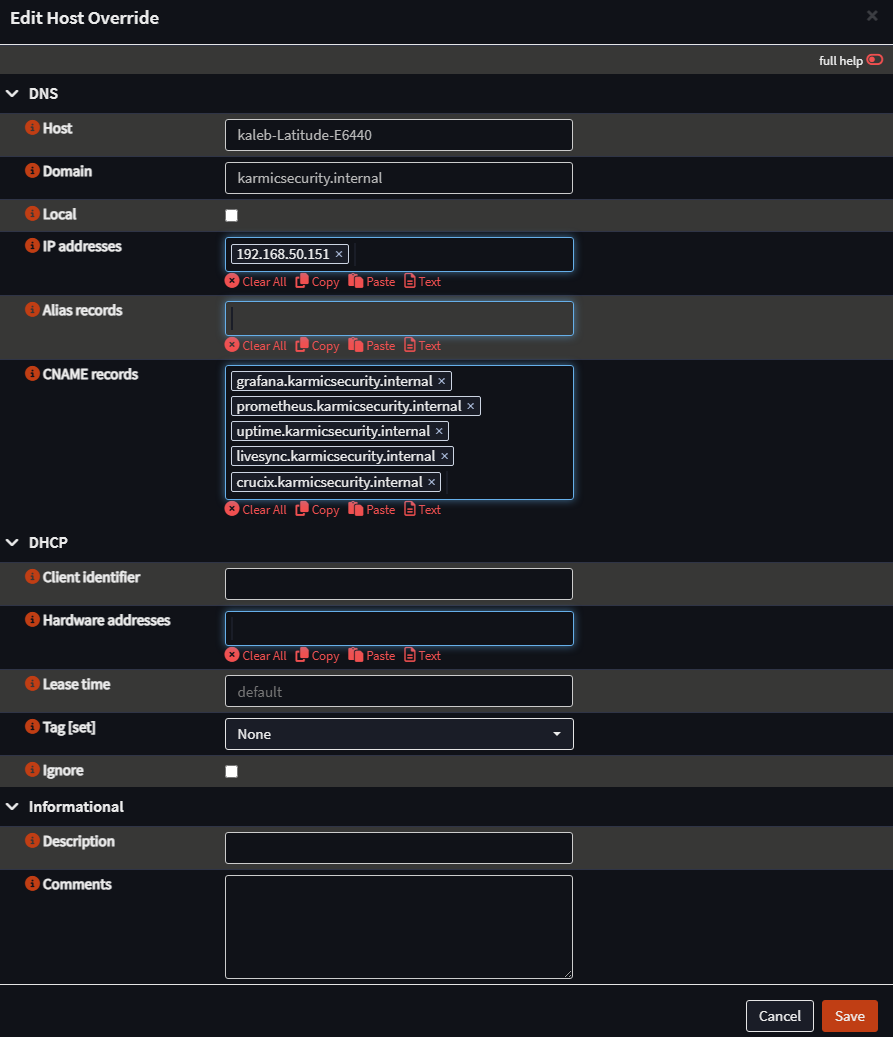 Pro tip, still under DNS Hosts, make sure to clear all your CNAME records. You can even see it in our
 nslookup’s I just did a second ago. Perhaps writing blog posts at 3am isn’t the best idea. Ah well, delete any CNAMEs you have for the services you want proxied and save and apply. Okay let’s try those lookups again.
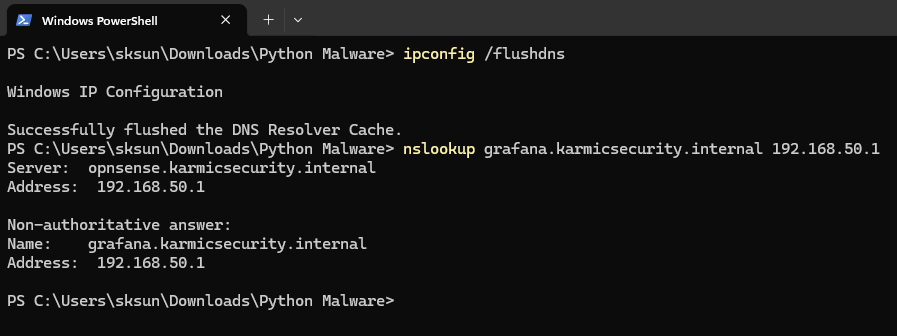 Okay better. Browser test?
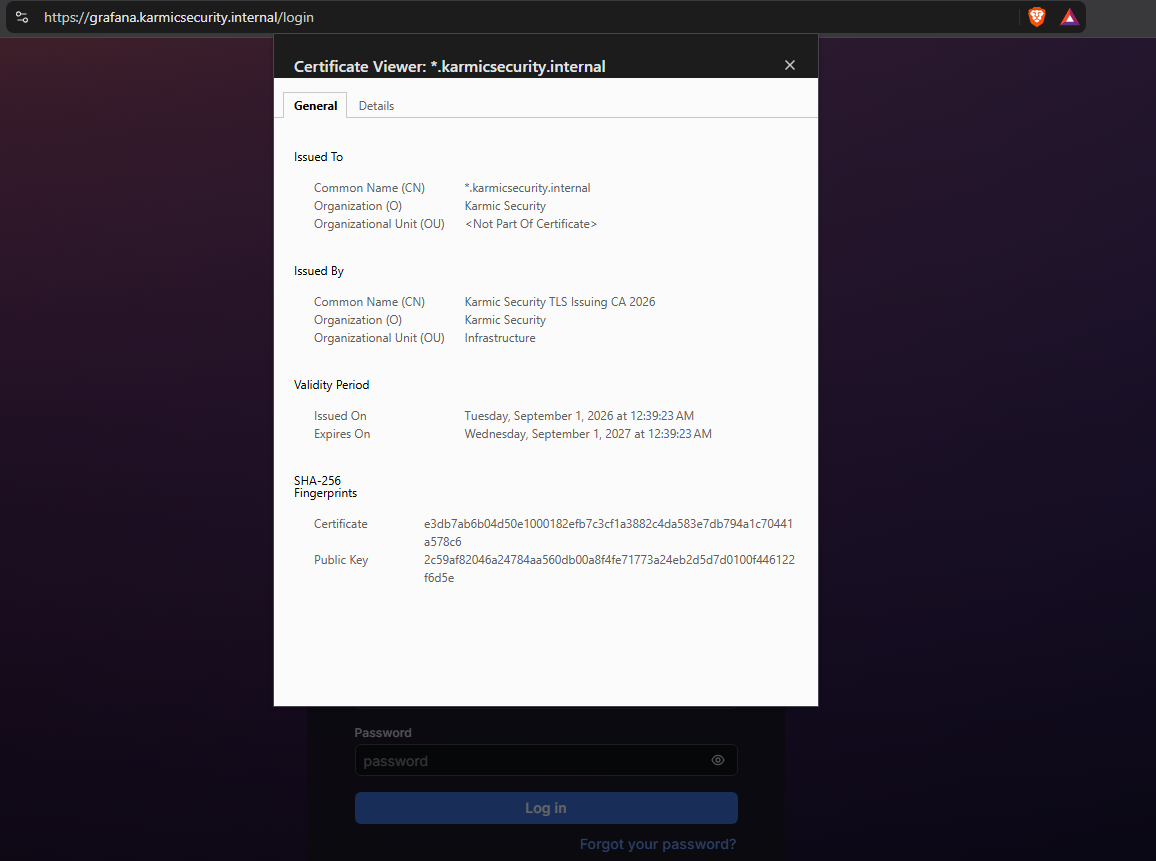
 Okay so that’s Caddy done.
Installing and Configuring WireGuard
Okay so under VPN -> WireGuard -> Instances is where we’re going to set this up, no need to install a plugin.
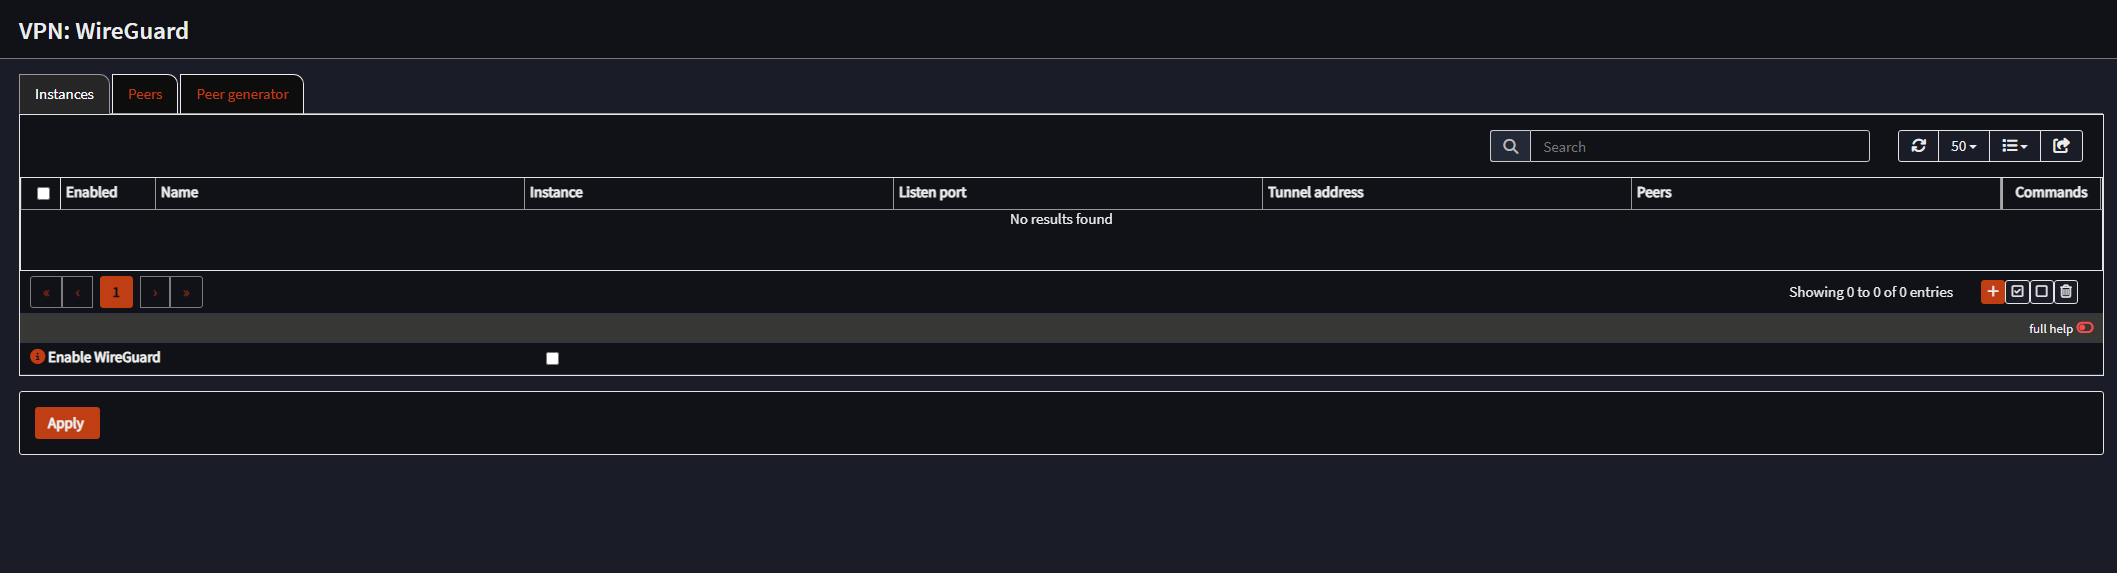 Shouldn’t be anything here yet. Alright let’s check the Enable WireGuard box and then click orange + to set up a new instance.
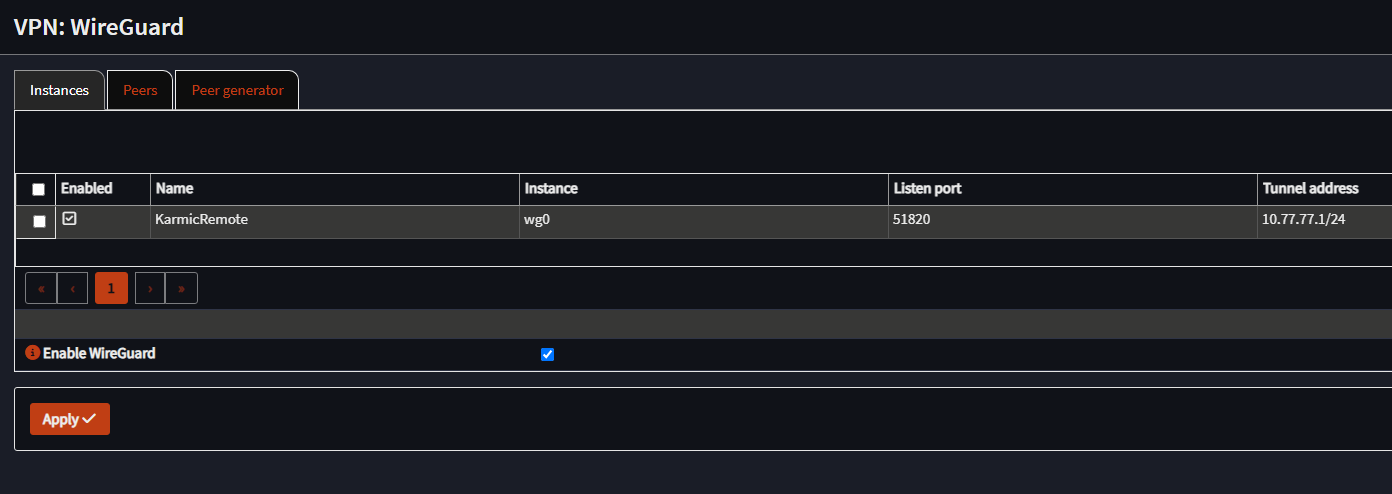 Okay awesome. Now we’re going to go to Interfaces -> Assignments.
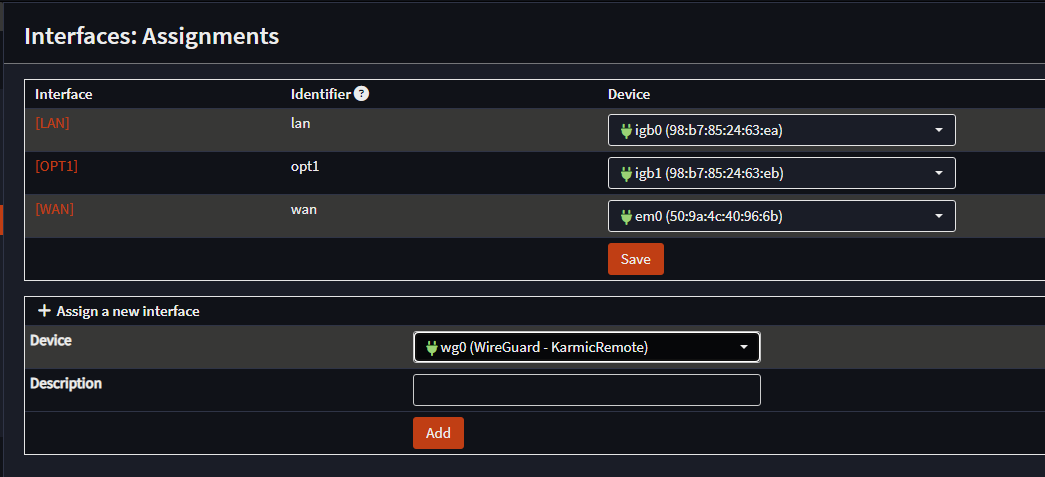 And we can see that OPNsense already wants to add our WireGuard interface (wg0). Go ahead and give it a description and click Add.
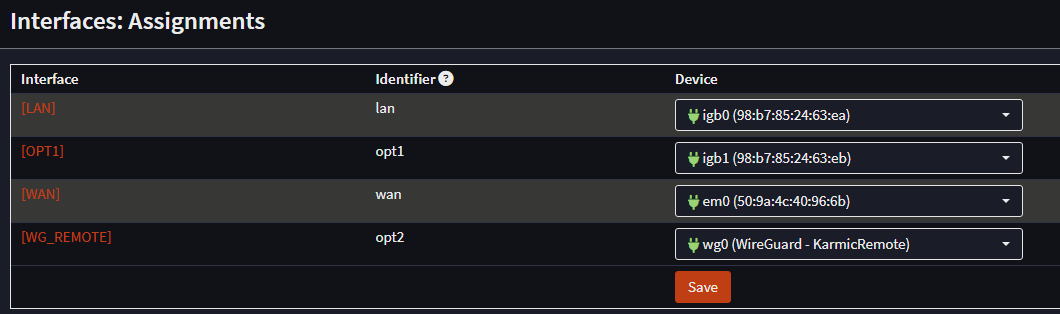 Cool. We’re now going to want to click on the interface to configure it, so I will click on WG_REMOTE.
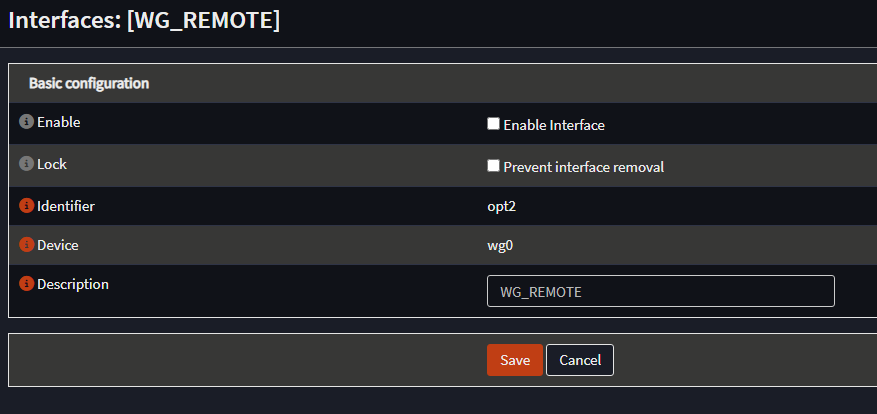 And then we configure with our desired settings.
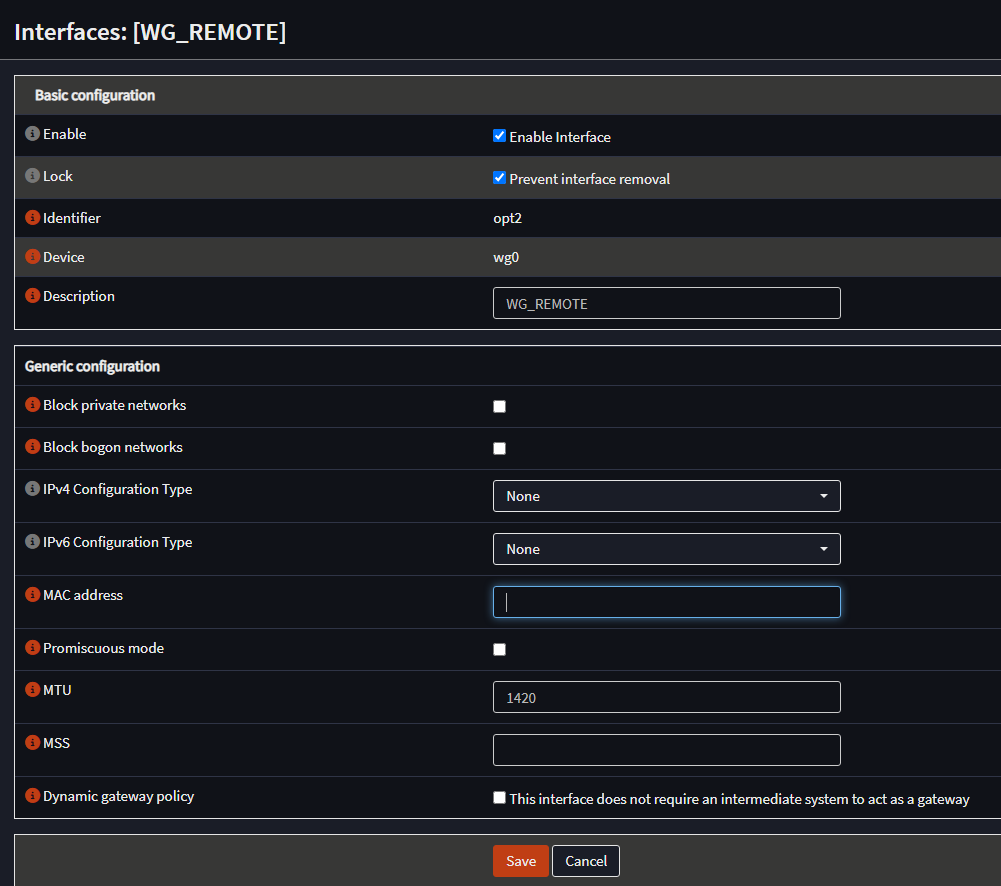 Should look something like this. I’m leaving the MTU at the WireGuard default of 1420 to account for tunnel overhead. VPNs by their nature add additional headers and whatnot to network packets, so whenever you’re configuring any VPN solution, you should keep that in mind. Click Save and then Apply when prompted. After that go back to Interfaces -> Overview to verify the interface is up and has the right info.
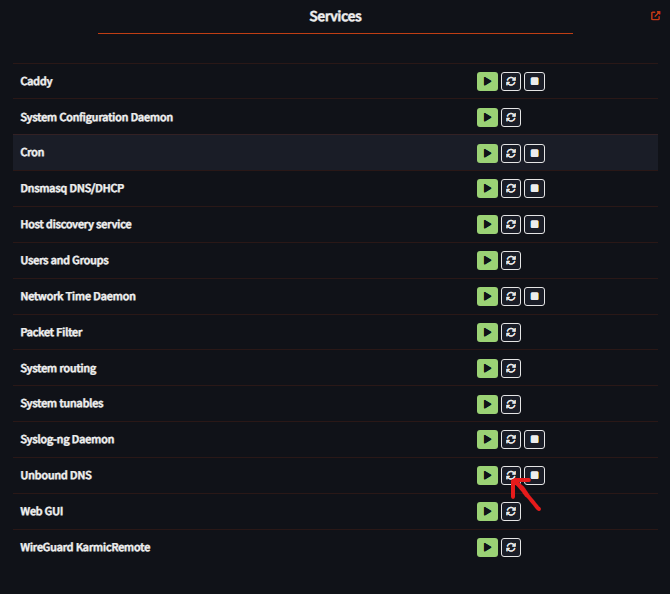
 Awesome. Now we’re actually going to back to our main dashboard to restart the Unbound DNS service so our new interface registers with it.
 Alright, time to configure the firewall to allow WireGuards traffic into our LAN. So under Firewall -> Rules -> WAN
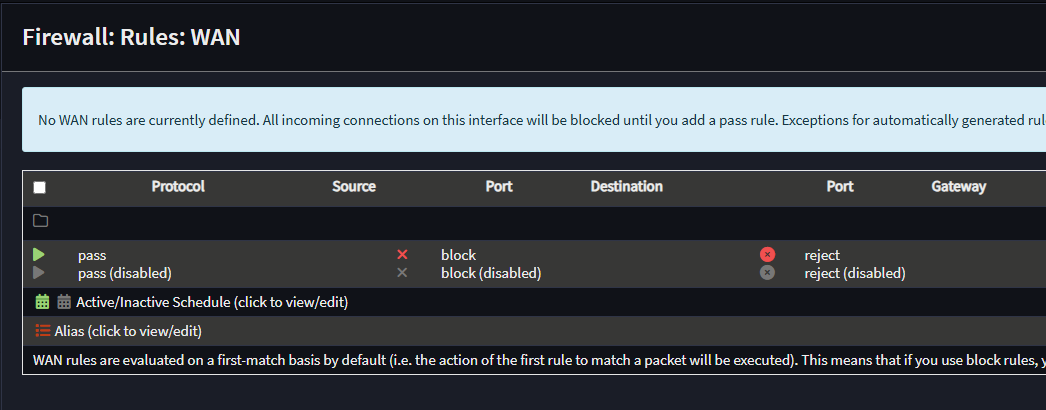 Right hand side orange +
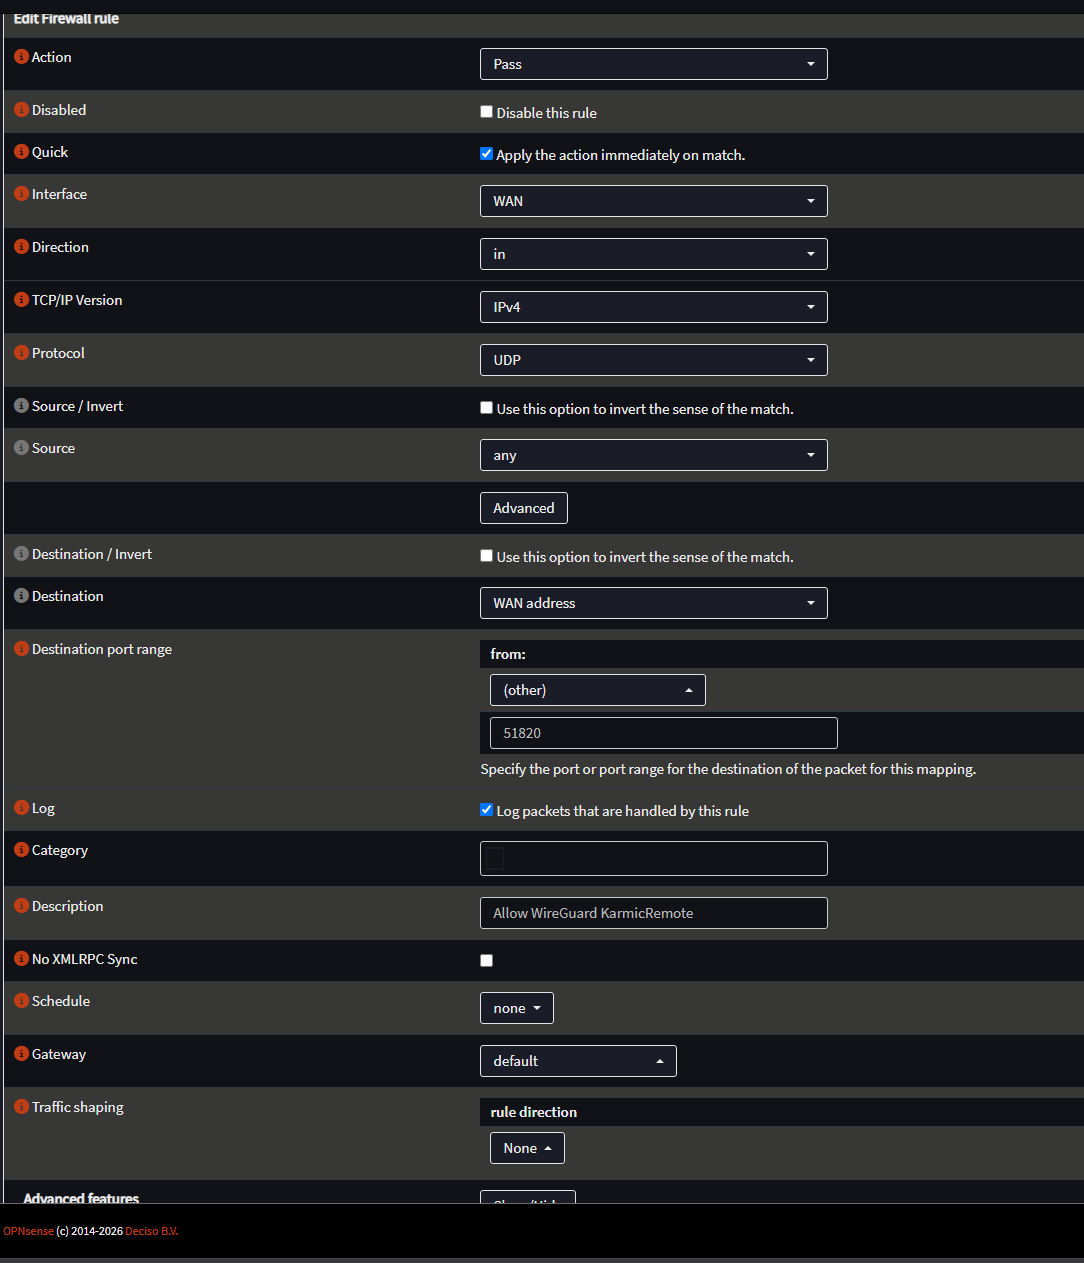 Firewall wall rule should something look like this. Save and Apply. Alright, now we need to make a couple rules for our WireGuard clients to access DNS via the tunnel interface and then access to the internal network.
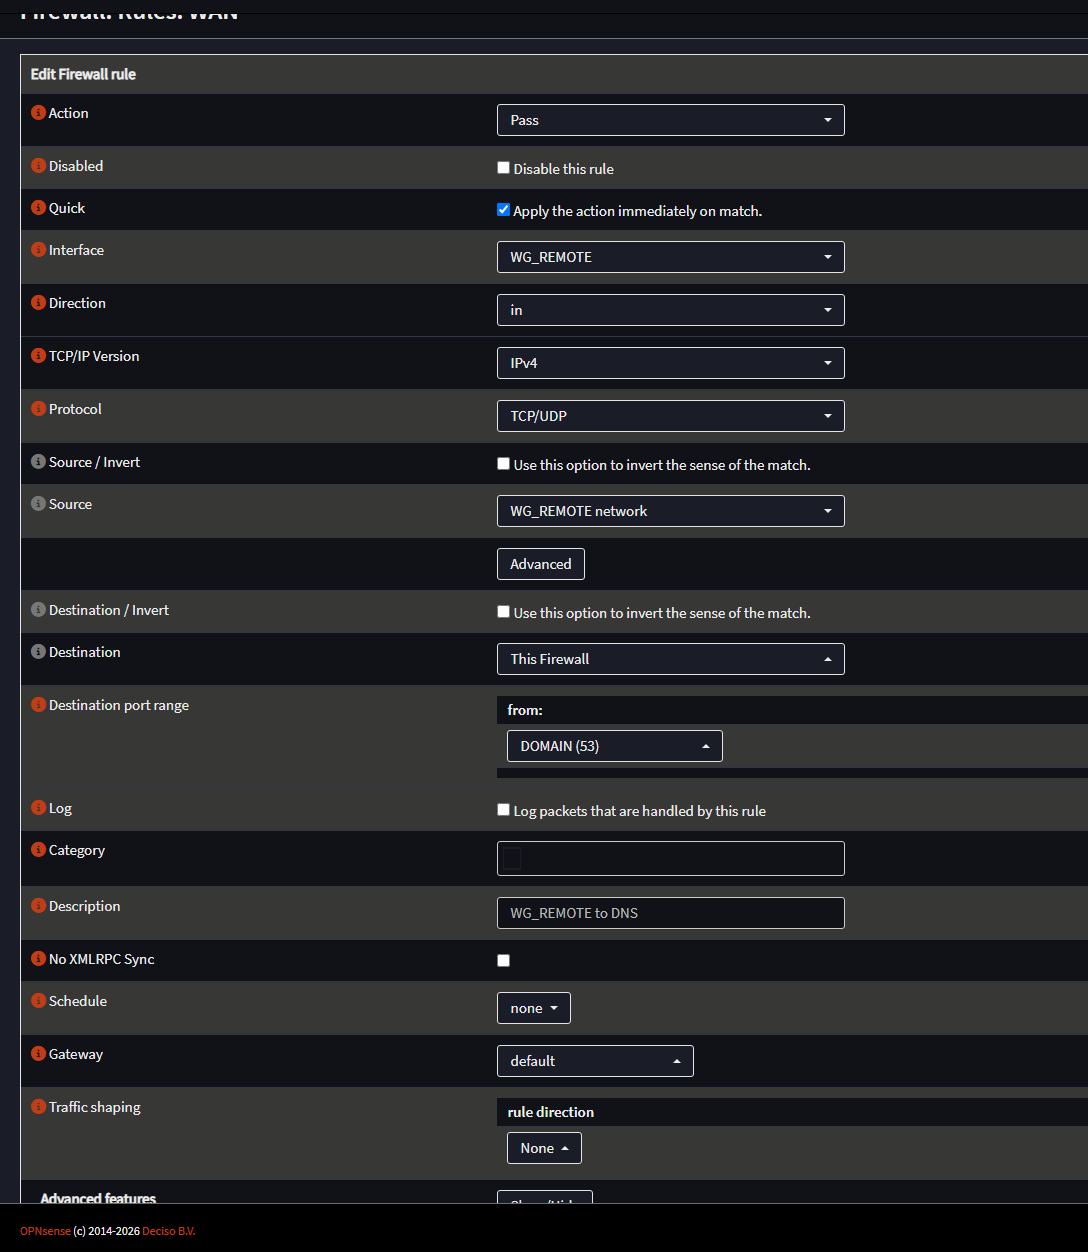
Here’s my config for allowing DNS traffic to the tunnel interface:
Firewall wall rule should something look like this. Save and Apply. Alright, now we need to make a couple rules for our WireGuard clients to access DNS via the tunnel interface and then access to the internal network.
Here’s my config for allowing DNS traffic to the tunnel interface:
 And now for LAN access:
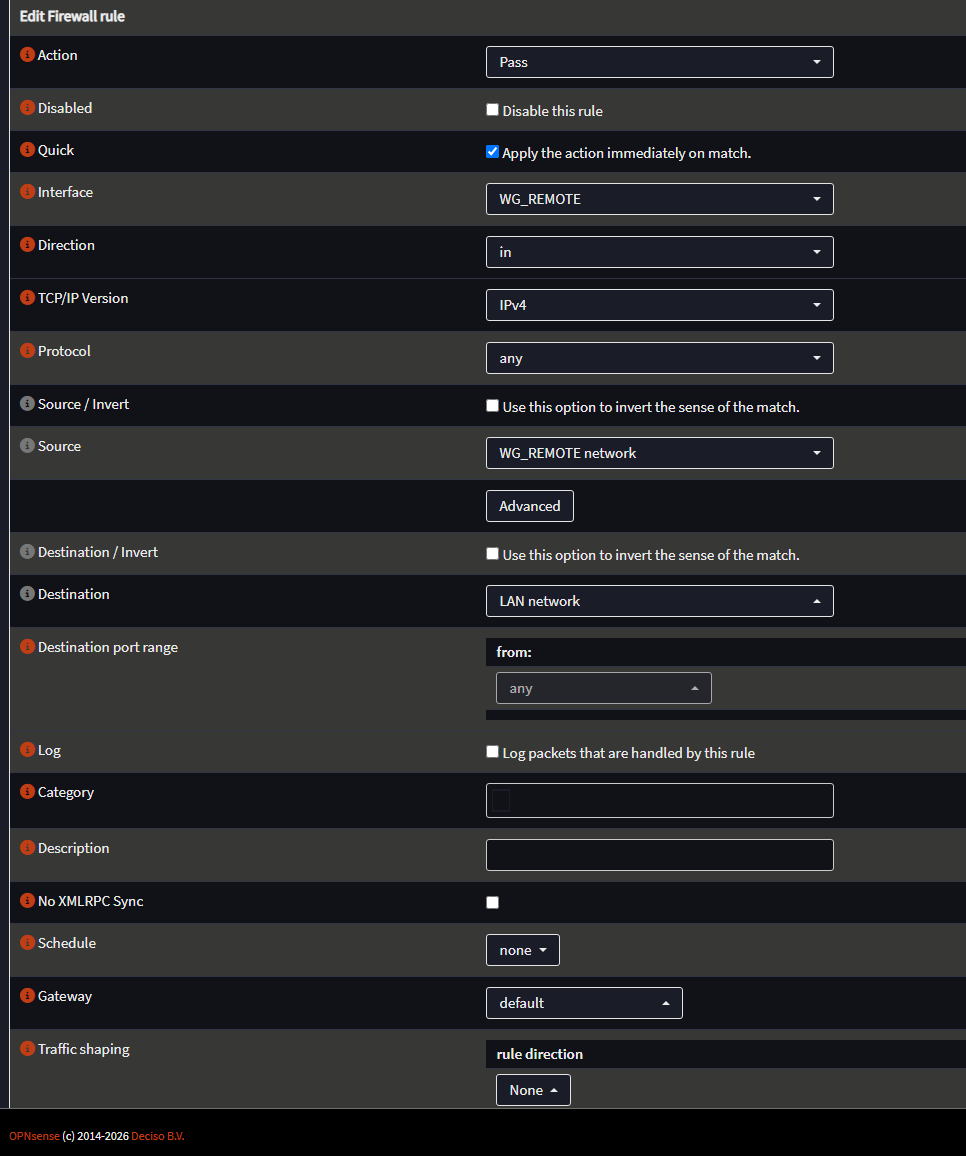 This one is pretty simple, just from WG_REMOTE to LAN network. Now this configuration is giving all of my VPN clients complete access to the LAN. If you want them to only have access to specific hosts, you’ll need to specify that. Alright let’s take a peak at our firewall rules thus far.
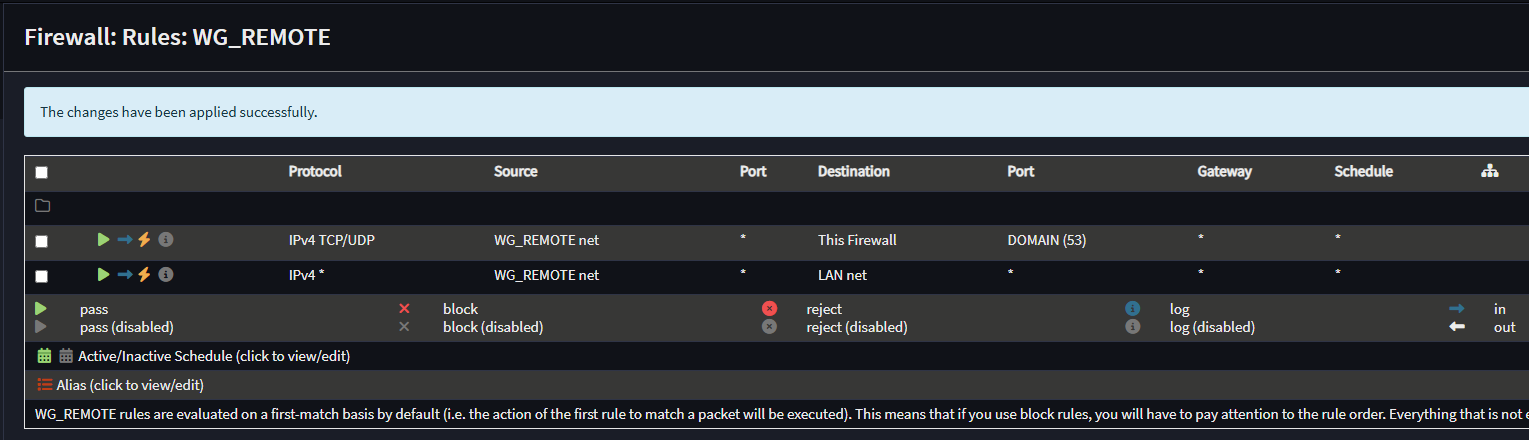 And a quick glance to make sure everything looks okay. Our firewall rules should be good now, let’s go to Caddy and add an access rule there.
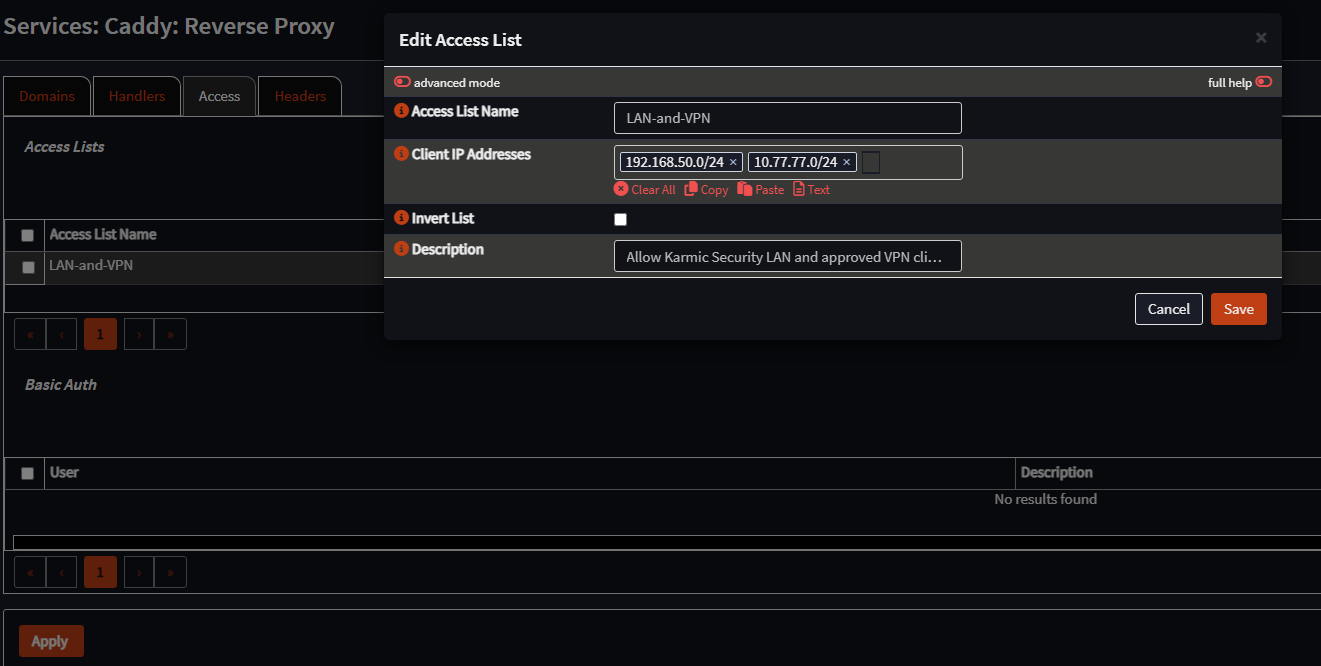 Back to Services -> Caddy -> Reverse Proxy under the Access tab, add our remote client network. Save and Apply.
Alright now we just need to go back to the main dashboard again and restart Unbound DNS yet again. Now, after we do that, we should be good to add our first VPN client.
If we go VPN -> WireGuard -> Peer generator. Now I am not showing my config for this, but I will break down what the fields should be.
Back to Services -> Caddy -> Reverse Proxy under the Access tab, add our remote client network. Save and Apply.
Alright now we just need to go back to the main dashboard again and restart Unbound DNS yet again. Now, after we do that, we should be good to add our first VPN client.
If we go VPN -> WireGuard -> Peer generator. Now I am not showing my config for this, but I will break down what the fields should be.
| Field | Value |
|---|---|
| Instance | RemoteClients or something |
| Name | Hostname of your client |
| Address | IP of client with a 32 bit mask |
| DNS Servers | Should be your tunnel interface IP |
| Endpoint | IP of your WAN interface:51820 |
| Allowed IPs | Remote client IP network and LAN network |
| Keepalive | 25 |
| Preshared key | Generate one, if offered |
| Store private key | Leave unchecked |
| After you configure all of that, make sure to Apply. Okay so after that, there’s that little QR code there. If you’re configuring WireGuard on your smartphone go ahead and download the mobile app now. When you do it’ll ask if you want to Add a tunnel. Yes we do, click that and it will prompt you for how you want to create the tunnel. In this case choose QR code. It’ll then ask you to name the tunnel. | |
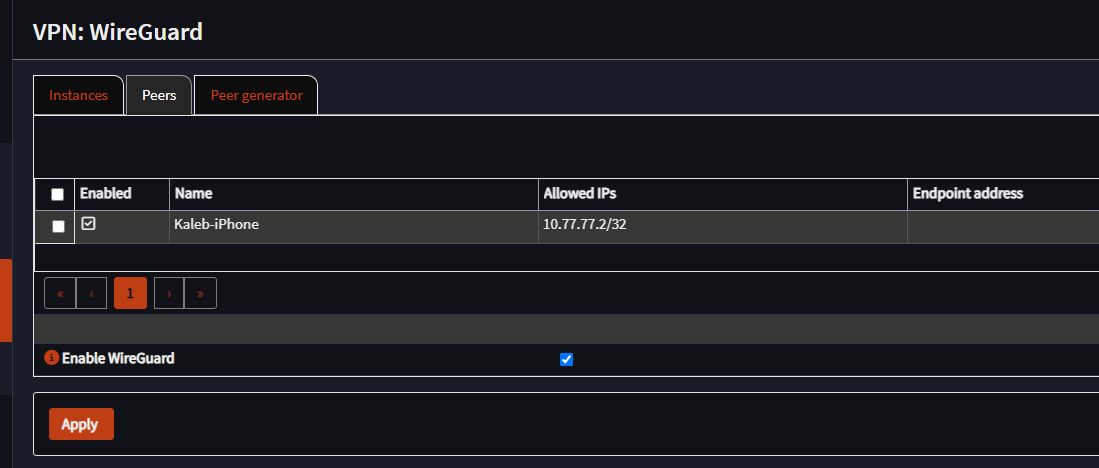
| Now back on OPNsense make sure to click the checkmark next to Store and generate next. You should now see our peer under the peers tab. | |
 |
|
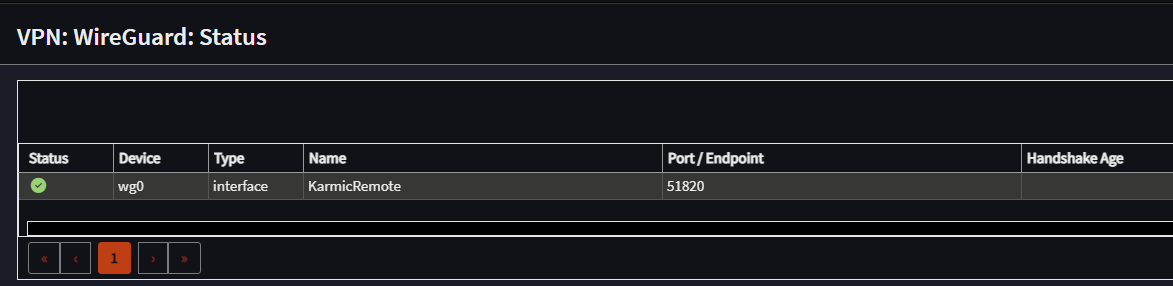
| Epic. Now on my mobile device, I am going to disable Wi-Fi and turn on the VPN client. After we turn on the tunnel, if we go to VPN -> WireGuard -> Status we should see our new peer! | |
 |
|
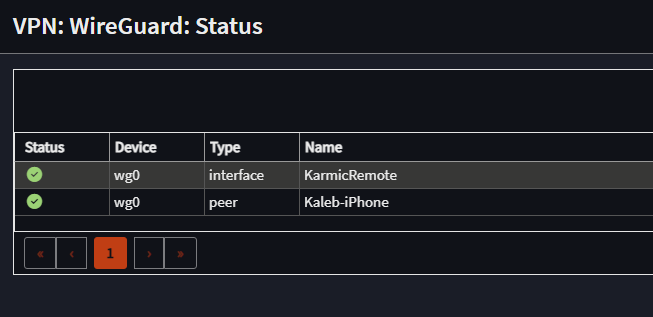
| Dammit. One second. Okay, for some reason, under my Peers tab, my Endpoint Address and Port settings got blown up, so double check that they are set. Now if we enable the tunnel… | |
 |
|
| You love to see it. And if I navigate to any of the subdomains we configured with Caddy earlier, I am able to access them from my cellular network. Let’s. Go. Now, granted I do need to import our internal Root CA onto my phone so I don’t get the associated errors when navigating to internal URLs. But hey, we set up internal DNS and PKI, an HTTP reverse proxy and then set up remote access. I think that’s all for tonight folks. |
Conclusion
Good lord that was a lot. I will say though we have a pretty sleek setup going on at this point. Now, the kicker is, there’s so much more you can do with OPNsense, but that’s all we’ll be doing for now. I have nothing clever to say after all that, k thx bye.